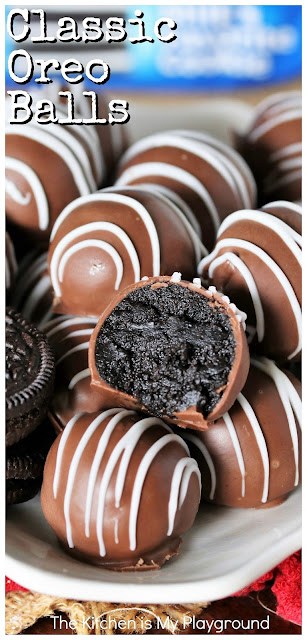
Chocolaty soft Oreo centers, dipped in chocolate, and beautifully decorated with white chocolate drizzle -- What's not to love about these classic little treats? And they're classic for a reason -- because they're just plain good. Follow these easy steps on How to Make Oreo Balls: Step-by-Step to whip up a tasty batch of your own. They're a perfect party nibble, Christmas gift from the kitchen, or tasty treat whenever that chocolate craving hits!
This Oreo Balls recipe is a classic that just about everybody has enjoyed at some point, whether you've made them yourself, had them gifted to you at Christmas time, or nibbled on their deliciousness as a tasty party sweet treat. Because these Oreo Balls are a classic that just seem to be loved by all.
With their wonderfully chocolaty soft Oreo centers dipped in chocolate coating, what's not to love?
As an added bonus to their fabulous flavor, Oreo Balls are pretty easy to make.
As an added bonus to their fabulous flavor, Oreo Balls are pretty easy to make. Yes, admittedly, these no-bake beauties may be a little bit time consuming to pull together. But none of the individual steps to make them are difficult.
The hardest part may just be not gobbling up all the tasty Oreo filling mixture with a spoon!
Follow these easy steps on How to Make Oreo Balls: Step-by-Step to whip up a tasty batch of your own. They're a perfect party nibble, Christmas gift from the kitchen, or tasty treat whenever that chocolate craving hits.
Step 1: Make Oreo Mixture
The mixture for the centers of these Oreo Balls really couldn't be much easier -- crush up a package of Oreos and mix it with a package of softened cream cheese. That's it. Really. Use a food processor for the Oreos, and you're done making the filling in about 2 minutes flat.
You do want to finely crush those Oreos -- a food processor works very well for this. This makes the filling nice and smooth and soft in the finished Oreo Balls.
Use a food processor for the Oreos, and you're done making the filling in about 2 minutes flat.
Once you combine the crushed Oreos and cream cheese together, stir the mixture until no streaks of cream cheese are visible and the mixture is very well combined.
Then place the mixture in the freezer for about 10 minutes to chill. This makes the filling easier to work with when forming it into balls.
Step 2: Form Into Balls & Chill
Use your hands to shape the Oreo mixture into approximately 1" balls, using 1 tablespoon mixture per ball. A small 1-tablespoon cookie scoop works very well for this and helps keep the Oreo balls all close to the same size.
Set the formed balls aside on a baking sheet lined with wax paper or parchment paper. Then cover the baking sheet with plastic wrap and refrigerate the balls for about 1 hour.
Or, for quicker chilling, place them in the freezer for about 15 minutes.
Step 3: Melt Chocolate for Coating
In a small deep bowl, melt some chocolate candy melts or almond bark coating together with a little shortening, per the package directions (typically in 30 second intervals in the microwave, stirring in between).
If you'd like, see my post How to Melt Chocolate: On the Stove & In the Microwave for helpful tips about melting chocolate.
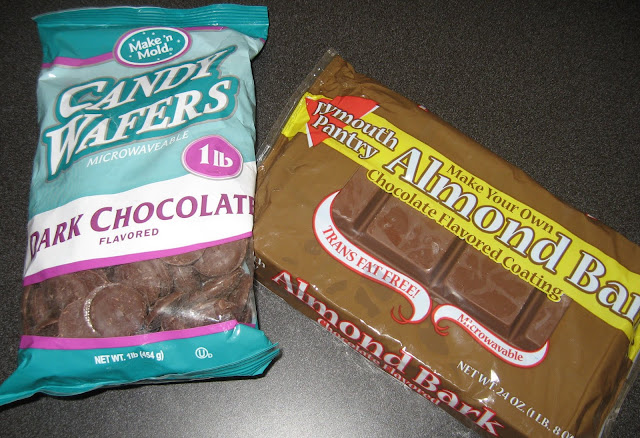
I usually use the candy melt type of chocolate coating (on the left in the photo above) you buy in craft stores when I make Oreo balls or other truffles. But Almond Bark chocolate coating (on the right in the photo above) from the regular grocery store works, as well.
As a side note, one day I wondered if the two work and taste equally as well? So, I decided to test Almond Bark Coating out in a head-to-head test with the candy melts.
I fully expected the candy melts to outperform. But I can truly say I found little difference between the two. Honestly, I was surprised at just how little difference there was.
Step 4: Dip in Chocolate
Once the chocolate is melted, remove the formed Oreo balls from the refrigerator.
Then use a fork to dip the Oreo balls in the melted chocolate coating, letting excess coating drip off back into the bowl.
Place the chocolate-coated balls on a baking sheet lined with wax paper or parchment paper.
If you have a lot of excess chocolate pooling around the bottom of a dipped ball, run a toothpick through the pooled chocolate close to the bottom of the Oreo ball before the chocolate is fully set. This "breaks off" that pooling, and allows it to easily and cleanly separate away from the Oreo ball once the chocolate is set.
Step 5: Let Chocolate Coating Set
Let the chocolate-coated balls stand to allow the coating to set. Or for quicker setting, chill the dipped Oreo balls for about 15 minutes until the chocolate is set.
Step 6: Melt White Chocolate for Drizzle
Once you've dunked all your Oreo balls and let the coating set, drizzle the tops randomly with another color of candy coating or chocolate to decorate them. As these are Oreo treats, I chose white as the decorative color since the cream inside an Oreo cookie is white.
You can use some white chocolate chips, white/vanilla candy melts, vanilla Almond Bark coating, or even a white chocolate bar to make the white chocolate decorative drizzle.
Whatever you choose, just make sure it's in small pieces before you try to melt it. So if you're using a white chocolate bar or vanilla Almond Bark coating, give it a rough chop with a sharp knife.
Keep them for yourself as a super tasty treat, give them as a wonderfully delicious gift from the kitchen, or serve them up as a sweet little party nibble.
Place the white chocolate and 1 teaspoon shortening in a zip-top sandwich bag on a microwave-safe dish. Then pop it in the microwave and heat it in 15 second intervals until melted, kneading the white chocolate after each heating.
Stop heating it as soon as you feel it's smooth. Don't overheat it, because white chocolate will scorch pretty easily.
Then using scissors, snip a very tiny hole in one corner of the sandwich bag. The smaller your cut, the thinner the streams of decorative drizzle.
Step 7: Drizzle to Decorate
Gently holding the bag of white chocolate, move your hand back and forth to drizzle the melted white chocolate over the chocolate-dipped Oreo balls. It should drizzle out of the bag readily, and you shouldn't even really have to squeeze the white chocolate at all.
Let stand until the drizzled coating is firm.
Then store the finished Oreo Balls in an airtight container in the refrigerator or freezer. As you place the Oreo Balls in their storage container, snap off any hanging/lingering stray drizzle stripes with your fingers.And then you're ready to enjoy Oreo Balls' chocolaty deliciousness!
Keep them for yourself as a super tasty treat, give them as a wonderfully delicious gift from the kitchen, or serve them up as a sweet little party nibble.
No matter how they're enjoyed, their chocolaty soft Oreo centers dipped in chocolate and beautifully decorated with white chocolate drizzle will be loved, for sure.
Check out these other super tasty chocolatey treats:
Thank you for stopping by The Kitchen is My Playground. We'd love to have you back soon!
Yield: about 40 Oreo balls

How to Make Oreo Balls
Chocolaty soft Oreo centers, dipped in chocolate, and beautifully decorated with white chocolate drizzle -- What's not to love about these classic little treats? And they're classic for a reason -- because they're just plain good. They're a perfect party nibble, Christmas gift from the kitchen, or tasty treat whenever that chocolate craving hits!
Prep time: 1 H & 30 MCook time: Total time: 1 H & 30 M
Ingredients:
Oreo Balls:
- 1 (14.3 oz.) package Oreo cookies (36 cookies)
- 1 (8 oz.) package cream cheese, softened
- 1 (12 oz. or 16 oz.) package chocolate candy melts or Almond Bark coating*
- 1 T. shortening
Decorative White Chocolate Drizzle:
- about 2 oz. white chocolate (white chocolate chips, chopped vanilla almond bark coating, or white candy melts)
- 1 tsp. shortening
Instructions:
For the Oreo Balls:
- Finely crush Oreos -- a food processor works very well for this. Add softened cream cheese to the Oreo crumbs. Stir until no streaks of cream cheese are visible and the mixture is very well combined. Place mixture in the freezer for about 10 minutes to chill.
- Shape Oreo mixture into approximately 1" balls, using 1 tablespoon mixture per ball (a 1-tablespoon cookie scoop works well for this). Set balls aside on a baking sheet lined with wax paper or parchment paper. Cover baking sheet with plastic wrap and refrigerate balls for about 1 hour (or place in freezer for about 15 minutes).
- In a small deep bowl, melt candy melts (or almond bark coating) and shortening together in the microwave per candy melt package directions (typically in 30 second intervals, stirring in between).
- Use a fork to dip each Oreo ball in the candy coating, letting excess coating drip off back into the bowl. Place on a baking sheet lined with wax paper or parchment paper.
- Let dipped balls stand to allow coating to set. Or for quicker setting, chill the dipped Oreo balls until the chocolate is set, about 15 minutes.
For the White Chocolate Decorative Drizzle:
- Place white chocolate (chopped into small pieces, if using a block) and 1 teaspoon shortening in a zip-top sandwich bag on a microwave safe dish. Heat in 15 second intervals in the microwave until melted, kneading after each heating.
- Using scissors, snip a very tiny hole in one corner of the bag. The smaller your cut, the thinner the drizzle.
- Drizzle the melted candy coating back and forth over the chocolate-dipped Oreo balls.
- Let stand until drizzled coating is firm.
- Store Oreo balls in the refrigerator.
TRACEY'S NOTES:
- *I usually use Make 'n Mold dark chocolate flavored candy wafers, available at most craft stores. Or, Plymouth Pantry brand chocolate flavored almond bark coating, available in the baking aisle of most grocery stores.
- I use a small 1-tablespoon cookie scoop to scoop out the Oreo mixture for each ball. This helps keep my Oreo balls all pretty close to the same size.
- See my post How to Melt Chocolate: On the Stove & In the Microwave for helpful tips on melting chocolate.
- If you have a lot of excess chocolate pooling around the bottom of a dipped ball, run a toothpick through the pooled chocolate close to the bottom of the Oreo ball before the chocolate is fully set. This "breaks off" that pooling, and allows it to easily and cleanly separate away from the Oreo ball once the chocolate is set.
You might also like these other tasty Oreo treats:
Affiliate links are included in this post. I receive a small amount of compensation for anything purchased from these links,at Amazon.com at no additional cost to you.


Love your little truffles.
ReplyDeleteWow, I normally would be totally intimidated to make truffles, but that really looks easy. You may have convinced me to try it!
ReplyDeleteYour truffles are so pretty. Love them! Thanks for joining the party and sharing your recipe on A Well-Seasoned Life's Sweet Indulgences Sunday.
ReplyDeletehttp://www.wellseasonedlife.com/2011/06/sweet-indulgences-sunday-9.html
Your truffles look perfect! It's good to know that you can use almond bark instead of the candy melts!
ReplyDeleteThese look wonderful! I'd love for you to link up to my Sweet Treats Party this weekend! It ends @ midnight. Hope to see you there :)
ReplyDeleteAshton
www.somethingswanky.com
Ohhh these sound so good!!
ReplyDeleteI think that I would like to make these for my wedding, they are so good!
ReplyDeleteI like to bake cookies after my working day. Cause I spend my day writing argumentative essays using https://essayclick.net/blog/argumentative-essay-topics so I am a little bit tired sometimes.
ReplyDeleteTruffles are sweet and gorgeus chocolate. I will make it for my lover this Xmas. Thanks for nice recipe.
ReplyDeleteNice! Thanks for sharing on Fiesta Friday this week!
ReplyDeleteThey look so good and so yummy!
ReplyDeleteCONGRATULATIONS: Our Adrienne has chosen this delicious tempting recipe to be featured in the next Blogger's Pit Stop.
ReplyDeleteKathleen