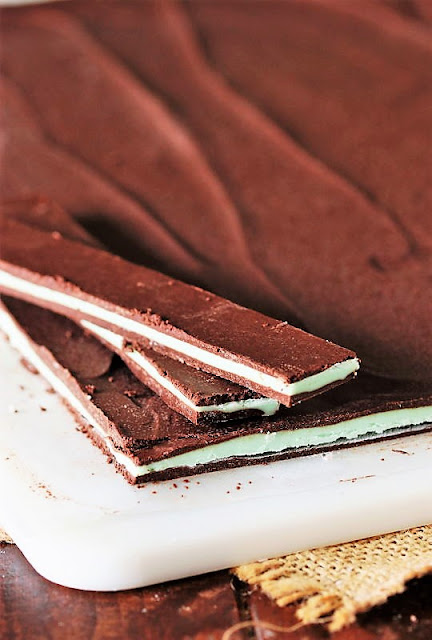
Skip the bright green box and make your own Homemade Andes Mints! These tasty copycats are great for enjoying yourself at Christmas, packaging up for little gifts, or for nibbling on all year round.
CLICK HERE TO PIN FOR LATER
CLICK HERE TO PIN FOR LATER
One of my Mom's favorite candies is Andes Mints. Though as much as she loves them, she doesn't indulge in them often -- generally reserving them as a treat for Christmastime.
Almost every year at Christmas growing up I would get her a box, wrapping it up to put under the tree or slipping them into her stocking. And then I would snitch as many of them as I could once she opened up that bright green box of deliciousness.
I truly don't know who loves Andes Mints more -- Mom, or me. It may just be a tie.
These tasty copycats are great for enjoying yourself at Christmas, packaging up for little gifts, or for nibbling on all year round.
With this Homemade Andes Mints recipe though, I don't need to snitch Mom's Christmas mints. Instead, I can make my own right at home! Now, of course I could easily just go to the store and buy a box -- but it's totally more fun to make this copycat version at home.
These tasty copycats are great for enjoying yourself at Christmas, packaging up for little gifts, or for nibbling on all year round.
And they're not hard to make -- All it takes is a little chocolate melting, a little a stirring, and a little patience in spreading to create the layers.
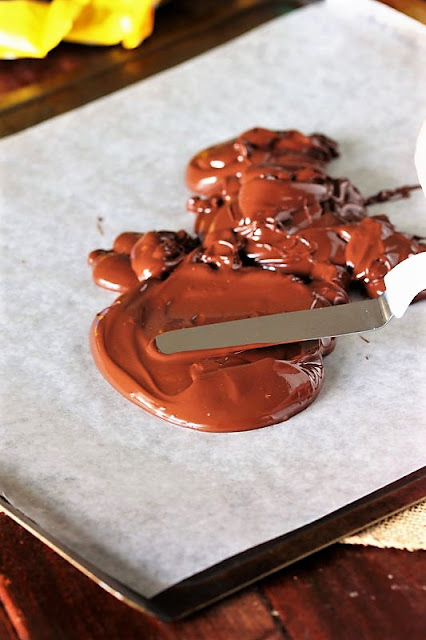
Then pour the melted chocolate onto a parchment-lined baking sheet and use an offset spatula to spread it into a very thin layer.
You want to spread the chocolate out to create somewhere around a 12" by 12" rectangle.
Pop the first layer of chocolate in the refrigerator to set and harden. While it sets, prepare the middle mint layer.
Melt together a package of white chocolate chips with about 2 tablespoons of shortening. The shortening thins out the white chocolate a bit and helps it melt more smoothly. It also makes it easier to spread.
Once the white chocolate is melted, remove it from the heat and stir in 1 tablespoon of peppermint extract and a few drops of green food coloring.
A full tablespoon of peppermint extract may sound like a lot, but it's truly the amount needed to bring bold peppermint flavor to the mints.
A full tablespoon of peppermint extract may sound like a lot, but it's truly the amount needed to bring bold peppermint flavor to the mints. If you'd like the mints more or less peppermint-y however, adjust the amount of extract to suit your personal taste. Taste a little bit of the warm white chocolate mixture to see how the flavor is to you.
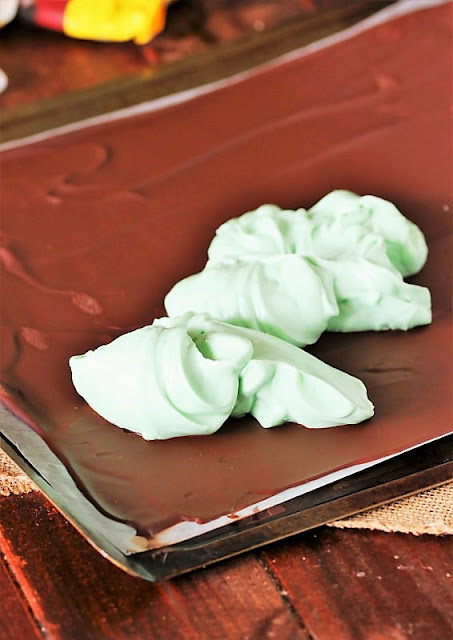
Spread the minty white chocolate mixture on top of the first hardened dark chocolate layer.
When spreading, be careful not create a swirled or marbled effect. Some of the top of the dark chocolate layer will melt just a bit from the heat of the mint layer -- be mindful not to swirl the melted dark chocolate into the minty layer too much.
To make the final layer, melt more dark chocolate chips and pour it on top of the minty layer.
Then spread out the melted chocolate, completely covering the green minty middle layer.
Once fully set, cut the slab into strips about 3/4"-wide. Then cut each strip crosswise into individual mints.

It can be a little tricky to cut the layered slab into nice individual mints.
Sometimes the mints break up or crack. And sometimes the layers separate from each other. I do have a few tips to help get the best cuts. However even if the mints come out in funky shapes or with cracks, they'll still taste great!
Sometimes the mints break up or crack. And sometimes the layers separate from each other. I do have a few tips to help get the best cuts. However even if the mints come out in funky shapes or with cracks, they'll still taste great!
Cuttings tips:
- It's ESSENTIAL to loosen the slab of mints from the parchment or wax paper. If it's not loosened, the mints' layers will absolutely separate from each other when being cut into pieces. Loosen the slab from the parchment paper by carefully and gently peeling it away from the chocolate.
It's essential to loosen the slab of mints from the parchment. If it's not loosened, the mints' layers will absolutely separate from each other when being cut into pieces.
- Use a long, sharp knife. And then try to work in sections not longer than the knife if you can. The layered slab tends to crack up toward at the end of the knife. (As a side note, I tried a pizza cutter -- it doesn't work. It just crushes the mints.)
- Place the knife on the slab where you want to cut, and push the knife straight down with even pressure to get the best cuts.
Then once cut, enjoy the dark chocolate minty deliciousness! They'll taste just like the Andes Mints they're modeled after.
So if you're an Andes Mints lover like me and my Mom, skip the bright green box and give making your own Homemade Andes Mints a try. These tasty copycats are great for enjoying yourself at Christmas, packaging up for little gifts, or for nibbling on all year round.
Thank you for stopping by The Kitchen is My Playground. We'd love to have you back soon!
Yield: Varies based on size of pieces

Homemade Andes Mints
Skip the bright green box and make your own Homemade Andes Mints! These tasty copycats are great for enjoying yourself at Christmas, packaging up for little gifts, or for nibbling on all year round.
prep time: 45 Mcook time: 10 Mtotal time: 55 M
ingredients:
- 2 (10 oz.) packages dark chocolate chips
- 1 (12 oz.) package white chocolate chips
- 1 T. peppermint extract
- 2 T. shortening
- 3 drops green food coloring
instructions:
How to make Homemade Andes Mints
Make First Layer:
- Cover a baking sheet with parchment paper or wax paper. Set aside.
- In the top of a double boiler over gently simmering water, melt one package of dark chocolate chips.
- Pour melted dark chocolate onto prepared parchment-lined baking sheet. Use an offset spatula to spread the chocolate into a thin layer, making approximately a 12"x12" rectangle.
- Place in the refrigerator to harden, about 8-10 minutes.
Make Second Layer:
- In the top of a double boiler over gently simmering water, melt together white chocolate chips and shortening.
- Remove from heat and stir in peppermint extract and green food coloring. Let stand in pan for 2 minutes to cool slightly.
- Pour over the first layer of dark chocolate. Use an offset spatula to spread into a thin layer, completing covering the dark chocolate layer. Be careful when spreading to not create a marbling or swirling effect (as some of the top of the dark chocolate layer will melt a bit).
- Place in the refrigerator to harden, about 8-10 minutes.
Make Third Layer:
- In the top of a double boiler over gently simmering water, melt remaining package of dark chocolate chips.
- Remove from heat and let stand in pan for 2 minutes to cool slightly.
- Pour over the mint layer. Use an offset spatula to spread into a thin layer, completing covering the mint layer. Again, be careful when spreading to not create a marbling or swirling effect (as some of the top of the mint layer will melt a bit).
- Refrigerate until completely set and hardened.
Cut in Pieces:
- Remove pan from refrigerator and allow to stand at room temperature for 5 minutes.
- Loosen the slab of mints from the parchment paper by carefully and gently peeling it from the chocolate.*
- Using a long sharp knife, cut the slab of mints into strips about 3/4"-wide -- Place the knife on the slab where you want to cut, and push the knife straight down with even pressure to get the best cuts. Then cut the strips into individual mints.
- Store in an airtight container. Can be frozen.
TRACEY'S NOTES:
- 1 tablespoon of peppermint extract sounds like a lot, but it's truly the amount needed to bring bold peppermint taste to the mints. With that being said, use more or less to adjust to your personal taste if you'd like.
- Leave out the green food coloring or increase it for bolder green color in the middle layer, if you'd like.
- * It's ESSENTIAL to loosen the slab of mints from the parchment or wax paper. If it's not loosened, the layers WILL absolutely separate from each other when being cut into pieces.
You might also like these other sweet treats:
How to Make Homemade Thin Mints
Martha Washington Candy (2 Ways)
Kentucky Bourbon Balls
Homemade Marshmallows
How to Make Chocolate Truffles
How to Make Homemade Thin Mints
Martha Washington Candy (2 Ways)
Kentucky Bourbon Balls
Homemade Marshmallows
How to Make Chocolate Truffles
Affiliate
links are included in this post. As an Amazon.com associate, we earn from qualifying purchases.


That sounds rather easy to make and who doesn't love an Andes mint? Yum. Pinned.
ReplyDeleteThese sound delicious Tracey. Thank you for sharing the recipe this week at Create, Bake, Grow & Gather. I'm delighted to be featuring your homemade Andes Mints recipe at tonight's party and pinning too.
ReplyDeleteHappy New Year!!
Kerryanne
This comment has been removed by a blog administrator.
ReplyDeleteThis comment has been removed by a blog administrator.
ReplyDelete