


Our very favorite Yum Yum dessert gets all decked out in beautiful red white & blue to create this festive Red White & Blue Mixed Berry Yum Yum. It's a perfect no-bake dessert for 4th of July, Memorial Day, or anytime you want to enjoy the tasty combination of strawberry and blueberry together.
CLICK HERE TO PIN THIS FOR LATER
CLICK HERE TO PIN THIS FOR LATER

We love Yum Yum dessert here at The Kitchen is My Playground -- sharing recipes ranging from the classics like Cherry Yum Yum, Blueberry Yum Yum, and Strawberry Yum Yum made with fresh strawberries, to non-traditional ones like Banana Pudding Yum Yum and Pumpkin Yum Yum that's just perfect for fall.
So naturally as 4th of July approaches, it made perfect sense to create and share a red white and blue version of classic Yum Yum dessert, too.
Not only is Red White & Blue Mixed Berry Yum Yum fun, beautifully decked out in festive colors, and delicious, it's no-bake and pretty easy to make, too.
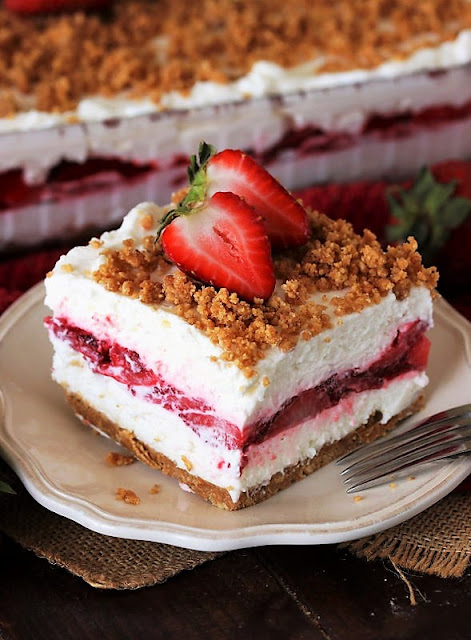
This Mixed Berry Yum Yum includes both strawberry and blueberry pie filling, and stacks up three layers of its characteristic fluffy cream cheese mixture instead of the traditional two, to create its festive red white and blue color scheme.
Those beautiful red white and blue stripes make it a perfect dessert to enjoy with 4th of July or Memorial Day festivities. Or hey, just enjoy it anytime that craving hits for the tasty combination of strawberry and blueberry together.
Not only is Red White & Blue Mixed Berry Yum Yum fun, beautifully decked out in festive colors, and delicious, it's no-bake and pretty easy to make, too.

I always use the "premium" fillings so there are more berries in the fruit filling layers, but either premium or regular will work.

Make a simple no-bake graham cracker crust pressed into a 9x13-inch baking dish.
Then mix up a big bowl of Yum Yum's classic sweetened cream cheese and whipped cream mixture. This is what's used to create its fluffy, creamy white layers that sandwich the strawberry and blueberry filling.

In total, there will be about 9 to 10 cups of cream cheese mixture. So 1/3 will be roughly about 3 cups. I do encourage measuring out the amount for each cream cheese mixture layer so you don't get to the top layer and not have enough mixture to cover the top of the dessert.
Then drop dollops of the strawberry pie filling all over the top of the cream cheese layer.

Gently spread the strawberry pie filling evenly over the cream cheese layer, connecting the dollops.
Using the "dollop method" and then connecting the dollops when spreading makes spreading the pie filling easier. -- You don't have as far to spread the filling as you would if you dumped all the pie filling on, say, just one end of the pan.
The "dollop method" also creates nice distinct layers, helping prevent a more swirled-together result.

Top the strawberry layer with another layer of fluffy cream cheese mixture, using the "dollop method" and gentle spreading.
Then repeat the process with the blueberry pie filling.

Top the blueberry layer with a last layer of the remaining fluffy cream cheese mixture.

Cover the Yum Yum and refrigerate it overnight before serving.
Usually with our other Yum Yum flavors, I say to refrigerate the dessert for several hours OR overnight before serving. With this red white & blue mixed berry version, I definitely recommend overnight chilling.
Overnight chilling helps the layers set and meld together - I don't recommend short-cutting this step.
Overnight chilling helps the layers set and meld together -- I don't recommend short-cutting this step. Since there's more, thinner layers than in the usual Yum Yum, we've found the layers are more prone to sliding apart when served if chilled for only a few hours.
The longer chilling time seems to help the layers better join together, and then stay intact when cut.

At serving time, cut into the Yum Yum to reveal it's beautiful red, white, and blue layers and to enjoy the mixed berry deliciousness!
With its fun festive colors, fabulous flavor, and easy no-bake prep, Red White & Blue Mixed Berry Yum Yum is a perfect dessert to enjoy for 4th of July or Memorial Day.
Or, whip up a pan anytime you want to enjoy the tasty combination of strawberry and blueberry together.
Check out these other tasty red white & blue treats:
- Red White & Blue Strawberry Cheesecake Bites
- Red White & Blue Mini Cheesecakes
- Red White & Blue Fluff Salad
- Red White & Blue Virgin White Sangria
- Red White & Blue Chocolate-Dipped Sugar Wafers
- Red White & Blue Cherry Almond Cookies
- Red White & Blue Sprinkle Sugar Cookies
- Triple Berry Fruit Salad with Vanilla Simple Syrup
- Triple Berry Punch Bowl Cake
- Red White & Blue Italian Ice Floats
- More dessert recipes

Thank you for stopping by The Kitchen is My Playground. We'd love to have you back soon!
Yield: about 12-14 servings

Red White & Blue Mixed Berry Yum Yum
Our very favorite Yum Yum dessert gets all decked out in beautiful red white & blue to create this festive Red White & Blue Mixed Berry Yum Yum. It's a perfect no-bake dessert for 4th of July, Memorial Day, or anytime you want to enjoy the tasty combination of strawberry and blueberry together.
Prep time: 30 MCook time: Total time: 30 M
Ingredients:
Crust:
- 2 1/2 c. graham cracker crumbs
- 12 T. unsalted butter, melted
Cream Cheese Mixture:
- 2 (8 oz.) packages cream cheese, softened
- 1 c. confectioners' sugar
- 4 c. whipping cream
- 2 tsp. vanilla extract, divided
- 6 T. granulated sugar
Mixed Fruit Filling:
- 1 (21 oz.) can strawberry pie filling
- 1 (21 oz.) can blueberry pie filling
Instructions:
Prepare the Crust:
- In a bowl, combine graham cracker crumbs and melted butter. Blend with a fork until crumbs are moistened.
- Set aside 3 tablespoons of crumbs to sprinkle on the top.
- Press crumb mixture into the bottom of a 9x13-inch pan that's been sprayed with non-stick cooking spray.
Prepare the Cream Cheese Mixture:
- With an electric mixer, cream together softened cream cheese, confectioners' sugar, and 1 teaspoon vanilla extract until smooth.
- In a separate bowl, whip the whipping cream, granulated sugar, and remaining 1 teaspoon vanilla extract until stiff peaks form.
- By hand, mix together whipped cream and cream cheese mixture until well combined.
Assemble the Yum Yum Layers:
- Spread 1/3 of the cream cheese/whipped cream mixture (roughly about 3 cups) evenly over the crust.
- Drop strawberry pie filling by large spoonful dollops on top of the cream cheese layer. Gently spread strawberry pie filling evenly over the cream cheese layer, connecting the dollops.
- Top strawberry layer with another 1/3 cream cheese/whipped cream mixture. Gently spread it evenly over the strawberry layer, covering it completely.
- Drop blueberry pie filling by large spoonful dollops on top of the second cream cheese layer. Gently spread blueberry pie filling evenly over the cream cheese layer, connecting the dollops.
- Top blueberry layer with remaining 1/3 cream cheese/whipped cream mixture. Gently spread it evenly over the blueberry layer, covering it completely.
- Sprinkle the top with the 3 tablespoons reserved graham cracker crumbs.
- Cover and refrigerate overnight before serving.
TRACEY'S NOTES:
- I use the "premium" strawberry and blueberry pie fillings so there are more berries in the fruit filling layers.
- You can substitute 2 (8 ounce each) containers of Cool Whip non-dairy whipped topping for the homemade whipped cream in the cream cheese mixture if you'd like. We do, however, prefer this dessert made with homemade whipped cream.
- Overnight chilling helps the layers set and meld together -- I do not recommend short-cutting this step. We've found the layers are prone to sliding apart when served if chilled for only a few hours. Longer chilling time seems to help the layers better join together, and then stay intact when cut.
You might also like these other tasty no-bake Yum Yum desserts:


Another scrumptious looking dessert to add to my list to make ~ pinned.
ReplyDeleteThis is one of the best 4th of July desserts I've seen. Beautiful! Pinned - Thanks for sharing at the What's for Dinner party. Have a fabulous week!
ReplyDeleteThank you so much! I'm with you ... I just love the colorful layers. And thank you, too, for the Pin!
DeleteGorgous!! Thanks for sharing at Fiesta Friday this week.
ReplyDeleteMollie
Can this be prepared with fresh strawberries and blueberries?
ReplyDeleteYes, this Mixed Berry Yum Yum can be prepared with fresh berries. See our Fresh Strawberry Yum Yum recipe (https://www.thekitchenismyplayground.com/2020/05/fresh-strawberry-yum-yum.html) for one method of making the strawberry layer with Jell-o as a thickener. For the blueberry layer, you could do the same thing with Berry Blue or Grape Jell-o as the thickener, or make a homemade fresh blueberry pie filling. Enjoy!
DeleteDelicious. Thanks For the Sharing. i will try to make it on this weekend. have a nice day!
ReplyDeleteIt Looks so Yummy. Thanks for Sharing.
ReplyDeleteI pinned this recipe and printed it out. I will have two ministry students staying with us this summer for a few weeks and this would be perfect to add to my menu. So yummy looking and pretty looking. Thanks so much for sharing it. #HomeMattersParty
ReplyDeleteLooks delicious. Thank you for sharing.
ReplyDeleteWhat yummy looking summer desserts!
ReplyDeleteLooks fabulous! I made DH a cherry delight (same thing as yum-yum) for Father's Day. It's one of his favorite desserts. :)
ReplyDeleteAbsolutely beautiful!! Thanks for sharing at the What's for Dinner party. Have a fantastic week!
ReplyDeleteCan the strawberry filling be replaced with cherry filling?
ReplyDeleteYes you can! Enjoy it and let us know how it turns out.
DeleteCould this be frozen??
ReplyDeleteWe do not recommend freezing this as the layers will seperate.
DeletePerfect for my son and future daughter-in-law’s 4th of July Couples shower!! Thanks!
ReplyDeleteHello! Wondering if it’s supposed to be heavy whipping cream or whipped cream like cool whip. Thanks!
ReplyDeleteIt is heavy whipping cream; hope you enjoy.
DeleteI am wondering I’d it would be ok to layer in a trifle dish!? May try!
ReplyDeleteI think it would be. Please let us know how it turns out!
DeleteJust finished making this for a 4th of July party this weekend. Can't wait to taste it. I decorated mine differently though. I saved a bit of the blueberry and strawberry filling and made it look like a flag. Wish I could attach a photo
ReplyDeleteWhat’s the longest time in advance can you make this?
ReplyDeleteThe dessert is best if served no longer than 3-5 days after making it. We hope you enjoy!
DeleteMade it today for the 4th of July and it was a HUGE hit at my work!! Amazing never had a yum yum before and now my family is obsessed
ReplyDeleteMade this for a church dinner and people were commenting on how delicious it was. I'm pretty sure it was the real whipped cream filling. I'll be making it again!!!
ReplyDelete