Who doesn't love classic No-Bake Cookies? Fudgy oats, chocolate, and peanut butter are such a deliciously-classic favorite combination, for sure. And they're just so darn easy to make, too!
Enjoy classic Tarragon Chicken Salad, loaded with big flavor from dried tarragon, dried cranberries, and chopped pecans. Perfect served over greens or in {the best} chicken salad sandwiches.
Kids love everything funfetti! Well, kids and adults alike will love these little-bite Funfetti Cake Balls.
I have a question. What do you do when you commit to making a dessert for a friend for her family's beach trip, decide to test out a new vanilla cupcake recipe, bake the cupcakes, and they're absolutely terrible??? I mean horrible. Dry. Not a lot of flavor. A huge 'oops.' And ... you don't have a lot of time to come up with something else?
Well, one option is to crumble up all the cupcakes, stir in a bunch of vanilla buttercream and a whole lot of rainbow sprinkles, and make funfetti cake balls. And that's how these funfetti cake balls were born!
Fortunately, I had some yellow candy melts in the pantry leftover from a previous cake pop adventure. And I always have an assortment of sprinkles on hand ... you just never know when you're going to need them, right? So I went to work turning the disappointingly failed cupcakes into fun and pretty little cake bites.
Not too bad a recovery of a huge 'oops,' right?!? Hope they go over well with my friend's family!
Thank you for stopping by The Kitchen is My Playground. We'd love to have you back soon!
funfetti cake balls recipe, how to make funfetti cake balls, sprinkles cake balls
Kids love everything funfetti! Well, kids and adults alike will love these little-bite Funfetti Cake Balls.
Prep time: 1 hourCook time: Total time: 1 H
Ingredients:
1 baked 9x13" yellow cake
1 to 1/12 c. vanilla frosting, canned or make your own
1 (1 lb.) package vanilla candy melts, any color
about 2 T. shortening
Rainbow sprinkles
Larger confetti/disc sprinkles for decorating
Instructions:
Crumble cake into a large bowl, working it into small crumbs. Add frosting and mix until well combined. Mix in rainbow sprinkles until the mixture looks your desired level of "confetti'ish."
Shape into approximately 1" balls, using about 1 T. of the cake mixture per ball; set aside on wax paper.
Cover with plastic wrap and refrigerate for about 1 hour, or place in freezer for about 15 minutes.
In a small deep bowl, melt candy melts and shortening together in the microwave per candy melt package directions (typically in 30 second intervals, stirring in between).
Use a fork to dip each cake ball in the candy coating, letting excess coating drip off back into the bowl. Place on wax paper.
Immediately sprinkle with a few large disc/confetti sprinkles (or additional rainbow sprinkles).
Affiliate
links are included in this post. I receive a small amount of compensation for
anything purchased from these links, at no additional cost to you.
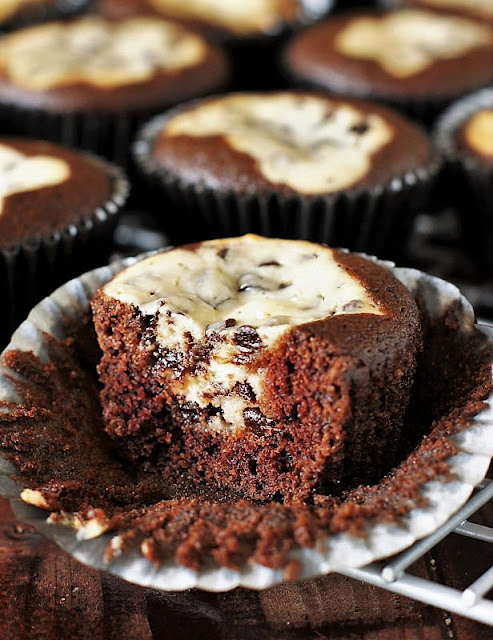
With their scratch-made chocolate cake bottoms and chocolate chip cheesecake centers, these Black Bottom Cups are little bites of chocolate-and-cheesecake heaven. CLICK HERE TO PIN THIS FOR LATER
Well, that jukebox my Mom says I have in my head is at it again!
See, I grew up watching Sesame Street and The Muppets. Remember the song "Mnah, Mnum" from The Muppets? You know, it goes ... "Mnah, mnum, do-do-do-do-do. Mnum, mnum, do-do-do-do." My Mom and I used to sing that song whenever we were cooking and something turned out really good.
So why am I talking about this song now?
Because these Black Bottom Cupcakes deserve to have that song sung for them!
It's hard to believe, as delicious as these cupcakes are, that they're so easy to make.
Yes, they're that good. A dark chocolate cupcake with a chocolate chip cheesecake center - Oh my gracious, they're amazingly delicious. And we owe my Mom for this fabulous recipe - I have no idea where she got it, but I'm so glad she shared!
So, in honor of these cupcakes and all the great times I've shared with my Mom in the kitchen, here's Animal (and a few other Muppets) singing "Mnah, Mnum."
I love Animal! He was always my favorite. Take it away, Muppet friends!
Thank you for indulging me on that nostalgic song. Animal always cracks me up.
Okay, time to step off Memory Lane and come on back to baking cupcakes. It's hard to believe, as delicious as these cupcakes are, that they're so easy to make.
First, just mix up a simple cheesecake batter - cream cheese, an egg, a bit of sugar, and some mini chocolate chips. Set that aside.
Then, mix up a really easy chocolate batter.
Fill muffin pan cups with paper cupcake liners. Spoon some chocolate batter into each paper cupcake liner, and then top each with a heaping teaspoon of cheesecake batter in the middle.
Bake them up and then let them cool. And believe me, letting these little cakes cool is is the hardest part of the recipe - because you'll want to grab one to eat as soon as they're out of the oven!
Once they're cooled, dig in!
I love how the cheesecake just peeks out on the top, but then is a really big hunk of cheesecake when you bite in. Delish.
I bet Animal would destroy the whole batch in about 30 seconds flat, don't you think?
Thank you for stopping by The Kitchen is My Playground. We'd love to have you back soon!
With their scratch-made chocolate cake bottoms and chocolate chip cheesecake centers, these Black Bottom Cups are little bites of chocolate-and-cheesecake heaven.
prep time: 15 Mcook time: 35 Mtotal time: 50 M
ingredients:
Cheesecake Center:
1 c. cream cheese, at room temperature
1/3 c. granulated sugar
1 unbeaten egg
1/8 tsp. salt
1 c. mini chocolate chips
Chocolate Bottom:
1 1/2 c. all-purpose flour
1 tsp. baking soda
1/2 tsp. salt
1 c. granulated sugar
1/4 c. cocoa
1 c. water
1/3 c. canola oil
1 T. white vinegar
1 tsp. vanilla extract
instructions:
How to cook Black Bottom Cups
Prepare the Cheesecake Center:
Combine cream cheese, 1/3 cup sugar, egg, and 1/8 teaspoon salt in a small bowl. Beat well.
Stir in mini chocolate chips.
Set aside.
Prepare the Chocolate Bottom:
In a large bowl, combine flour, baking soda, 1 cup sugar, 1/2 teaspoon salt, and cocoa.
Add water, vinegar, oil, and vanilla; stir to combine.
Bake:
Line a muffin pan with paper cupcake liners.
Fill each cup 1/3 full of chocolate batter. Top each with a heaping teaspoon of cream cheese mixture.
Bake at 350 degrees for 30 - 35 minutes.
TRACEY'S NOTES
I always seem to have extra cheesecake batter. I drop a 'Nilla Wafer, an Oreo, a crushed up graham cracker ... or whatever I have on hand ... into the bottom of a couple of cupcake liners as a crust, top them with the leftover cheesecake batter, and bake these up as mini cheesecakes right along with the cupcakes. I've even used a couple of animal crackers as the crust! These make-shift mini cheesecakes are quite tasty, too.
White Sangria with Nectarines, Plums, & Lemons is the perfect summer sipper. Whip up a batch and beat that summer heat!
Here's what I consider the perfect summer sipper! White sangria, chock full of sweet, ripe nectarines, juicy plums, and fresh lemons ~ it tastes oh-so cool and refreshing on a hot summer day. Oh, and did I mention the splash of rum? Mmmm hmmm ... I think you're going to want some of this.
I made this White Sangria with Nectarines, Plums, & Lemons for a visit from two of my college friends. Their first night here we reminisced about our college days, caught up about current life, and enjoyed this very scrumptious pitcher of sangria {~ it's so good it didn't last long, let me tell ya}.
Isn't it wonderful to catch up with dear friends? Especially the kind of friends who, even though it's been several years since you've gotten together, the friendship flows on like you've been together every day.
The only down-side to my friends' visit was that it reminded me how I much I miss them. Guess I just need to make sure I see them more often!
White Sangria with Nectarines, Plums, & Lemons comes together really quickly and easily. Pretty much all you do is combine wine, rum, and a touch of sugar ...
... and then stir in some sliced fresh fruit.
Chill it, and add in a little seltzer just before serving. That's it!
Grab a glass, pull up a chair with some great friends, and enjoy beating the heat with this delightful white sangria.
Check out these other super tasty sangria recipes:
Fritter-Fried Okra is fresh okra pan-fried coated in a pancake-like batter. And it's freezer-friendly too, letting you preserve the fresh taste of bountiful summer okra.
Nothing says summer southern cooking like okra! Well ... maybe fresh peaches ... or sweet tea ... or tomato pie - but let's stick with okra for right now. And this fritter-fried okra is my absolute favorite way to enjoy fresh okra.
I learned this method from my mother-in-law. After eight years of requesting fritter-fried okra every time Mark and I go to visit her, I've finally started making my own. Though I still request it at her house, too, of course!!
To make this, start by slicing up fresh okra - into about 1/4" to 1/2" thick pieces.
Fresh okra
Then mix up what is pretty much a pancake batter. Toss the okra slices in the batter ... the batter won't completely cover all the slices, but that's okay. It'll look about like this:
Batter'ed up!
Drop it into a frying pan, very much like you would pancakes. Let it get golden brown on the first side and then ...
Is it hot in here, or it just me?
... flip it over! Let the second side get golden brown, and then start breaking the okra up and stirring it around to make sure all the batter gets cooked.
Golden brown & ready to flip
Now, here's a beautiful thing about this preparation - you can eat it immediately, or put it up in the freezer to have all winter long! When I'm going to put it up in the freezer, I spread it out on baking sheets to cool. Then, I pack it in freezer bags and chill it completely in the refrigerator before popping it in the freezer.
When you take it out of the freezer, ya know, during the middle of January when you're longing for beautiful weather and a taste of summer produce, thaw it and heat it up in a skillet. Then enjoy your from-the-summer treat!
Fritter-Fried Okra is fresh okra pan-fried coated in a pancake-like batter. And it's freezer-friendly too, letting you preserve the fresh taste of bountiful summer okra.
Prep time: 15 MCook time: 15 MTotal time: 30 M
Ingredients:
1 c. all-purpose flour
1/2 tsp. salt
1 T. baking powder
1/3 c. milk
2 eggs, well-beaten
5 c. sliced okra, about 1/4" to 1/2" thick
Canola oil to coat pan
Instructions:
Combine flour, baking powder, and salt in a mixing bowl. Add beaten eggs and milk, beating until smooth. Add okra, stirring until coated.
Spoon okra into hot oil in a large skillet; cook, stirring occasionally, until golden brown. Depending on the size of your pan, you may need to do multiple batches. You don't want to crowd the pan.
If freezing, cool in a single layer on baking sheets. Package in freezer bags or sealable plastic containers; freeze. When ready to serve, thaw and reheat in a little hot oil in a skillet on the stove.


