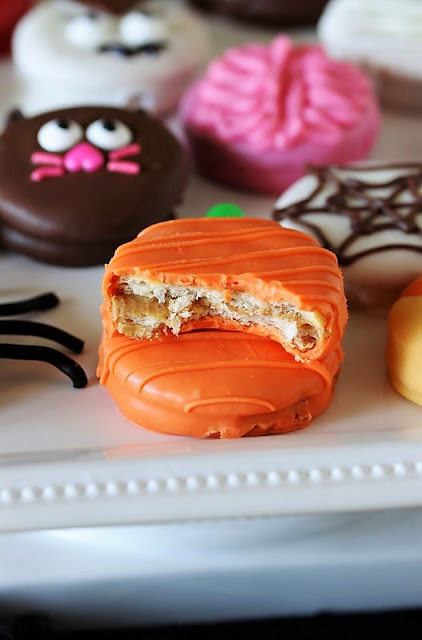
Looking for a fun Halloween treat? Whip up some of these
Halloween Peanut Butter Ritz Cookies - with 12 cute & creepy ways
to choose from! Or if you prefer, dunk Oreos to make them Halloween
Oreos instead. Either way, they're a super cute, super tasty Halloween
treat that's sure to please.
Halloween has just so many themes to work with to create fun and festive
little treats! The ideas and options for playful sweets are seemingly
boundless -- from ghosts to goblins, pumpkins, black cats, spiders, and
mummies, and witches galore.
And with these Halloween Peanut Butter Ritz Cookies? - We've got 12 cute and
creepy designs for you to choose from. Or if you prefer, dunk Oreos to make them Halloween Oreos instead.
Either way, they're a super cute, super tasty Halloween treat that's sure to
please.
Whether you whip them up yourself, or do them as a holiday project with the
kiddos, these Halloween-themed cookies are just plain fun to make. Do
allow yourself a bit of time to make them -- depending on which and how many
designs you choose, it can take anywhere from 1 hour to several to complete
your creations.
Whether you whip them up yourself, or do them as a holiday project with the kiddos, these Halloween-themed cookies are just plain fun to make.
I've organized them below in the post by degree of difficulty, starting with
the easiest and finishing with the more complex. -- Each design has a rating
of 1. Super Easy, 2. Easy, or 3. Moderate. None of the designs
are truly hard to make, just some are indeed quite a bit easier than others.
Wanting to spend about an hour or so making some with the little kiddos? -- I
suggest choosing just 2 or 3 of the "super easy" designs.
Got a good chunk of available time and want to whip up a fun party platter?
-- I recommend choosing 6 designs or so. Though if making this
type of thing is totally your jam, then go for it with all 12!
The designs can all be made with fairly basic supplies. Though some
items do require a trip to the craft store, and some others may need to be
sourced at your local candy store or online.
Candy melt coatings, candy eyes, and black writing gel are a must. And
chocolate chips, jelly beans, Tootsie Rolls, and sprinkle jimmies add adorable
touches to several designs.
Preparing & Dipping the Peanut Butter Ritz Sandwiches
Before getting started with making your adorable Halloween creations, prepare
a bunch of peanut butter Ritz sandwiches so they're ready to go.
Just spread about 3/4 of a teaspoon of creamy peanut butter between two Ritz
crackers, and set them aside until you're ready to dip and create.
Of course, if you're using Oreos instead then skip this step.
Let's Talk Coatings
Here's what you'll need to dip and coat the peanut butter Ritz sandwiches,
depending on the design or designs you choose:
- Chocolate almond bark coating or dark chocolate candy melts - I usually use Plymouth Pantry brand chocolate flavored almond bark coating, available in the baking aisle of most grocery stores. If I use candy melts, it's usually Make 'n Mold chocolate flavored candy wafers, available at most craft stores. With a 16-ounce package of almond bark coating you can coat about 40 cookies, while with a 12-ounce bag of candy melts you can coat about 20 cookies. I do find the chocolate almond bark coating a bit easier to work with.
- White chocolate almond bark coating - When it comes to white coating, I highly recommend using white chocolate almond bark coating instead of white candy melts. The white candy melts I tried were difficult to work with. -- They didn't melt smoothly, had a lot of air bubbles, and it was difficult to get a thin, smooth coating on the cookies. The finished cookies looked gloppy and messy. Just as with the chocolate almond bark coating, with a 16-ounce package of white chocolate almond bark coating you can coat about 40 cookies.
- Colored candy melts - When making designs such as pumpkins, purple monsters, or red devils, you'll need colored candy melts. Many colors are available at most craft stores, and those that aren't can usually be ordered online through Amazon or cake decorating suppliers.
- Shortening (such as Crisco) - Adding just a small touch of shortening -- 2 teaspoons, -- to the chocolate coating or candy melts thins it a bit and helps more easily create a nice, smooth coating on the finished cookies.
Once you have your coating selected, melt it together with a bit of shortening in the microwave per the package
directions (typically in 30 second intervals, stirring in between).
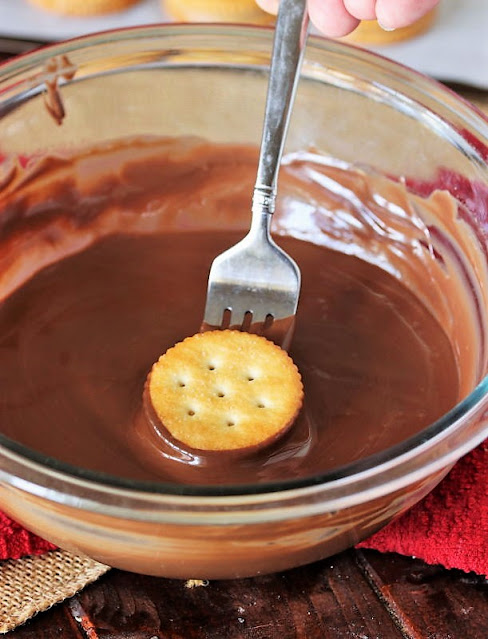
Then use a fork to dip a cracker sandwich in the chocolate coating.
Flip the cracker sandwich in the coating with the fork to make sure it's
completely covered in the coating, letting any excess coating drip off
back into the bowl.
Place each dipped cookie on a baking sheet lined with wax paper or parchment paper and apply any decorations needed to create your chosen
design. Most decorations need to be applied immediately while the
coating is wet so the decorations will adhere to the cookies.
And now let's take a detailed look at what you'll need and how to make
each of the 12 Halloween designs!
How to Make Pumpkin Peanut Butter Ritz Cookies (or Oreos)
Degree of Difficulty: Super easy
What You'll Need:
- Orange candy melts
- Green jelly beans or green M&Ms for stems
- Ziploc sandwich baggie or disposable plastic piping bag for decorative drizzle
Pumpkin Cookie Instructions:
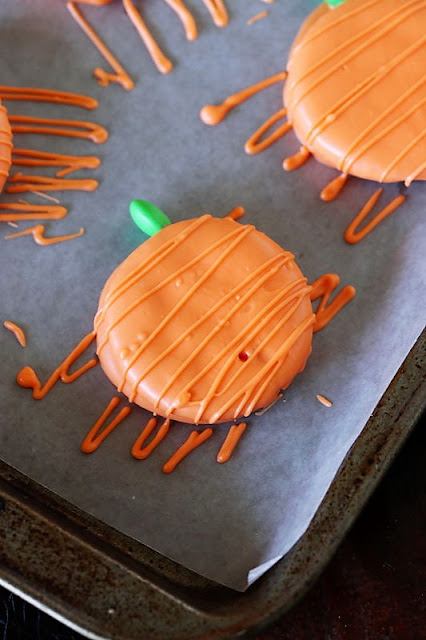
Dip the Ritz sandwiches in orange candy melts. While the coating is
wet, place a green jelly bean or green M&M at the top for a stem.
Let the dipped cookies stand at room temperature to allow the coating to
set completely. Or for quicker setting, chill them in the refrigerator for
about 15 minutes until the coating is set.
Then spoon about a tablespoon or so of warm melted orange coating into one bottom corner of a Ziploc sandwich baggie (or disposable plastic piping bag). Snip off a very small piece of the corner of the baggie to create a small hole through which to pipe the coating.
Very gently squeeze the baggie of coating while moving it back and forth over the pumpkin cookies to create thin lines of decorative drizzle.
How to Make Mummy Peanut Butter Ritz Cookies (or Oreos)
Degree of Difficulty: Super easy
What You'll Need:
- White chocolate almond bark coating
- Black writing gel
- Ziploc sandwich baggie or disposable plastic piping bag for mummy drizzle
Mummy Cookie Instructions:
Dip the Ritz sandwiches in white chocolate almond bark coating.
Allow the coating to set completely.
Then spoon a tablespoon or so of melted white chocolate coating into one
bottom corner of a Ziploc sandwich baggie. Snip off a very small piece of
the corner of the baggie to create a small hole through which to pipe the
coating.
Very gently squeeze the baggie of coating while moving it back and forth
over the mummy cookies to create mummy drizzle. Let stand to allow
the drizzle to set completely.
Once the mummy drizzle is set, use black writing gel to make two small eyes.
How to Make Candy Corn Peanut Butter Ritz Cookies (or Oreos)
Degree of Difficulty: Super easy
What You'll Need:
Candy Corn Cookie Instructions:
Dip Ritz sandwiches in white chocolate almond bark coating, coating
them completely in white. Let stand to allow the white coating to set completely.Once the white coating is set, dip Ritz sandwiches about 3/4 of the way
into orange candy melts. Then allow the orange coating to set
completely.Once the orange is completely set, dip the orange end about 1/4 of the
way into yellow candy melts. Allow the yellow coating to set
completely, and then you're good to go.
How to Make Ghost Peanut Butter Ritz Cookies (or Oreos)
Degree of Difficulty: Super easy
What You'll Need:
Ghost Cookie Instructions:
Once the white coating is set, use black writing gel to draw an
oval-shaped mouth.
How to Make Monster/Purple People Eater Peanut Butter Ritz Cookies (or
Oreos)
Degree of Difficulty: Super easy
What You'll Need:
- Purple candy melts
- Jumbo candy eyes
- Black writing gel for mouths
- Purple sugar sprinkles (optional)
- Purple gum drops for horns (optional)
Monster/Purple People Eater Cookie Instructions:
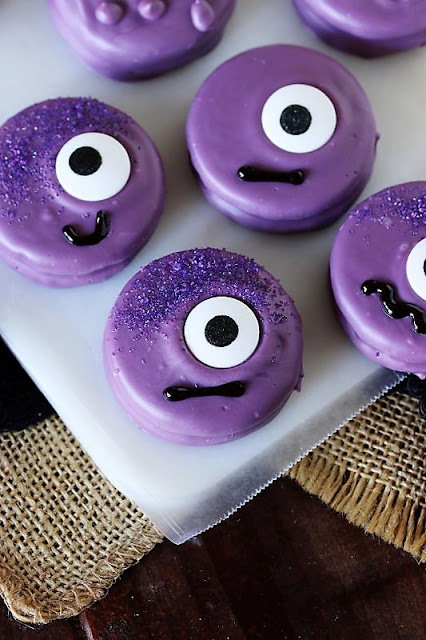
Dip cookies in purple candy melts. While the coating is wet, sprinkle on purple sugar sprinkles, if you're
using them. The sugar sprinkles are optional, but we think they
add an extra-fun little touch. The monsters still look amazing
without them, though!
Also while the coating is wet, place 1 jumbo candy eye off-center in
the middle of the dipped cookie.
If you're including a Purple People Eater horn like in the photo below,
cut a sliver from a purple gum drop. While the coating is still wet,
place the gum drop sliver sticking out of the top of the monster. Be
sure to embed the gum drop into the coating so it will stick.
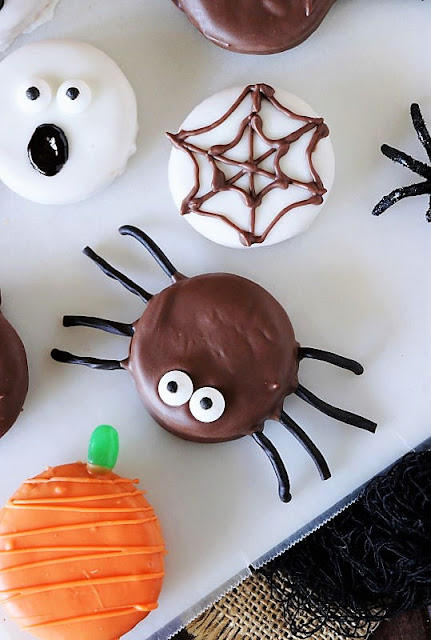
How to Make Spider Peanut Butter Ritz Cookies (or Oreos)
Degree of Difficulty: Easy
What You'll Need:
- Chocolate almond bark coating
- Candy eyes
- Black shoelace licorice for legs
Spider Cookie Instructions:
I give this spider design an "easy" rating instead of "super easy" just
because it takes a little fine motor control to adhere the legs to the
cookie spider body. Don't get me wrong -- it's still REALLY easy.
The youngest of little ones may just struggle a bit with attaching the
legs.
To make spiders, dip Ritz sandwiches in chocolate almond bark
coating. While the coating is wet, place 2 candy eyes at the
bottom of the dipped cookie.
Cut 8 pieces of black shoestring licorice 1-inch long each. Then one at a time, dip the ends in the melted chocolate coating. Stick the dipped ends onto the side of the spider cookie, making 8 spider legs in all.
How to Make Brain Peanut Butter Ritz Cookies (or Oreos)
Degree of Difficulty: Easy
What You'll Need:
- Pink candy melts
- Ziploc sandwich baggie or disposable plastic piping bag for piping the brain
Brain Cookie Instructions:
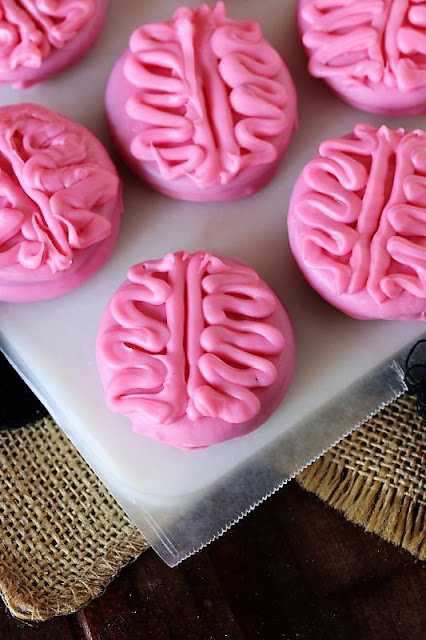
Dip the cookies in pink candy melts. Let stand to allow the coating to set completely.Once the initial coating is set, spoon some melted pink coating into
one bottom corner of a Ziploc sandwich baggie. Snip off a small piece
of the corner of the baggie to create a small hole through which to
pipe the coating.Gently squeeze the baggie of coating to draw two vertical lines
side-by-side down the middle of the cookie. Then pipe a fairly
thick squiggly line on each side of the vertical lines to create a
brain.
How to Make Spider Web Peanut Butter Ritz Cookies (or Oreos)
Degree of Difficulty: Moderate
What You'll Need:
- White chocolate almond bark coating
- Chocolate almond bark coating OR black writing gel for webs
- Ziploc sandwich baggie or disposable plastic piping bag for piping the webs (if you use melted chocolate almond bark)
Spider Web Cookie Instructions:
I rate this one as "moderate" difficulty level simply because it takes
a bit of a steady hand to pipe the spider web design. It's not a
hard task, it just takes some fine motor skill.To whip up some spider webs, dip Ritz sandwiches in white chocolate
almond bark coating. Let stand to allow the coating to set completely before piping the web
design.You can pipe the spider web with either melted chocolate or black
writing gel. Both work just fine, however I prefer
chocolate. Why? -- Because chocolate sets up completely, which
means you can stack the finished cookies to store them. The black
writing gel stays sticky, no matter how long you leave it out to
dry. So you can never stack the cookies and have to store them in
a single layer.To pipe the web in chocolate, spoon some warm melted chocolate coating
into one bottom corner of a Ziploc sandwich baggie. Snip off a very small
piece of the corner of the baggie to create a small hole through which to
pipe the chocolate.
Gently squeeze the baggie of coating to pipe a spider web onto the top of the cookie. Start by making a dot in the very center of the cookie to serve as your "centering anchor." Then draw three lines all the way across the cookie with each going directly through the "centering anchor" dot, and dividing the cookie into roughly equal sections.
Use a "swooping" motion to draw curved lines close to the center, connecting the lines of each section. Work your way around the cookie one section's "swoop" line at a time. Repeat with a second set of "swoop" lines along the outer edge of the cookie to complete the web.
How to Make Bat Peanut Butter Ritz Cookies (or Oreos)
Degree of Difficulty: Moderate
What You'll Need:
- Chocolate almond bark coating
- Chocolate chips for ears
- White chocolate chips for eyes
- Oreo cookies for wings
Bat Cookie Instructions:
For bats, dip the Ritz sandwiches in chocolate almond bark coating.
While the coating is wet, place 2 chocolate chips sticking out of the top
of the cookie for ears. And place 2 white chocolate chips near the middle of
the cookie for eyes. Lay the white chocolate chips sideways pointing
toward each other to form triangle-shaped eyes.
To create the wings, twist open an Oreo cookie and scrape off the cream filling. Use a small paring knife to cut the chocolate wafers in half. The cuts don't have to be perfect! -- Rustic is just fine.
To attach the bat's wings, dip the end of two Oreo pieces into melted
chocolate and stick them onto the sides of the bat cookie, embedding them
into the bat's wet chocolate coating so they'll adhere.
How to Make Dracula Peanut Butter Ritz Cookies (or Oreos)
Degree of Difficulty: Moderate
What You'll Need:
- White chocolate almond bark coating
- Tootsie Rolls for widow's peak hair
- Candy eyes
- Chocolate sprinkles/jimmies for eyebrows
- Black writing gel for mouths and fangs
Dracula Cookie Instructions:
Use your fingers to mold a Tootsie Roll into a flat disc. Then use a small
paring knife to cut a triangle shape for Dracula's widow's peak hair.
Dip the Ritz sandwiches in white chocolate almond bark coating. While the coating is wet, place a Tootsie Roll triangle in the top center of the cookie to form the widow's peak hair.
Place on 2 candy eyes, and then 2 chocolate sprinkle jimmies slanted inward
above the eyes as eyebrows. Clean craft tweezers come in really handy for
placing the sprinkles!
Let all this stand to allow the coating to set completely. Then once coating is set, use black writing gel to draw a mouth and 2 fangs.
How to Make Black Cat Peanut Butter Ritz Cookies (or Oreos)
Degree of Difficulty: Moderate
What You'll Need:
- Chocolate almond bark coating, or black candy melts if you want to make these truly black cats
- Candy eyes
- Chocolate chips for ears
- Heart sprinkles for noses
- Pink sprinkles/jimmies for whiskers (from a container of rainbow sprinkles)
Black Cat Cookie Instructions:
Dip cookies in chocolate almond bark coating, or black candy melts if you
prefer to make these truly black cats.
While the coating is wet, place 2 candy eyes and 1 upside-down heart
sprinkle as the nose in the middle of the dipped cookie. Using clean craft
tweezers, place 4 pink sprinkle jimmies alongside the nose to create the
cat's whiskers.
Also while the coating is wet, place 2 chocolate chips sticking out of
the top of the cookie to create the ears. I like to place the
chocolate chips so the little curled-over top is facing toward the front
-- I think the cat's ears look extra cute that way.
How to Make Devil Peanut Butter Ritz Cookies (or Oreos)
Degree of Difficulty: Moderate
What You'll Need:
- Red candy melts
- Red gum drops or red jelly beans for horns
- White chocolate almond bark coating for eyes
- Black writing gel for mouths and eyes
- Ziploc sandwich baggie or disposable plastic piping bag for piping white part of the eyes
Devil Cookie Instructions:
Dip the Ritz sandwiches in red candy melts.
To make the devil horns, cut 2 slivers from a red gum drop or cut a red
jelly bean in half. While the red coating is still wet, place these
sticking out of the top of the cookie to create devil horns. Let this
stand to allow the coating to set completely.
Once the coating is set, spoon a small amount of melted white chocolate
coating into a Ziploc sandwich baggie and pipe 2 small "swoosh"
shapes to create slanted eyes. Allow the white to set. Then
use black writing gel to make small black dots on top of the white
"swooshes" to finish the eyes.
Finally, use black writing gel to draw a frowning mouth.
Tips for Making Halloween Peanut Butter Ritz Cookies (or Halloween
Oreos)
- Do allow yourself a good bit of time to make these treats -- depending on which and how many designs you choose, it can take anywhere from 1 hour to several to complete your creations.
- If you're making some as a fun Halloween project with the little kiddos, I suggest choosing just 2 or 3 super easy designs.
- Prepare all of your decorations before you melt your coating. This makes it easier to quickly assemble your creations, and minimizes the number of times the coating needs to be reheated to stay at a "workable" consistency.
- Have (clean!) craft tweezers at the ready to help put sprinkle decorations in their place.
- Toothpicks work great to pop and smooth over air bubbles in the coating, or to gently nudge decorations into place.
- Keep in mind that black writing gel stays sticky, and never fully sets up as dry. With designs that use black writing gel, they need to be stored in a single layer rather than stacked up.
Have fun making these adorable Halloween treats, and enjoy!
Thank you for stopping by The Kitchen is My Playground. We'd love to have
you back soon!
Check out these other Halloween-inspired treats:
Yield: varies

Halloween Peanut Butter Ritz Cookies (or Halloween Oreos) - 12 Cute & Creepy Ways
Looking for a fun Halloween treat? Whip up some of these Halloween Peanut Butter Ritz Cookies - with 12 cute & creepy ways to choose from! Or if you prefer, dunk Oreos to make them instead. Either way, they're a super cute, super tasty Halloween treat that's sure to please.
Prep time: 1 H & 30 MTotal time: 1 H & 30 M
Ingredients
For All Designs:
- Ritz crackers
- Creamy peanut butter
- 12 oz. or 16 oz. package(s) of candy melts or Almond Bark coating, as called for with your chosen design(s)
- 2 tsp. shortening (such as Crisco) per each 12 oz. or 16 oz. package of candy melts or Almond Bark coating
Pumpkin:
- Orange candy melts
- Green jelly beans or green M&Ms for stems
- Ziploc sandwich baggie or disposable plastic piping bag for decorative drizzle
Mummy:
- White chocolate almond bark coating
- Black writing gel
- Ziploc sandwich baggie or disposable plastic piping bag for mummy drizzle
Ghost:
Monster/Purple People Eater:
- Purple candy melts
- Jumbo candy eyes
- Black writing gel for mouths
- Purple sugar sprinkles (optional)
- Purple gum drops for horns (optional)
Spider:
- Chocolate almond bark coating
- Candy eyes
- Black shoelace licorice for legs
Brain:
- Pink candy melts
- Ziploc sandwich baggie or disposable plastic piping bag for piping the brain
Spider Web:
- White chocolate almond bark coating
- Chocolate almond bark coating OR black writing gel for webs
- Ziploc sandwich baggie or disposable plastic piping bag for piping the webs (if you use melted chocolate almond bark)
Bat:
- Chocolate almond bark coating
- Chocolate chips for ears
- White chocolate chips for eyes
- Oreo cookies for wings
Dracula:
- White chocolate almond bark coating
- Tootsie Rolls for widow's peak hair
- Candy eyes
- Chocolate sprinkles/jimmies for eyebrows
- Black writing gel for mouths and fangs
Black Cat:
- Chocolate almond bark coating, or black candy melts if you want to make these truly black cats
- Candy eyes
- Chocolate chips for ears
- Heart sprinkles for noses
- Pink sprinkles/jimmies for whiskers (from a container of rainbow sprinkles)
Devil:
- Red candy melts
- Red gum drops or red jelly beans for horns
- White chocolate almond bark coating for eyes
- Black writing gel for mouths and eyes
- Ziploc sandwich baggie or disposable plastic piping bag for piping white part of the eyes
Instructions
To Prepare All Designs:
- Spread a thick layer of peanut butter (about 3/4 of a teaspoon each) on Ritz crackers and top with another Ritz to create peanut butter cracker sandwiches. (If using Oreos, skip this step.)
- In a small deep bowl, melt candy melts or almond bark coating and shortening together in the microwave per package directions (typically in 30 second intervals, stirring in between).
- Use a fork to dip each cracker sandwich in the coating, covering completely, and letting excess coating drip off back into the bowl. Place on a baking sheet lined with wax paper or parchment paper.
- Once all decorations are added and the cookie coating is set, store at room temperature in an airtight container. Or, if you find the coatings to be soft, store in the refrigerator.
Pumpkins:
- Dip in orange candy melts.
- While coating is wet, place a green jelly bean or green M&M sticking out of the top for a stem.
- Let stand to allow coating to set completely. Or for quicker setting, chill until coating is set, about 15 minutes.
- Spoon a tablespoon or so of warm melted orange coating into one bottom corner of a Ziploc sandwich baggie (or disposable plastic piping bag). Snip off a very small piece of the corner of the baggie to create a small hole through which to pipe the coating.
- Very gently squeeze the baggie of coating while moving it back and forth over the pumpkin cookies to create thin lines of decorative drizzle.
Mummies:
- Dip in white chocolate almond bark coating.
- Let stand to allow coating to set completely. Or for quicker setting, chill until coating is set, about 15 minutes.
- Spoon a tablespoon or so of warm melted white chocolate coating into one bottom corner of a Ziploc sandwich baggie (or disposable plastic piping bag). Snip off a very small piece of the corner of the baggie to create a small hole through which to pipe the coating.
- Very gently squeeze the baggie of coating while moving it back and forth over the mummy cookies to create mummy drizzle. Let stand to allow drizzle to set completely.
- Use black writing gel to make two small eyes.
Candy Corn:
- Dip in white chocolate almond bark coating, coating the Ritz sandwiches completely. Let stand to allow white coating to set completely. Or for quicker setting, chill until coating is set, about 15 minutes.Dip about 3/4 of the way into orange candy melts. Allow orange coating to set completely.Dip the orange end about 1/4 of the way into yellow candy melts. Allow yellow coating to set completely.
Ghosts:
- Dip in white chocolate almond bark coating.
- While coating is wet, place 2 candy eyes near the top.
- Let stand to allow coating to set completely. Or for quicker setting, chill until coating is set, about 15 minutes.
- Once white chocolate coating is set, use black writing gel to draw an oval-shaped mouth.
Monsters/Purple People Eaters:
- Dip in purple candy melts.
- While coating is wet, sprinkle on purple sugar sprinkles, if using. Place 1 jumbo candy eye off-center in the middle of the dipped cookie.
- If including a Purple People Eater horn, cut a sliver from a purple gum drop. While coating is wet, place it sticking out of the top. Be sure to embed the gum drop sliver in the coating so it will stick.
- Let stand to allow coating to set completely. Or for quicker setting, chill until coating is set, about 15 minutes.
- Once purple coating is set, use black writing gel to draw a mouth.
Spiders:
- Dip in chocolate almond bark coating.
- While coating is wet, place 2 candy eyes at the bottom of the cookie.
- Cut 8 pieces of black shoestring licorice 1-inch long each. Dip the end of a piece of licorice in the melted chocolate coating, and stick the dipped end onto the side of the spider cookie. Repeat with the remaining 7 licorice pieces to make 8 legs on the spider cookie.
Brains:
- Dip in pink candy melts.Let stand to allow coating to set completely. Or for quicker setting, chill until coating is set, about 15 minutes.
- Spoon warm melted pink coating into one bottom corner of a Ziploc sandwich baggie (or disposable plastic piping bag). Snip off a small piece of the corner of the baggie to create a small hole through which to pipe the coating.
- Gently squeeze the baggie of coating to draw two vertical lines side-by-side down the middle of the cookie. Then pipe a fairly thick squiggly line on each side of the vertical lines to create a brain.
Spider Webs:
- Dip in white chocolate almond bark coating.Let stand to allow coating to set completely. Or for quicker setting, chill until coating is set, about 15 minutes.
- Spoon warm melted chocolate coating into one bottom corner of a Ziploc sandwich baggie (or disposable plastic piping bag). Snip off a very small piece of the corner of the baggie to create a small hole through which to pipe the chocolate.
- Gently squeeze the baggie of chocolate to pipe a spider web onto the top of the cookie. Start by making a dot in the very center of the cookie to serve as your "centering anchor." Then draw three lines all the way across the cookie with each going directly through the "centering anchor" dot, and dividing the cookie into roughly equal sections.
- Use a "swooping" motion to draw curved lines close to the center, connecting the lines of each section. Work your way around the cookie one section's "swoop" line at a time. Repeat with a second set of "swoop" lines along the outer edge of the cookie.
- NOTE: You can use black writing gel to draw the web instead, if you prefer.
Bats:
- Dip in chocolate almond bark coating.
- While coating is wet, place 2 chocolate chips sticking out of the top of the cookie for ears. Place 2 white chocolate chips near the middle of the cookie for eyes, laying the white chocolate chips sideways to form triangle shapes.
- To create the wings, twist open an Oreo cookie and scrape off the cream filling. Use a small paring knife to cut the chocolate wafers in half (the cuts don't have to be perfect!). Dip the end of two Oreo pieces into melted chocolate coating and stick them onto the sides of the bat cookie, embedding them into the bat's wet chocolate coating.
- Let stand to allow coating to set completely. Or for quicker setting, chill until coating is set, about 15 minutes.
Dracula:
- Use your fingers to mold a Tootsie Roll into a flat disc. Then using a small paring knife, cut a triangle shape for Dracula's widow's peak hair. Set aside.
- Dip in white chocolate almond bark coating.
- While coating is wet, place Tootsie Roll triangle in the top center of the cookie. Place on 2 candy eyes, and then 2 chocolate sprinkle jimmies slanted inward above the eyes as eyebrows. (Clean craft tweezers come in really handy for placing the sprinkles.)
- Let stand to allow coating to set completely. Or for quicker setting, chill until coating is set, about 15 minutes.
- Once coating is set, use black writing gel to draw a mouths and 2 fangs.
Black Cats:
- Dip in chocolate almond bark coating (or black candy melts if you want to make these truly black cats).
- While coating is wet, place 2 candy eyes and 1 upside-down heart sprinkle as the nose in the middle of the dipped cookie. Using clean craft tweezers, place 4 pink sprinkle jimmies alongside the nose to create whiskers.
- Place 2 chocolate chips sticking out of the top of the cookie to create ears.
- Let stand to allow coating to set completely. Or for quicker setting, chill until coating is set, about 15 minutes.
Devils:
- Dip in red candy melts.
- Cut 2 slivers from a red gum drop, or cut a red jelly bean in half. While the red coating is wet, place these sticking out of the top of the cookie to create devil horns.
- Let stand to allow coating to set completely. Or for quicker setting, chill until coating is set, about 15 minutes.
- Spoon a small amount of warm melted white chocolate coating into one bottom corner of a Ziploc sandwich baggie (or disposable plastic piping bag). Snip off a very small piece of the corner of the baggie to create a small hole through which to pipe the white chocolate.
- Pipe a small amount of white chocolate in "swoosh" shapes to create two slanted eyes. Allow to set. Use black writing gel to make small black dots on top of the white "swooshes" to finish the eyes.
- Use black writing gel to draw a frowning mouth.
TRACEY'S NOTES:
- SUPER EASY DESIGNS: Pumpkin, Mummy, Candy Corn, Ghost, Monster/Purple People Eater
- EASY DESIGNS: Spider, Brain
- MODERATE DIFFICULTY DESIGNS: Spider Web, Bat, Dracula, Black Cat, Devil
- If you're making some as a fun Halloween project with the little kiddos, I suggest choosing just 2 or 3 super easy designs.
- Do allow yourself a good bit of time to make these treats -- depending on which and how many designs you choose, it can take anywhere from 1 hour to several to complete your creations.
- Prepare all of your decorations before you melt your coating. This makes it easier to quickly assemble your creations, and minimizes the number of times the coating needs to be reheated to stay at a "workable" consistency.
- Have (clean!) craft tweezers at the ready to help put sprinkle decorations in their place.
- Toothpicks work great to pop and smooth over air bubbles in the coating, or to gently nudge decorations into place.
- Keep in mind that black writing gel stays sticky, and never fully sets up as dry. With designs that use black writing gel, they need to be stored in a single layer rather than stacked up.
Affiliate links are included in this post. As an Amazon.com associate, we earn from qualifying purchases.











I absolutely LOVE these. Totally brilliant. Pinned xx
ReplyDelete#BloggersPitStop
I absolutely love what you did here! Halloween is such a fun time of the year to have these little treats and make them creepy and fun. Your cookies look so cute!
ReplyDeleteYour creative cookies have been chosen by Adrienne to be featured in the next Blogger's Pit Stop.
ReplyDeleteKathleen
Those are really cute - a great little gift! Thanks for sharing at the What's for Dinner party! Hope to keep seeing you every Sunday!!
ReplyDeleteThanks so much for sharing your awesome post with us at Full Plate Thursday,507! We featured your post this past week and hope you will come back to see us real soon!
ReplyDeleteMiz Helen
These are adorable. I love the kitties!
ReplyDeleteThese are so fun! Wow, you've done an amazing job. I like the peanut butter in Ritz option as opposed to Oreos, too. I love the Tootsie Roll for Dracula--that is so clever. Thank you for sharing this post with us at the Will Blog for Comments #71 linkup. We hope to see more of your posts next time at #72, which opens Monday. Have a great week.
ReplyDelete