Did you know you can make
homemade pizza dough with just a few simple ingredients and a few simple steps? - It's easier than you think! Follow these steps on how to make Homemade Pizza Dough, and you'll be whipping up your own dough in a flash.
CLICK HERE TO PIN THIS FOR LATER
CLICK HERE TO PIN THIS FOR LATER
If you ask my daughter what my favorite food is, she'll say "Pizza."
Yes, I love pizza so much even others can answer that question correctly for me. I swear, I could eat it everyday - and probably for every meal of every day and not get sick of it. Cold pizza for breakfast? - It's the best.
And while I absolutely love take-out pizza, I also enjoy making and eating homemade pizza, too. When we make our own pizza at home it's fun to experiment with more non-traditional flavor combinations - like our Shrimp & Pesto Pizza with Sun-Dried Tomatoes, or Sweet-&-Spicy Pulled Pork BBQ Pizza, or our very favorite Sausage & Balsamic-Caramelized Onion Pizza. But I certainly won't turn down a good-old plain pepperoni!
Making homemade pizza dough takes only a few simple ingredients you probably already have in your pantry.
Did you know making your own homemade pizza dough is actually really easy?
Truly, it is.
Making homemade pizza dough takes only a few simple
ingredients you probably already have in your pantry.
If you have flour, salt, sugar, olive oil, and yeast on hand, you're ready!
I'm guessing the only one of those you may need to run to the store for is yeast. So grab a packet of yeast the next time you go grocery shopping, - and you'll be good to go.
So skip the take-out pizza or buying pre-made pizza dough balls, and follow these simple steps to make your own homemade dough.
Step 1: Proof the Yeast
Step 1: Proof the Yeast
Proofing dissolves the yeast and prepares it for use in the dough, as well as proves its active and alive so you know your dough will rise.
Combine 1 cup warm water, 2 teaspoons sugar, and a 1 1/4 ounce package of active dry yeast in a small bowl to proof the yeast. Give the mixture a gentle whisk with a fork.
Combine 1 cup warm water, 2 teaspoons sugar, and a 1 1/4 ounce package of active dry yeast in a small bowl to proof the yeast. Give the mixture a gentle whisk with a fork.
Use water that's 100-110℉, which means it should feel just slightly warm to your fingers. Hotter water will kill the yeast and the dough won't rise.
After about 5 to 10 minutes, look for tiny bubbles or for the yeast mixture to become creamy looking like in the photo below. That's how you'll know the yeast is active.
After about 5 to 10 minutes, look for tiny bubbles or for the yeast mixture to become creamy looking like in the photo below. That's how you'll know the yeast is active.
Set the yeast mixture aside while you prepare the remaining dough ingredients.
The yeast mixture should start to get a little bit of foamy-looking stuff on the top, like in the photo below.
Step 2: Combine the Dough Ingredients
In a fairly large mixing bowl, combine 3 cups all-purpose flour and 1 teaspoon salt.
Make a well in the center of the flour. Pour in the yeast mixture and 2 tablespoons extra virgin olive oil, then stir until a soft dough forms.
It's okay if the dough isn't completely brought together into a ball and everything isn't absolutely completely combined. It'll be brought together more in the next step.
Step 3: Knead the Dough
Turn the soft dough out onto a lightly floured surface.
Knead by pressing into the dough with the heel of your hand, pushing forward slightly as you press. Turn the dough slightly, fold it in half, and press again.
Repeat until the dough is smooth and springy, which should happen after about 8 to 10 minutes of kneading.
Knead by pressing into the dough with the heel of your hand, pushing forward slightly as you press. Turn the dough slightly, fold it in half, and press again.
Repeat until the dough is smooth and springy, which should happen after about 8 to 10 minutes of kneading.
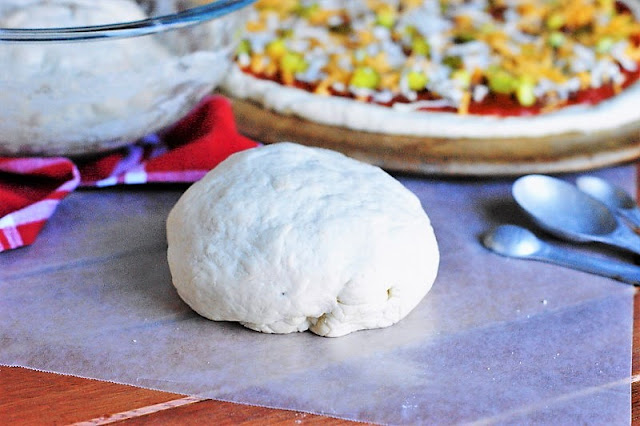
Kneading develops the dough's gluten and elasticity, creating a soft and airy crust. To test if you're done kneading, shape the dough into a ball and let it drop to your work surface from a few inches up (like, maybe six inches or so). If it holds its shape for the most part, the dough is ready.
Step 4: Let the Dough Rise
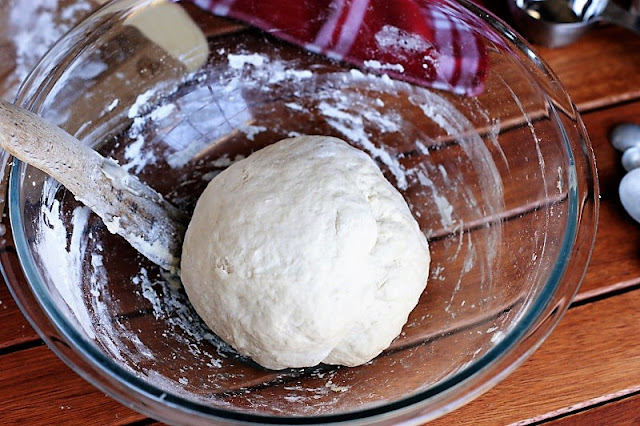
Place the dough ball in a large bowl that's been lightly coated with olive oil. I usually just use the large mixing bowl I had mixed the dough ingredients in. Whatever bowl you choose, just be sure to use a bowl large enough to give the dough room to grow.
Cover the bowl lightly with plastic wrap and set it aside in a warm, draft-free place until the dough is nearly doubled in size.
Cover the bowl lightly with plastic wrap and set it aside in a warm, draft-free place until the dough is nearly doubled in size.
Risen dough will appear puffy and airy, like in the photo below.
Punch down the risen dough and let it rest for 10 minutes.
Step 5: Turn Out the Dough
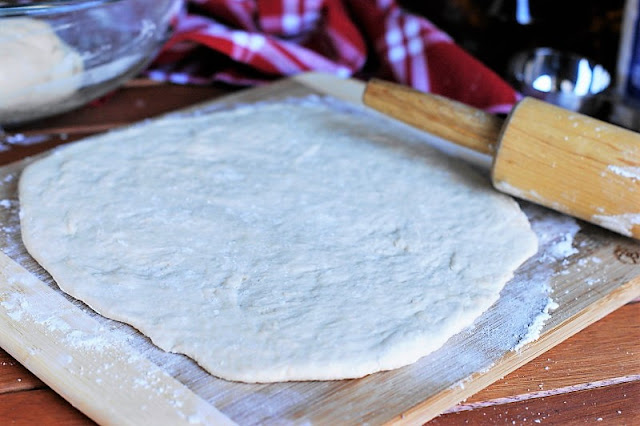
Lightly flour a work surface on which to roll out the dough. It can be a large cutting board, the counter top, or a pastry dough rolling mat.
Turn the dough out from the mixing bowl onto the floured surface.
Turn the dough out from the mixing bowl onto the floured surface.
Step 6: Shape the Dough
What if you've got dough that's snapping back like elastic rather than stretching into shape? Give it a break!
That's right, walk away for a few minutes and let it rest. After a rest, the dough will be more pliable and much more manageable.
Step 7: Top & Bake
Now comes the extra fun part - top your homemade pizza dough with sauce, cheese, and toppings as you'd like.
Perhaps you'd like to make a Bacon Cheeseburger Pizza, pictured in the photo below, like we did with this batch of homemade dough? Or, toss on some sausage or pepperoni? Or make a loaded veggie pizza? Whatever you'd like! - that's the extra fun of making your own pizza at home.
The next time you're at the grocery store, grab a couple of packets of yeast to keep on hand in your pantry. Then you can whip up your own pizza dough in a flash.
Then bake the topped dough at 400℉ for about 25 minutes.
That's it. Truly, that's all there is to how to make your own homemade pizza dough. All that's left is to kick back and enjoy all your not-so-hard work once that pizza comes out of the oven!
So the next time you're at the grocery store, grab a couple of packets of yeast to keep on hand in your pantry. Then you can skip the take-out pizza and be ready to whip up your own pizza dough in a flash.
It's way easier than most people think.
Check out these other tasty "make-your-own" recipes:
Thank you for stopping by The Kitchen is My Playground. We'd love to have you back soon!
Yield: 1 pizza crust

How to Make Homemade Pizza Dough
Did you know you can make homemade pizza dough with just a few simple ingredients and a few simple steps? - It's easier than you think! Follow these steps on how to make Homemade Pizza Dough, and you'll be whipping up your own dough in a flash.
prep time: 2 hourcook time: 25 Mtotal time: 2 H & 25 M
ingredients:
- 1 c. warm water (100-110℉, which means it should feel just slightly warm to your fingers)
- 2 tsp. granulated sugar
- 1 (1 ¼ oz.) package active dry yeast
- 3 c. all-purpose flour
- 1 tsp. salt
- 2 T. extra-virgin olive oil
instructions:
How to cook How to Make Homemade Pizza Dough
- Combine warm water, sugar, and yeast in a small bowl to proof* the yeast. Set the yeast mixture aside while you prepare the remaining dough ingredients.
- In a mixing bowl, combine the flour and salt. Make a well in the center, pour in the yeast mixture and olive oil, and stir until a soft dough forms.
- Turn the soft dough out onto a lightly floured surface. Knead by pressing into the dough with the heel of your hand, pushing forward slightly. Turn the dough slightly, fold it in half, and press again. Repeat this kneading process until the dough is smooth and springy, about 8 to 10 minutes.
- Lightly coat a large bowl with olive oil. Place the dough in the bowl and cover it lightly with plastic wrap. Set aside in a warm, draft-free place until the dough is nearly doubled in size. The risen dough should appear puffy and airy.
- Punch down the risen dough and then let it rest for 10 minutes.
- Turn dough out onto a lightly floured surface (a large cutting board, the counter top, or a pastry dough rolling mat). Use your hands and a rolling pin to gently shape the dough into a round or rectangular crust. If the dough snaps back like elastic rather than stretching into shape, let it rest for a few minutes. After a rest, the dough will be more pliable.
- Add your desired pizza toppings and then bake at 400℉ for about 25 minutes.
TRACEY'S NOTES
- * Proofing dissolves the yeast, prepares it for use in the dough, and proves its active and alive so you know your dough will rise. After 5 to 10 minutes, look for tiny bubbles or for the yeast mixture to become creamy looking to know the yeast is active.
You might also like these tasty pizza recipes made with homemade pizza crusts:
Affiliate
links are included in this post. I receive a small amount of compensation for
anything purchased from these links,at Amazon.com at no additional cost to you.


I didn't know letting the dough rests stops it from being elastic! Great info - Thanks for sharing at the What's for Dinner party!
ReplyDeleteThanks for sharing this dough recipe. My grands love pizza. It's a great summer meal with a side salad and cold drink. Thanks for sharing on Sunday's Best.
ReplyDelete