Every now and then I find something out in blogland that I just have to try. Immediately. This Baked Eggvocado from The Traveling Spoon was one of those finds. I came across this idea Thursday night while checking out one of my favorite blog hops, stopped at the store on my way home from work Friday to pick up some avocados, and whipped these up for Saturday morning breakfast this morning. One word - delicious.
Rachel of The Traveling Spoon wasn't so sure she liked the taste of the baked avocado, but I loved it. It was super creamy, and the runny egg yolk mixed with the creamy warm avocado was a really wonderful flavor combination - even better than I expected. I see so many possibilities with this method - and will definitely be experimenting. Wouldn't it be great with some salsa or pico de gallo spooned over it? Sort of like a baked avocado version of huevos rancheros?? Chipotle? Parmesan and marinara? Lots of thoughts ... lots of thoughts for this one.
And I certainly won't relegate this to breakfast. I see this becoming a regular in my easy-weeknight-dinners rotation.
All you do to make this Baked Eggvocado is slice an avocado in half and hollow out the center a little bit to make it big enough to hold an egg. The half on the left in the photo below has been hollowed out. See how I made it quite a bit bigger than 'the original?' (I ate the scooped out part straight from the spoon ... kinda like a breakfast appetizer, right?)
Then crack an egg into the hollowed out avocado center. A little bit of egg white will spill out ... that's okay, no worries. But, that's why the aluminum foil liner is in the pan ... it'll catch the spilled egg white and keep it from baking onto your pan and having to be scrubbed out later.
Sprinkle each egg with a little salt and pepper (and/or any other seasonings you'd like), and pop the pan in the oven. The only thing I had to change from Rachel's recipe was the cooking time - my oven took a little longer than the 15 minutes suggested.
When these little tasty treats come out of the oven, they'll look like this:
Serve them up with some fruit, and you've got one delicious and healthy breakfast! ... or lunch, or brunch, or dinner ...
Oh, yes ... I will be making these again.
Baked Eggvocado Source: Adapted from The Traveling Spoon (Printable recipe) Ingredients
1 ripe avocado
2 eggs
Salt & pepper, to taste
Other seasonings, as desired
Directions
1. Cut avocado in half, remove pit, and scoop out a little bit of the avocado flesh to make a hollow big enough to hold an egg. Place avocado halves in a small foil-lined baking dish.
2. Crack an egg into each avocado half (don't worry if a little bit of the egg white spills over). Sprinkle each egg with salt, pepper, and/or other seasonings, to taste.
3. Bake at 375 degrees for 20-30 minutes until eggs reach desired doneness. (I baked mine for 28 minutes.) Serve warm.
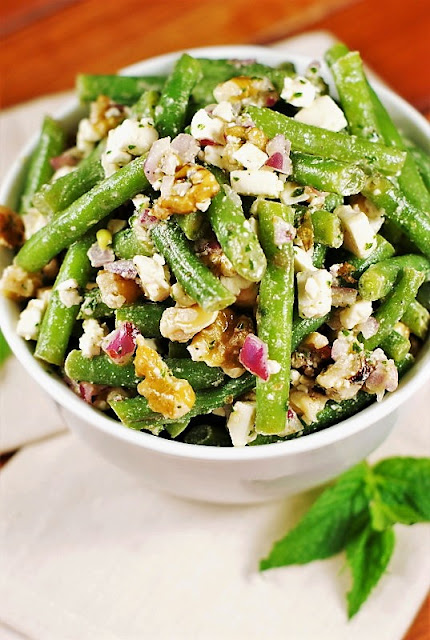
Loaded with fresh broccoli, chopped apple, dried cranberries, crunchy walnuts, and a creamy Greek yogurt dressing, this Broccoli & Apple Salad is packed with great flavor. It's perfect for enjoying with any Fall dinner ... or all-year-round!
When I make broccoli salad, I usually make my Mom's broccoli salad with bacon & dried cranberries. Loaded with craisins (or raisins), red onion, sunflower seeds, and bacon, it's probably the version of broccoli salad most people are familiar with.
And oh, it's delicious.
It delivers up great crunch from its combination of raw broccoli florets, chopped celery, and sunflower seeds. And delivers up fabulous flavor with the tanginess of its sweet-and-sour dressing, smokiness from crumbled bacon, and the sweetness of dried cranberries.
It's one of my go-to dishes, for sure.
Well, the other night I wanted to make some broccoli salad to go along with dinner. I went to the pantry and soon discovered I didn't have all the ingredients on hand.
Namely, I was lacking red onion, sunflower seeds, and, well, bacon.
Wonderful crunch comes from a combination of raw broccoli florets and a hearty dose of walnuts. Fresh apple lends a nice texture element, as well.
But hey - I had the broccoli! It's a start, right?
I turned to the Internet, and quickly found an alternative combination ... this apple version. And what do you know? ~ I had all the ingredients on hand.
I whipped it up for dinner, and was very pleased with the result. Mark and I both declared it a keeper, and decided we really liked the apple in it.
Just as with the classic broccoli salad version, this salad delivers up great crunch. This time, the wonderful crunch comes from a combination of raw broccoli florets and a hearty dose of walnuts. Fresh apple lends a nice texture element, as well.
As for the usual bit of sweetness? Yep, still there. This time from a combination of both dried cranberries and chopped apple.
This version is given a nice creaminess with a stir-in of plain Greek yogurt.
And the characteristic tanginess of the dressing? There, too! But this version is given a nice creaminess with a stir-in of plain Greek yogurt.
It's truly a wonderful flavor when it all comes together.
So, if you have a hankering for broccoli salad and find yourself missing some ingredients ... or just don't feel like frying up some bacon, ... give this apple version a try.
It makes up a really nice and tasty salad, for sure.
Thank you for stopping by The Kitchen is My Playground. We'd love to have you back soon!
broccoli salad recipe, broccoli salad with apples, broccoli salad with Greek yogurt recipe
Loaded with fresh broccoli, chopped apple, dried cranberries, crunchy walnuts, and a creamy Greek yogurt dressing, this Broccoli & Apple Salad is packed with great flavor. It's perfect for enjoying with any Fall dinner ... or all-year-round!
prep time: 20 Mcook time: total time: 20 M
ingredients:
4 c. broccoli florets, chopped
4 green onions, thinly sliced
1 c. chopped unpeeled apple
1/4 c. plain Greek yogurt
2 T. mayonnaise
2 tsp. red wine vinegar
3 tsp. granulated sugar
1/2 c. dried cranberries, chopped
1/2 c. coarsely chopped walnuts or pecans
instructions:
How to cook Broccoli & Apple Salad
In a medium-sized bowl, combine the broccoli florets, green onions, and chopped apple.
In a small bowl, whisk together the Greek yogurt, mayonnaise, red wine vinegar, and sugar. Pour over the broccoli mixture. Stir to coat.
Stir in dried cranberries and nuts.
Refrigerate at least 30 minutes before serving to allow flavors to meld.
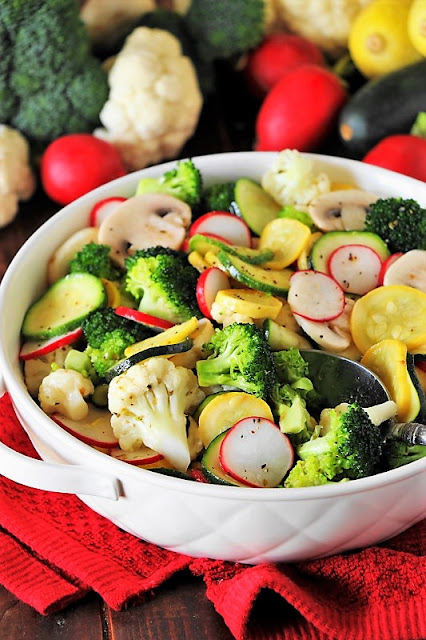
Loaded with chopped greens and minus the traditional potatoes, Clam Chowder with Greens is a lighter Clam Chowder option. Serve up a bowl with some whole-grain bread, and you've got yourself a hearty meal with all the creamy goodness of New England Clam Chowder -- with a little more healthfulness packed in.
The thick and creamy goodness of New England style clam chowder, chock full of clams, cream, and tender potatoes ... it's one of my favorites. But, I felt it necessary to find a lower-fat, lower-carb, healthier version to make at home that didn't induce the usual post-bowl guilt I felt after indulging in it's rich yumminess.
Still, it was difficult for me to let go of the traditional. I did grow up in New England, after all. When I came across a recipe packing in greens and boasting lower calories and carbs, I was skeptical, but tried to hold on to a chowder-open mind. Replace the traditional potatoes with leafy greens?? Really??? Though skeptical, I was intrigued.
So, figuring the worst that could happen was a wasted pot of chowder, I took the plunge and cooked up a batch. Well guess what? This is now my go-to Clam Chowder. No wasted pot of chowder here. While it's not quite as thick as the traditional fare, it's got great flavor and a healthy kick from the greens.
Healthy greens like these turnip and mustard greens ...
... chopped up and cooked up with a whole mess of clams, half-and-half, and turkey bacon.
Serve up a bowl with some whole-grain bread, and you've got yourself a hearty meal with all the creamy goodness of New England Clam Chowder ... with a little more healthfulness packed in.
Thank you for stopping by The Kitchen is My Playground. We'd love to have you back soon!
Clam Chowder with Greens {a lighter New England Clam Chowder option}
Loaded with chopped greens and minus the traditional potatoes, Clam Chowder with Greens is a lighter Clam Chowder option. Serve up a bowl with some whole-grain bread, and you've got yourself a hearty meal with all the creamy goodness of New England Clam Chowder -- with a little more healthfulness packed in.
Prep time: 15 MCook time: 25 MTotal time: 40 M
Ingredients:
1/4 lb. (about 5 slices) turkey bacon
1 T. olive oil
1 large onion, finely chopped
1 garlic clove, minced
6 T. flour
4 c. (about 12 oz.) chopped turnip, mustard, or other greens
2 (14 1/2 oz.) cans chicken broth
3 (10 oz.) cans chopped clams, juice reserved
1 c. milk or half-and-half
1/4 tsp. black pepper
Instructions:
Drain clams, reserving the juice.
Chop bacon; cook in a large saucepan over medium-low heat until crisp. Drain on a paper towel and set aside.
Add olive oil to the same pan, and then add onion and garlic. Cook, stirring occasionally, until onion is translucent, about 8-10 minutes. Add flour and cook and stir about 1 minute, coating onions with the flour. Add chopped greens and cook about 2 minutes.
Stir in chicken broth and reserved clam juice. Bring to a simmer over medium heat and cook for about 10 minutes.
Stir in milk or half-and-half and heat through. Stir in black pepper, clams, and turkey bacon; cook for 1-2 minutes more.
TRACEY'S NOTES:
I usually use a combination of turnip greens and mustard greens.
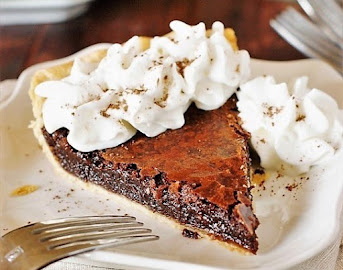
Coconut Cupcakes with Cream Cheese Frosting, straight from The Barefoot Contessa's recipe box, are a moist, decadently rich, and deliciously coconutty cupcake with coconut both in the batter itself and on top of the frosting. A little hint of almond extract gives these extra fabulous flavor.
Today is The Kitchen is My Playground's 1st blogiversary. Wow, what a year it's been! I thought it would be fitting, on this day, to share with you the story of how The Kitchen is My Playground came to be.
It all started with a snowstorm.
As have several big changes in my life. For example, that's how I ended up moving to North Carolina. See ... I had every intention of moving back to Vermont after finishing graduate school in upstate New York. Then it snowed. In late March. Enough to completely bury my car so it wasn't even a slight bump in the vast sea of white. In very. Late. March. Now I live in North Carolina.
I guess snowstorms make me think. Or give me time to think, perhaps. That's probably more the case. Plans and normal routines get put on hold. And there's time. Time to do what you weren't planning to do. During one such snowstorm late last January, this was the case for me.
Trapped in my house by a freakishly big storm for North Carolina (that led to school being cancelled for a week, mind you), I watched the movie "Julie & Julia" - you know, the one about a woman named Julie who decides to cook her way through Julia Child's cookbook and start a blog about it? Well, I had just published a family cookbook and given it as a Christmas present to all the ladies in my family. Inspired by Julie, I decided I should cook my way through my own family's cookbook (though not as ambitiously as Julie, who only gave herself a year!).
To get myself started, I made a list of recipes to get to during 2011 (my "50 for 2011" list) and shared it out with my Facebook friends. They then, in turn, requested updates and that the recipes be shared as I worked through them. I tried sharing the first couple of recipes (that very same week - yes, quick turn-around, but remember school was canceled for a week and I was bound to my house), and, well ... decided perhaps a blog would be a better way. I mentioned the idea to a few friends, and they whole-heartedly encouraged me to start a blog. I wasn't yet convinced.
On the evening of February 5th, 2011, while watching TV with my husband, I decided to just poke around Blogger for a bit and explore these things called blogs. I clicked a few design buttons ... thought, hmmmm, I might be able to figure this out ... thought, I wonder what this button does? Thought, what would I call my blog?
Around 10:00, my husband Mark said goodnight. I replied, "I'm going to play around with this blog stuff just a little bit more. I'll be up soon." At about 3:00 in the morning of February 6th, The Kitchen is My Playground was born. The inaugural post? ... "50 Recipes for 2011" Project - I better get cooking!
Now, though I haven't done very well working through my "50 Recipes for 2011" project list, I've had tons of fun taking on many other cooking adventures throughout The Kitchen is My Playground's first year. I've had tons of fun ... and, sometimes, a bit of frustration (especially with the photography part!!) ... trying to figure out this adventure called blogging. I've had tons of fun 'meeting' readers and other bloggers. Thank you so very much for reading my little space in blogland. And thank you for all your wonderful comments. I truly read and appreciate each and every one, and treasure them like gifts. I'm excited to see what adventures The Kitchen is My Playground's second year holds!
Now, let's celebrate The Kitchen is My Playground's first blogiversary with cupcakes! Barefoot Contessa's Coconut Cupcakes, to be exact.
These are a moist, decadently rich, and deliciously coconutty cupcake selected from my "30 Recipes for 2012" Project. Loaded with butter and sugar, I wouldn't consider them to be "everyday cupcakes" ... I would save them for more of a special occasion. I thought my 1st blogiversay was just such the perfect special occasion!
And oh. my. goodness. - these are so good. A great selection for my celebration! I love that there's coconut both in the batter itself and on the top of the frosting. Yum, yum, yummy. And the hint of almond extract gives these a fabulous flavor.
So, if you've got a special occasion coming up or just feel like indulging in some coconut deliciousness, I highly recommend giving these beauties a whirl. Thank you for joining me on my blogiversary!
Thank you for stopping by The Kitchen is My Playground. We'd love to have you back soon!
Coconut Cupcakes with Cream Cheese Frosting, straight from The Barefoot Contessa's recipe box, are a moist, decadently rich, and deliciously coconutty cupcake with coconut both in the batter itself and on top of the frosting. A little hint of almond extract gives these extra fabulous flavor.
Preheat oven to 325 degrees. Line two muffin pans with paper liners.
With an electric mixer, cream the butter and sugar until light and fluffy, about 5 minutes.
With the mixer on low speed, add the eggs one at a time, scraping down the bowl after each addition. Add the vanilla and almond extracts and 7 oz. of the coconut; mix well.
Combine flour, baking powder, baking soda, and salt. With the mixer on low speed, add flour mixture alternately with buttermilk, beginning and ending with flour mixture. Mix until just combined.
Fill each cupcake paper about 3/4 full with batter.
Bake for 25 to 35 minutes until the tops are light brown and a toothpick inserted in the center comes out clean. Allow to cool in the pan for 15 minutes. Remove to a cooling rack and cool completely.
Prepare Cream Cheese Frosting:
With an electric mixer, blend together the cream cheese, butter, and vanilla and almond extracts. Add the confectioner's sugar and mix until smooth.
Frost each cupcake generously with cream cheese frosting and sprinkle with the remaining 7 ounces of coconut.
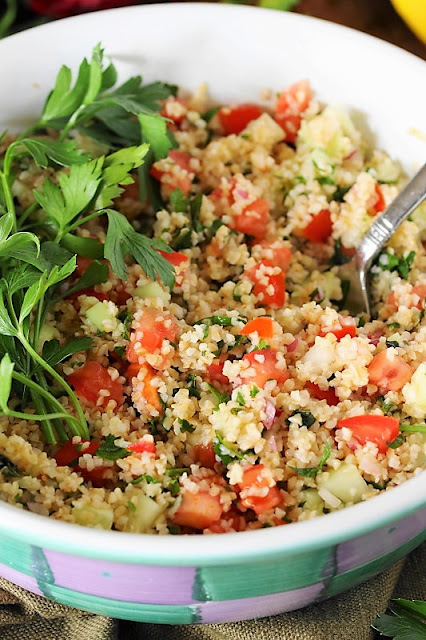
Follow these steps to whip up a big batch of Tabouli ~ a healthy and delicious Middle Eastern bulgur wheat and vegetable salad. It's tasty as a salad, sandwich filling, or as a dip with crackers.
Are you ready for some football?!? Yes, I will be watching the Superbowl this weekend. Just quietly at home. But I'll definitely be watching. I'm hard-pressed to say which part I like best ... the game itself or all the new commercials. It's probably a tie in my book.
Now, I love all the creamy delicious dips and fabulous finger foods we typically think of as Superbowl fare just as much as the next guy (case in point - my hot corn dip, crescent sausage bites, or creamy BLT dip). But I thought I'd offer up an on-the-healthy-side "girly" option, too - tabouli.
I just absolutely adore tabouli. Huge crush.
Some of you may be saying, huh? What's tabouli (or, 'taboulleh' as it's also spelled)?
In a nutshell, it's a Middle Eastern salad traditionally made with bulgur wheat, fresh parsley, fresh mint, cucumbers, tomatoes, lemon juice, and olive oil. Though, I eat mine more as a dip or spread than a salad. And oh, it's yummy.
Bulgur wheat, the mainstay of tabouli, comes in a box and is typically found in the cereal aisle of the grocery store somewhere near the oatmeals, or in the ethnic food section. Straight out the box, it's hard itty-bitty nuggets ...
... but when soaked in boiling water, it fluffs up and becomes a tasty little grain.
To make a flavorful bowl of tabouli, after the bulgar wheat has soaked for a bit, you add in lots of fresh parsley, fresh mint, red onion, olive oil, and fresh lemon juice.
The recipe calls for 1/2 cup chopped fresh mint, but I don't really measure. I just chop up about this much mint:
A little extra mint or parsley never hurts.
Stir this all together, and then refrigerate the mixture for about three hours. This lets all the flavors come together, and gives the bulgur wheat a nice little time to continue to soften.
After the three hours of chilling time, gently mix in diced cucumber and tomato. Then you're ready to serve it up as a salad or a dip for pita chips and crackers ...
... or, as one of my absolute favorite sandwiches - Hummus & Tabouli Pita Pockets. I just love, love, love the combination of hummus and tabouli. If you're a fan of either hummus or tabouli, you've got to try them together. Fantastic. I promise.
No matter what you choose to tickle your taste buds on the big game day, I wish you all a happy Superbowl Sunday! I think it's going to be a great game.
Follow these steps to whip up a big batch of Tabouli ~ a healthy and delicious Middle Eastern bulgur wheat and vegetable salad. It's tasty as a salad, sandwich filling, or as a dip with crackers.
prep time: 30 Mcook time: total time: 30 M
ingredients:
1 c. dry bulgur wheat
1 ½ c. boiling water
1 ½ tsp. salt
1/4 c. fresh lemon juice (or fresh lime juice)
1 tsp. crushed fresh garlic
1/2 c. finely chopped red onion
1/2 c. chopped fresh mint (or about 1 tsp. dried mint)
generous 1 c. chopped fresh parsley
1/4 c. extra virgin olive oil
1/8 tsp. Freshly ground black pepper
2 medium tomatoes, diced
1 c. chopped cucumber
instructions:
How to cook How to Make Tabouli {or Tabbouleh}
Combine bulgur wheat, boiling water, and salt in a bowl. Cover and let stand about 20 minutes, until bulgur wheat is chewable.
Add lemon juice, garlic, olive oil, black pepper, mint, parsley, and onion. Mix thoroughly. Cover and refrigerate 2-3 hours to let the flavors meld and the bulgur wheat to continue to soften.
Add tomatoes and cucumbers and mix gently. Taste; adjust salt and pepper if needed.
Serve as a salad, as a dip with pita chips or crackers, or in sandwiches.
TRACEY'S NOTES
Tabouli is especially great as a sandwich with hummus in pita pockets. It's one of my favorites!
Tabouli is also good with any of the following additions - 1/2 c. cooked chickpeas, 1/2 c. grated carrot, scallions, or a little feta cheese.
Mocha Swirl Cookies ~ Coffee and chocolate shortbread doughs make for a beautiful (and tasty!) swirled cookie treat.
Mocha. Check! Swirl. Check! Cookies. Double check!! I love all those words, so how could I not give these cookies a try? And they're so pretty! As soon as I saw these on Sprinkle Bakes' site, I knew I had to make them. Onto my Pinterest board they went.
I'll be up-front that making these cookies does entail quite a few steps, but if you like mocha flavor and shortbread'ish cookies, they're worth it. You get started by preparing a base dough that then gets divided in two. Half becomes coffee dough, using instant coffee granules (how easy!), and the other half becomes chocolate dough. These then get rolled together jelly-roll style to form the gorgeous swirl.
Sprinkle Bakes advises that the chocolate dough is a tad prone to cracking. If that happens, she says to STOP and fix it before continuing to roll. Well ... yes, I discovered first-hand that the chocolate dough does indeed crack quite easily. See that big ol' crack all the way down my dough roll?
But no worries. I just stopped, as advised, and gently rubbed and pinched the dough back together. It worked, and the dough log was none the worse for the wear.
Once the dough is rolled, chill it for at least an hour before slicing. Then give it a chop in half ... Check out that gorgeous spiral! Success!!
Then slice into 1/4" slices.
My slices squashed a little bit and the 'tails' of the end came a bit loose when I cut them. Once I placed the slices on the cookie sheet, I just gently reshaped them. All was well.
Once out of the oven, behold your beautiful spiral. Pretty, pretty, pretty! Oh, and yummy, too. Now stay tuned ... because this method gave me an idea that I just have to try. It's coming soon!
Thank you for stopping by The Kitchen is My Playground. We'd love to have you back soon!
mocha swirl cookies recipe, swirl cookies recipe, chocolate coffee cookies
Coffee and chocolate shortbread doughs make for a beautiful (and tasty!) swirled cookie treat.
Prep time: 2 H & 45 MCook time: 20 MTotal time: 2 H & 65 M
Ingredients:
3 c. all-purpose flour
1 1/2 tsp. baking powder
1/4 tsp. salt
1 c. butter, softened
1 c. sugar
1 egg
1 tsp. vanilla extract
1 1/2 tsp. instant coffee
2 oz. dark chocolate, melted and cooled slightly
Instructions:
Prepare the Base Dough:
Combine flour, baking powder, and salt; set aside.
With an electric mixer, beat butter until creamy (about 3 to 4 minutes). With the mixer running at low speed, gradually add the sugar to the butter.
Add egg and vanilla; beat well.
Add flour mixture, mixing until just combined. Scrape down the sides of the bowl and mix again until well incorporated.
Remove dough from the mixer and divide it into two equal portions.
Prepare the Coffee Dough:
Return half of the dough to the mixer.
Place instant coffee granules in a small zip-top plastic bag; crush fine with a meat mallet.
Add crushed instant coffee granules to the dough in the mixer bowl. Mix until combined and dough is speckled with coffee granules.
Remove coffee dough from the mixer.
Prepare the Chocolate Dough:
Return the other half of the dough to the mixer.
Add the melted chocolate. Mix until well combined.
Make & Bake the Cookies:
Roll out each dough separately between two sheets of wax paper to about 1/4" thickness. Each piece should be a 9 x 14" rectangle. Chill on baking sheets in the refrigerator for at least 1 hour.
When dough is thoroughly chilled, place the coffee dough on top of the chocolate dough. With a rolling pin, gently press together the two pieces of dough. Let the dough stand at room temperature until malleable.
Using a sharp knife, cut down one of the 14" sides to even the dough up. This provides an even start for the spiral when you roll up the dough.
Very slowly and carefully, roll the dough very tightly jelly-roll style, using the wax paper to guide the dough. If the chocolate dough cracks while rolling, stop and gently press and pinch the dough back together before continuing to roll. Continue to roll very slowly.
Once rolled into a log, cover the dough roll in plastic wrap and chill at least 1 hour. Turn the dough log while chilling at least once (or more) so it doesn't become flat on one side.
Remove dough log from the refrigerator. Uncover and slice in half with a sharp knife. Place half of the dough log back in the refrigerator to keep it chilled while you slice the other half. Using a sharp knife, slice dough into 1/4" thick rounds. If the ends of the spiral come loose or the shape warps, gently reshape once the slices have been placed on a cookie sheet.
Bake at 350℉ for 10 - 12 minutes. Let cool on the baking sheet for 2 - 3 minutes before transferring to a cooling rack.


%20swirled%20cookie%20treat.%20%20www.thekitchenismyplayground.com)