


Are you a lover of chocolate and cherries together? Give Mom's Chocolate Cherry Upside-Down Cake a try! With it's tasty rich flavor and how easy it is to make, I sure still love it today just as much as I did as a kid.
CLICK HERE TO PIN THIS FOR LATER
CLICK HERE TO PIN THIS FOR LATER

Growing up, my Mom used to make this Chocolate Cherry Upside-Down Cake all the time. And I had literally forgotten about it for years upon years, until I was thumbing through our family cookbook last week.
When I came to the page in the cookbook with this cake recipe, I immediately thought back to how much I loved it as a kid. And how I just loved the way the rich chocolate scratch-made cake combined with juicy cherries in every bite.
I of course had an immediate craving to make this blast-from-the-past delicious cake.
Now, the funny thing is I actually had to call my Mom with a question about the recipe in the middle of making the cake. That's how long it had been since I'd made it ... I forgot the recipe!
I had the batter for my Chocolate Cherry Upside-Down Cake all mixed up and was about to pour it in my baking pan when I thought, "Hey, I didn't put any eggs in the batter." So I scanned back through my copy of the recipe ... and, there were no eggs listed.
I was confused.
I thought to myself, "I don't recall this being an egg-free cake!" Certainly, I must have copied the recipe down wrong. So I hopped on the phone to Mom real quick and asked her about the recipe. Sure enough ... Mom's Chocolate Cherry Upside-Down Cake is a cake without eggs.
And let me just tell you, it's sure a very tasty cake without eggs indeed!
I of course had an immediate craving to make this blast-from-the-past delicious cake.
Now, the funny thing is I actually had to call my Mom with a question about the recipe in the middle of making the cake. That's how long it had been since I'd made it ... I forgot the recipe!
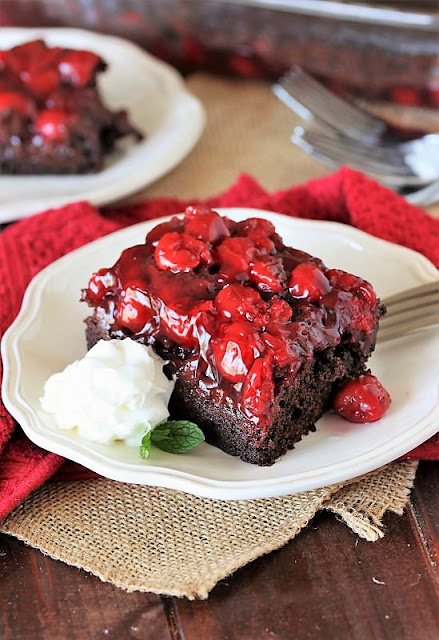
The chocolate part of the cake bakes up really rich and fudgy. It's then complimented beautifully by the sweetness of cherry pie filling that comes along with every bite.
I had the batter for my Chocolate Cherry Upside-Down Cake all mixed up and was about to pour it in my baking pan when I thought, "Hey, I didn't put any eggs in the batter." So I scanned back through my copy of the recipe ... and, there were no eggs listed.
I was confused.
I thought to myself, "I don't recall this being an egg-free cake!" Certainly, I must have copied the recipe down wrong. So I hopped on the phone to Mom real quick and asked her about the recipe. Sure enough ... Mom's Chocolate Cherry Upside-Down Cake is a cake without eggs.
And let me just tell you, it's sure a very tasty cake without eggs indeed!

The chocolate part of the cake bakes up really rich and fudgy. It's then complimented beautifully by the sweetness of cherry pie filling that comes along with every bite.
When served up with a dollop of whipped cream, it's kind of like getting an easy version of a Black Forest cake. Total yum.
Be sure to move the cherries around to get them evenly distributed in the bottom of the pan. That way, every piece of the cut cake will end up with some cherries.
And while the chocolate cake part of Mom's Chocolate Cherry Upside-Down Cake is scratch-made, it's still a super easy recipe to make.
Start by spreading a can of cherry pie filling evenly in the bottom of a 9x13-inch baking pan.
Be sure to move the cherries around to get them evenly distributed in the bottom of the pan. That way, every piece of the cut cake will end up with some cherries.

Then start mixing up a simple chocolate cake batter.
Stir together flour, sugar, baking cocoa, baking soda, and a touch of salt in a bowl ...

In a separate bowl, stir together water, oil, vinegar, and some vanilla extract.
Then add the liquid ingredients all at once to the prepared dry ingredients.
Stir everything together until the mixture is moistened and just combined ~ don't over mix. The batter will be quite thick and kind of lumpy looking.


Then pop the cake in the oven and bake it up. The cake is done when a wooden pick inserted in the middle comes out clean with no batter or crumbs on it.
Since there are no eggs in the cake, the cake gets its rise mostly from the interaction of the baking soda and vinegar in the batter. You may be skeptical about the no-eggs, but the cake really does bake up nicely even without them.
Now mind you, since it's an upside-down cake, when this Chocolate Cherry Upside-Down Cake comes out of the oven, it's not much to look at.
Now mind you, since it's an upside-down cake, when Mom's Chocolate Cherry Upside-Down Cake comes out of the oven, it's not much to look at. Nope, it's certainly not going to win any cake beauty contests.
Basically, it looks like it's just an unfrosted chocolate sheet cake.
But when you cut a piece and flip it over onto a serving plate?
Now that's a completely different story!
Once this cake is cut and served up, the juicy bright red cherries glistening on top of each slice are a thing of pure cake beauty.

Serve each piece up just as it is or with a dollop of whipped cream for a very tasty little treat.
So if you're a lover of chocolate and cherries together like me, definitely give Mom's Chocolate Cherry Upside-Down Cake a try. I sure do still love it today just as much as I did as a kid.
And believe me, I'm not going to forget about this cake recipe for years upon years again!
Check out these other super tasty chocolate cake recipes:

Thank you for stopping by The Kitchen is My Playground. We'd love to have you back soon!
Yield: 12-16 servings
Mom's Chocolate Cherry Upside-Down Cake
Are you a lover of chocolate and cherries together? Give Mom's Chocolate Cherry Upside-Down Cake a try! With it's tasty rich flavor and how easy it is to make, I sure still love it today just as much as I did as a kid.
prep time: 15 Mcook time: 35 Mtotal time: 50 M
ingredients:
- 1 (21 oz.) can cherry pie filling
- 2 ¼ c. all-purpose flour
- 1 ½ c. granulated sugar
- 3/4 c. baking cocoa
- 1 ½ tsp. baking soda
- 3/4 tsp. salt
- 1 ½ c. water
- 1/2 c. canola or vegetable oil
- ¼ c. white vinegar
- 1 ½ tsp. vanilla extract
instructions:
How to cook Mom's Chocolate Cherry Upside-Down Cake
- Grease a 9x13” baking pan. Spread the cherry pie filling evenly over the bottom of the pan. Move the cherries around as needed to get them evenly distributed in the bottom of the pan.
- In a large mixing bowl, place the flour, sugar, cocoa, baking soda, and salt. Stir until well combined.
- In another bowl, combine the water, oil, vinegar, and vanilla extract. Whisk until well mixed.
- Add the liquid ingredients to the flour mixture all at once. Stir until the mixture is moistened and just combined (do not over mix).
- Carefully pour and spread the batter evenly over the cherries in the baking pan.
- Bake at 350℉ for 35-40 minutes, or until a wooden pick inserted in the middle comes out clean with no batter or crumbs on it.
TRACEY'S NOTES
- There are indeed no eggs in this recipe ... that is not a typo. It's an egg-free chocolate cake.
You might also like these other cherry-licious treats:


Affiliate
links are included in this post. I receive a small amount of compensation for
anything purchased from these links,at Amazon.com at no additional cost to you.

Oh excellent! How nice to find this recipe reminiscent of a dump cake my dear aunt made but without the box mix. I love a good cake that doesn't need frosting. Thanks!
ReplyDeleteYou are welcome, when you make it let us know how it turns out.
DeleteChocolate and cherry are such great partners! What a deliciously easy vintage recipe, Tracey. Thank you so much for sharing with the Hearth and Soul Link Party. I’m featuring this post at the party this week. Hope to ‘see’ you there! Have a wonderful week ahead!
ReplyDeleteWow......easy as well as delicious! My family loved this cake. You have so many great sounding recipes, so many I want to try!
ReplyDeleteThank you for your comments! I am so glad to hear your family enjoyed the cake. Please let us know what you family thinks about the other recipes.
DeleteYou don't mention how you get it out of a9 × 13 pan ?
ReplyDeleteWe hope this helps: we cut one piece at a time and turn it over rather than taking the entire cake out of the pan at once.
DeleteI'm skeptical that a 21 oz can of cherry pie filling will cover the bottom of a 9x13" pan.
ReplyDeleteAs long as it is not too thick it will cover the pan. We hope you enjoy it.
DeleteThe cake was phenomenal I’m literally speechless over this cake my son loved it
ReplyDeleteThe cake was a winner thank you for sharing your wonderful recipe with us
Definitely 5 stars
wonderful, we love to hear that our readers enjoy the recipes.
DeleteThanks so much for posting! This seems like a delightfully simple base chocolate cake recipe - mine's cooling right now, and if it turns out well this is sure to become a staple in my house.
ReplyDeletehas anyone ever tried to flip it out after putting it in oven i saw were you serve a piece at a time. This one is for a client i think she belives its supposed to be like pineapple upside down
ReplyDeleteI have never seen this recipe anywhere except within my family handwritten cookbooks. A recipe very similar to this was my grandmother's recipe and has been my birthday cake for most of my 40 plus years. In recent years we decided it needed more cherries and started using 2 cans of cherries.
ReplyDeleteThis sounds wonderful. I love the cake recipe, it is the Wacky Cake recipe and it is my favorite one of all time. Never thought to make it into an upside down cherry cake. All my favs in one place. Will be making this.
ReplyDeleteCan you use a cake from a box
ReplyDeleteWe have never tested the recipe with a cake mix so we cannot vouch for making the recipe with a mix. If you try it please stop back by and let us know how it turned out.
Delete