Aren't these little pumpkins adorable? Well not only are they adorable, easy No-Bake Peanut Butter Pumpkins are just plain fun to make and to eat, too! They sure make for one cute and tasty little fall treat, perfect for Halloween, Thanksgiving, or any fun fall event.
Looking for a cute and tasty little fall treat? Well, they don't come much more fun and adorable than these easy no-bake Peanut Butter Pumpkins! They're just the perfect little cuties for Halloween, Thanksgiving, or any other fun fall event.
And when I say easy No-Bake Peanut Butter Pumpkins, I do truly mean easy. The homemade candy corn I've also made as a fun fall treat? Now, that's another story. -- While certainly a fun project, making your own candy corn doesn't quite fall in the "easy" category.
But these pumpkins? -- They definitely count as easy.
Simply mix up a quick peanut butter-based dough, roll the dough into small balls, mark with "pumpkin lines," and top with a mini chocolate chip stem. -- That's all there is to it! So even if you're not a whiz in the kitchen, you can certainly whip up a plateful of these cute little sweet treats, for sure.
Peanut Butter Pumpkins make for one cute and tasty little fall treat, perfect for Halloween, Thanksgiving, or any fun fall event.
What's to Love About This Recipe:
- Easy - Mix up a quick no-bake dough, roll into balls, and add "pumpkin lines" and a chocolate chip stem. That's all it takes to whip up these easy sweet treats.
- Adorable - When it comes to fall treats, they don't come much more adorable than these bite-sized mini pumpkins!
- Delicious - No-Bake Peanut Butter Pumpkins are little bites of rich & creamy peanut butter deliciousness, for sure.
- A fun fall treat - Peanut Butter Pumpkins make for one cute and tasty little fall treat, perfect for Halloween, Thanksgiving, or any fun fall event.
No-Bake Peanut Butter Pumpkins Ingredients:
To whip up a batch of easy No-Bake Peanut Butter Pumpkins, you'll need:
- Creamy peanut butter - The base of the pumpkins' peanut butter dough. Creamy peanut butter creates a nice soft texture for the pumpkins. We do not recommend substituting crunchy peanut butter in its place.
- Powdered sugar - Sweetens and creates the "bulk" of the peanut butter mixture. To maintain the pumpkins' creamy texture, do not substitute regular granulated sugar, as this would create a grainy texture.
- Butter - Brings added creaminess, richness, and a bit of "silky" feel to the peanut butter dough. Be sure the butter is softened so it smoothly incorporates into the dough.
- Water - Brings the peanut butter mixture together into a dough, and helps easily and evenly distribute the vanilla extract and food coloring throughout the dough.
- Vanilla extract - Rounds out and gives a nice boost to the flavor of the peanut butter mixture. For the best result, use 100% pure vanilla extract rather than imitation.
- Red & yellow food coloring - Brings an orange tint to the peanut butter pumpkins. I use gel food coloring, but either gel or regular liquid food coloring works just fine. You can use more or less food coloring to suit your desired color preference, or leave it out altogether if you prefer.
- Mini chocolate chips - Form the stems of the pumpkins. Do not substitute regular-sized chocolate chips, as they are too big.
- Toothpicks - Used to create the pumpkins' "pumpkin lines," giving them the distinct look and character of actual pumpkins.
How to Make Easy No-Bake Peanut Butter Pumpkins:
No-Bake Peanut Butter Pumpkins are quite easy to make. To get these little cuties going, start by whipping up a very simple peanut butter dough.
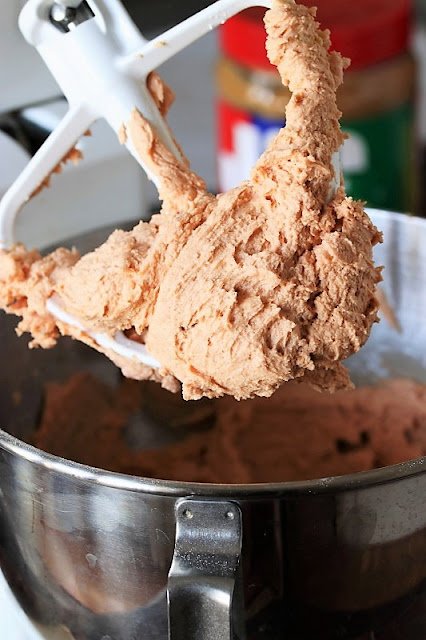
Place some butter, peanut butter, and powdered sugar in a bowl and beat with an electric mixer until it's well combined and smooth. If your butter is softened, the mixture comes together nice and smooth in no time at all.
The easiest way to get the food coloring to mix evenly throughout the dough is to mix it in with the water before you add it to the dough.
Then add in a little bit of water, some vanilla extract, and a few drops of red and yellow food coloring.
The easiest way to get the food coloring to mix evenly throughout the dough is to mix it in with the water before you add it to the dough. That way, you easily get it mixed in and get an even color -- instead of ending up with red or yellow streaks in the dough that are nearly impossible to stir out.
If you're opposed to food coloring, by all means, leave it out. The pumpkins will just be a light tan color instead of on the light orange side.
Once the dough is mixed, chill it for a few minutes ... about 20 or so. This makes it just a little less sticky to work with when forming it into pumpkins.
Working with a small piece of dough at a time, use your hands to roll some dough into a small ball. The peanut butter mixture is very rich, so keep your dough balls on the small side.
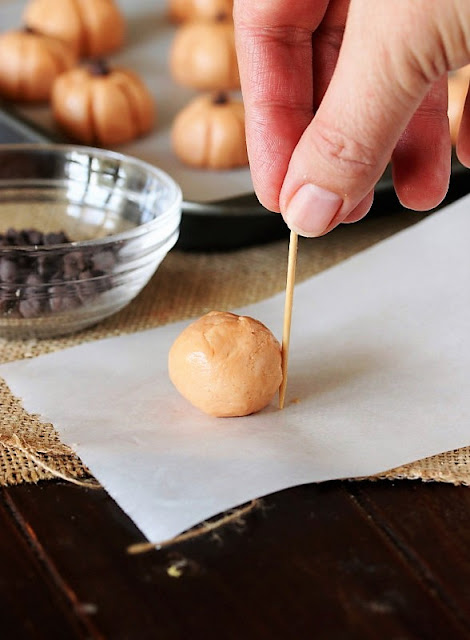
Then use a toothpick to add vertical lines to make the dough ball look like a pumpkin.
The easiest way to add "pumpkin lines" is to place a toothpick vertically up against the dough ball, like this:
And then gently lean the toothpick in, pressing it into the dough ball, like this:
Press the toothpick in pretty good to get a nice indentation.
In the past, we've tried drawing the lines on with the end of the toothpick instead of using the "press in" method -- that didn't work very well at all.
Use the toothpick to repeat indentations all the way around the dough ball, making about 5 or 6 "pumpkin lines" total.
Finally, pop a mini chocolate chip on top for a stem, and you're done!
You'll have an adorable little peanut butter pumpkin that looks about like this:

So cute! I love that each pumpkin comes out with its own look and "personality." -- Just like all of us, no two are alike.
When our daughter was young, she had a lot of fun making her pumpkins all different sizes ... even making cute little baby pumpkins. Not to mention, there may have been a few peanut butter snowmen, too.

No-Bake Peanut Butter Pumpkins are a great little family project to do with the kids. It's kind of like modeling with edible play-dough. -- And hey, you get to eat your creations.
So grab your jar of peanut butter and whip up a batch of adorable Peanut Butter Pumpkins for Halloween, Thanksgiving, or any fun fall event. Because these little cuties are just plain fun to make, and even more fun to eat!
Check out these other Halloween-inspired treats:

Thank you for stopping by The Kitchen is My Playground. We'd love to have you back soon.
Yield: 50-60 pieces

Easy Peanut Butter Pumpkins
Not only are they adorable, easy Peanut Butter Pumpkins are just plain fun to make and sure make for one cute & tasty little fall treat! Perfect for Halloween, Thanksgiving, or any fun fall event.
prep time: 1 H & 45 Mcook time: total time: 1 H & 45 M
ingredients:
- 3/4 c. (6 oz.) creamy peanut butter
- 3 c. (16 oz.) powdered sugar
- 1/2 c. (1 stick) butter, softened
- 1/4 c. water*
- 1 tsp. vanilla extract
- 7 drops each red & yellow food coloring (I use gel food coloring)
- mini chocolate chips
- toothpicks for forming the pumpkins
instructions:
How to make Easy Peanut Butter Pumpkins
- With an electric mixer, mix together peanut butter, powdered sugar, and butter until well combined and smooth.
- Place vanilla extract and food coloring in the water. Add water to the peanut butter mixture and mix until combined. (NOTE: Use more or less food coloring to suit your desired color.)
- Chill for about 20 to 30 minutes.
- Shape a small piece of the peanut butter dough into a small ball and place it on a flat surface. (The peanut butter mixture is very rich, so keep your dough balls on the small side.)
- To make pumpkin stripes: Place a toothpick vertically up against the side of the dough ball. Gently tip the toothpick toward the dough ball to press it into the dough, creating a vertical indentation line in the dough. Repeat to create about 5 or 6 lines around the dough ball.
- Top with a mini chocolate chip for a stem.
- Repeat with remaining dough.
- Store finished peanut butter pumpkins in the refrigerator.
TRACEY'S NOTES
- * The dough can easily become too sticky, so be sure to not measure over the 1/4 cup of water. If anything, err on the side of using slightly less than 1/4 cup.
- Makes about 50-60 pumpkins, depending on the size you make them.
Affiliate
links are included in this post. I receive a small amount of compensation for
anything purchased from these links at Amazon.com , at no additional cost to you.


You always amazes me with the cute, fun, creative, tasty food ideas you post. Will be making this tonight. Thank you
ReplyDeleteOh, thank you so much for your kind words, Ivory Jean! Enjoy the pumpkins!
DeleteThese are so adorable! What a fun idea to do with kids!
ReplyDeleteTracey, I love these adorable little pumpkin treats! Even the color is perfect! So cute! I've chosen you as one of my features on Share Your Style tonight. I hope we see you over at the party.
ReplyDeleteOh how cute and yummy! I'm saving this recipe and sharing it, too. Have a spooktacular week & if you love mewsic then stop by for a dance with me! ;)
ReplyDeleteCurious as a Cathy
They are so clever! And super cute too :)
ReplyDeleteWhat a fun fall treat! Thanks for sharing with us at the Snickerdoodle Link Party - this will be one of my features this Saturday!
ReplyDeletethese are so cute! Thanks for sharing at the What's for Dinner party!
ReplyDeleteThis is so cute, my kids would be thrilled to make & eat these. Definitely going to make some. Saw you at My Girlish Whims party. Would love if you shared it at my Craftastic Link Party: http://www.sewcando.com/2019/10/halloween-fall-fun-craftastic-monday.html
ReplyDeleteThank you and we will linkup and share with you.
ReplyDeleteThanks for sharing at the What's for Dinner party. Have a great week.
ReplyDeleteYour recipes always look so good and so fun Tracey - this one is just adorable!
ReplyDeleteThanks for sharing at Inspire Me Monday at Create With Joy.
It's always a pleasure to feature you (congrats!) :-)
These pumpkin treats are so cute!! Thank you for sharing at Tuesday Turn About Link Party.
ReplyDeleteCute and delicious! I love anything with peanut butter so I can't wait to try it out. #HomeMattersParty
ReplyDeleteThese are so cute and what a perfect addition to a dessert table or to wrap up as a hostess gift. So many possibilities. Featuring when my link party opens.
ReplyDeleteThank you for the feature. We hope all your readers enjoy!
Delete