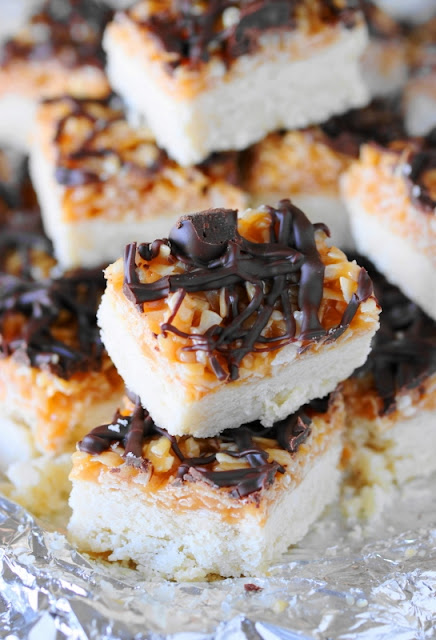
No need to wait for "the box" at "cookie time" ~ make your own homemade Samoas Bars and enjoy great Samoas taste any time! And believe me, making iconic Samoas cookies in bar form is way easier than making the homemade cookies themselves. {Yes, I tried both.}
CLICK HERE TO PIN THIS FOR LATER

CLICK HERE TO PIN THIS FOR LATER

I am hard-pressed to find someone who doesn't like the iconic Samoas Girl Scout cookie. They're pretty much up there in Girl Scout notoriety with the Thin Mint, am I right? But what's a Samoas-lover to do in the off season?
Well, with this homemade Samoas Bars recipe, there's no need to wait until "cookie time" to enjoy their wonderful flavor. You can whip up a batch any time!
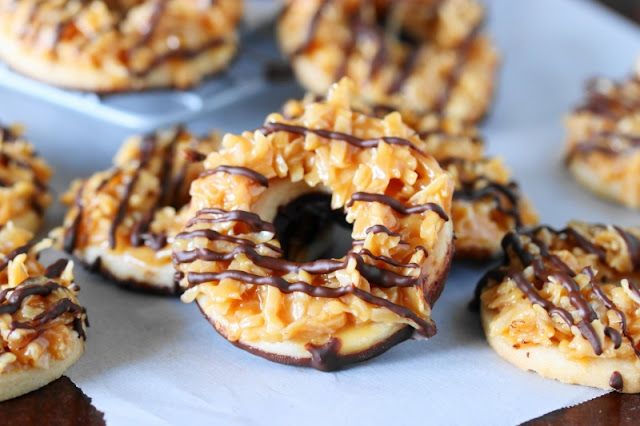
As a full-time food blogger {and Mom, that is}, I get to do some crazy-fun things for my job. {Like the time I went to Sister Schubert's house in Alabama to cook and enjoy Thanksgiving dinner with her, for example. Oh, that was indeed crazy-fun.} One of my latest assignments for the Food.com site was to photograph the process and write a how-to article for making homemade Samoas cookies.
Check out these little beauties ... they came out gorgeous, don't you think?
While they are indeed beautiful, these little suckers were a total pain-in-the-you-know-what to make. And while they are aMAZingly delicious, I knew there was no way on God's green Earth I would ever undertake the process of making them again. Way too many steps and too much tedious stuff for my liking ... rolling, cutting, chilling, spreading, dipping ...
I figured there had to be an easier way to enjoy their deliciousness.
And I figured if I was looking for an easier way, then many of you might be, too.
So I set about seeing if a no rolling & cutting involved, no dipping, less-fuss bar version would work and taste just as good.
I'm happy to report with a very resounding "yes," that YES, a less-fuss bar version does indeed work! With the same yummy delicious taste.
And believe me, the bar form is way easier than making the homemade cookie version themselves.
Instead of rolling and cutting dough into fussy little donut shapes, I simply pressed that same shortbread dough into a 9x13-inch baking dish to form a shortbread crust layer. I then topped the baked crust with the same coconut-caramel topping used in making the cookie version, spreading it on the bar crust in one shot instead of tediously smearing it on each cookie individually.
Finally, I gave the top of the bars a good drizzle with melted chocolate ... no dipping involved. Which did the trick in giving the same great taste as the cookie version, despite the fact the bars' bottoms aren't dipped in chocolate like with the cookies.
But if you're a Samoas cookie purist and feel the bars' bottoms should be chocolate-dipped, by all means simply melt some extra chocolate and dip the bottom of each cut bar in chocolate. As for me, I'm just fine skipping that step!
So if you want to enjoy the great taste of Samoas cookies in a homemade version, but don't want to spend the time in the kitchen making the exact look-alike, this homemade Samoas Bars recipe is for you.
All the yumminess of the iconic cookie with the convenience of an easier-to-make, very easy to cut and serve {even-easier-to-gobble-down} bar version. A perfect option for the cookie "off season", if you ask me.
Thank you for stopping by The Kitchen is My Playground. We'd love to have you back soon!
Yield: about 20-24 bars

Homemade Samoas Bars
No need to wait for "the box" at "cookie time" ~ make your own homemade Samoas Bars and enjoy great Samoas taste any time! And believe me, making iconic Samoas cookies in bar form is way easier than making the homemade cookies themselves. {Yes, I tried both.}
prep time: 25 Mcook time: 45 Mtotal time: 70 M
ingredients:
Crust:
- 1 c. (2 sticks) unsalted butter, at room temperature
- 1/2 c. granulated sugar
- 2 c. all-purpose flour
- 1/4 tsp. baking powder
- 1/4 tsp. salt
- 2 T. milk
- 1 tsp. vanilla extract
Coconut-Caramel Topping:
- 1 (11 oz.) bag soft caramels {about 40 caramels, I use Kraft caramels}
- 1/3 c. milk
- 1/8 tsp. salt
- 2 c. shredded sweetened coconut
Chocolate Drizzle:
- 1/2 c. semi-sweet chocolate chips
- 1/2 tsp. canola oil
instructions:
How to cook Homemade Samoas Bars
Crust:
- Place butter in a mixing bowl. With an electric mixer, beat butter at medium-high speed about 30 seconds until fluffy. Add sugar and vanilla extract. Beat until light and fluffy, about 1 to 2 minutes.
- In a separate bowl, whisk together flour, baking powder, and salt. Gradually add to the butter mixture, mixing after each addition until just combined. Add milk, mixing until the dough comes together in big pieces.
- Line a 9x13-inch baking dish with aluminum foil, letting the foil slightly overhang the edges of the pan {this step is optional, but makes it really easy to get the bars out of the pan after baking}. Lightly spray foil {or pan if not using foil} with nonstick cooking spray. Use your fingers to pat dough evenly into the bottom of the pan.
- Bake at 350℉ for 30 minutes. Set aside.
Toasted Coconut:
- Line a baking sheet with parchment paper or aluminum foil.
- Spread coconut evenly onto the baking sheet.
- Bake at 350℉ for 12-18 minutes, stirring frequently, until lightly browned and toasted on the edges. Keep a close watch on the coconut, as it can go from okay to burned very quickly. Set aside.
Coconut-Caramel Topping:
- Place unwrapped caramels and milk in the top of a double boiler. {If you don't have a double boiler, use a metal bowl or a smaller saucepan set over a larger pot.}
- Heat over simmering water, stirring frequently, until caramels are fully melted.
- Stir in salt and toasted coconut.
Chocolate Drizzle:
- Place chocolate chips and canola oil in a small microwaveable bowl. Melt the chocolate chips by heating for about 45 seconds in the microwave; stir until smooth. If chocolate is not fully melted, heat for an additional 10 seconds and stir again. {Or, melt in a small saucepan over medium-low heat, stirring frequently.}
- Use a spoon to drizzle melted chocolate over the coconut-caramel topping. Allow chocolate to set completely before cutting. {Refrigerate for about 15 minutes to speed up the process, if you'd like.}
- When ready to cut, remove bars from the pan by lifting up on the overhanging foil edges. Place on a cutting board and cut into small squares with a sharp knife.
- Store bars at room temperature.
You might also like these other sweet treats:
Affiliate
links are included in this post. I receive a small amount of compensation for
anything purchased from these links, at no additional cost to you. Thank you
for supporting The Kitchen is My Playground when you shop at Amazon.com .
.


No way! Samoas are my favorite girl scout cookie. Your variation looks amazing! I want to extend an invite for you to share this at our weekly link party which runs from Wednesday-Monday every week. Hope to see you there! http://www.thelifeofjenniferdawn.com/2017/02/handmade-gifts-for-any-occasion-and.html
ReplyDeletePinned! thank you for sharing at the Thursday Favorite Things blog hop. I featured you on facebook and google plus and of course I pinned too xo
ReplyDeleteLOVE these bars! Thanks for linkin' up with What's Cookin' Wednesday!
ReplyDeleteYour Homemade Samoas Bars look amazing! Thanks so much for sharing your awesome recipe with us at Full Plate Thursday and you have a great week!
ReplyDeleteMiz Helen
Love how easy these are to whip up! Scheduled to pin - Thank you for sharing wth us at Hearth and Soul! Hope to 'see' you again this week, Tracey!
ReplyDelete