Warm Rosemary Olives

May 27, 2011
Warm Rosemary Olives may be the simplest little appetizer ever ... but they sure pack a big flavor bang for the buck!  Make and enjoy this super easy appetizer with any combination of olives you'd like.


To quote one of my friends about this little bite:  "The whole is way more than the sum of the parts."  Yup, that's a good way to describe this treat.  It's only four little ingredients, but when put together and heated up, the result is fantabulous.

All you do is toss some olives, fresh rosemary, olive oil, and crushed red pepper on some aluminum foil.  Then seal it up to form a little pouch and toss it in the oven or on the grill.  That's it!


On one of my VERY few camping trips (I'm soooo not a camper ... I need electricity and a sleeping environment that absolutely does not include the potential of critter visitors), we cooked this appetizer over the campfire.  Hey, who says you have to limit campfire cooking to hot dogs??

Check out these other tasty baked party nibbles:
Thank you for stopping by The Kitchen is My Playground. We'd love to have you back soon!


baked olives recipe, warm rosemary olives recipe, baked olives with rosemary, warm olives with rosemary, easy appetizer recipes
Appetizers & Snacks
Greek
Yield: about 4-6 servings
Author:
Print
Warm Rosemary Olives

Warm Rosemary Olives

Warm Rosemary Olives may be the simplest little appetizer ever ... but they sure pack a big flavor bang for the buck! Make and enjoy this super easy appetizer with any combination of olives you'd like.
Prep time: 5 MCook time: 15 MTotal time: 20 M

Ingredients:

  • 1 (6.25 oz.) jar mixed olives, or about 1 c. olives of any variety mix you'd like
  • 4 or 5 large sprigs fresh rosemary
  • Sprinkling of crushed red pepper, to taste
  • 1 tsp. extra-virgin olive oil

Instructions:

  1. Drain olives and place them on a piece of aluminum foil. 
  2. Shake on a sprinkling of crushed red pepper. Lay rosemary sprigs on top and drizzle with extra-virgin olive oil.
  3. Seal aluminum foil to create a pouch and bake at 350 degrees for about 10-15 minutes. Or, toss the pouch on the grill until olives are heated through.
TRACEY'S NOTES:
  1. You in no way, shape, or form, need to be precise with the measurements for this recipe!
  2. It's also tasty to add capers, portabella mushroom slices, or roasted red pepper slices to the packet.
Created using The Recipes Generator


5

Who Stole the Honey?? ... & enjoyed blue cheese with honey drizzle

May 21, 2011
Sometimes it's the simple things we all love best.  And my favorite way to enjoy honey couldn't be simpler ~ blue cheese with honey drizzle.  It's an easy little appetizer that's simply delicious.


We robbed our bees last weekend!!  Well, actually, Mark robbed our bees last weekend ... I was purely a spectator for this round as I'm still recovering from my surgery a few weeks ago.  But I was an excellent spectator!  I should be able to resume my trusty Assistant Beekeeper role by the next robbing in July.

We have two hives - an established one, and one we just bought this spring.  This season we'll only be able to rob the established hive - the new one is still getting settled in, and there won't be enough honey yet for them to share with us.

But that's okay - we'll still get plenty of honey to hold us over from just the single hive!  We get about 6-8 quarts of honey from a single robbing, and we're able to rob the established hive twice in a summer ... May and July ... provided conditions stay good.  I don't really know what all these "conditions" are, but Mark does ... that's why he's the Head Beekeeper, and I'm just the trusty Assistant.  See, I'm new to beekeeping, but Mark's been doing it since he was in his early teens.  He and his father used to have ten hives ... ten ... that's a lot of honey!!  But then the bees all got sick and died off ... which is really sad ... and now we're just getting back into it.

But I bet you'd rather see some pictures of the robbing process, than hear about Mark's beekeeping history, wouldn't you?  Okay, so here we go!  Pictures of the process, with my absolute favorite way to enjoy honey at the end!

First up - Mark opening up the hive.  Doesn't he look all cute in his special suit?  Our bees are really gentle, so sometimes he doesn't wear the full suit ... just the hat and veil with a thick sweatshirt.  He makes me nervous when he does that ... I'd rather he wear the full suit.  Just in case.

Opening the hive
 After the hive is opened, he pulls out the frames.  The honeycomb in the frames has to be capped ... that white stuff you see sealing the cells ... or it's not ready to be robbed.  If you harvest the honey before the bees have capped it, the honey will spoil.  Mark gets very bummed when he thinks it's time to rob, but finds uncapped cells when he pulls out the frames.  When that happens, he has to just put the frames back in and we wait a couple of weeks to check again!

Capped and ready to be robbed!

Side view
 Next, we carry the full frames (they're heavy!) into the basement and start cutting those caps off to release the honey.  They make special electric heated knives to use to cut the caps, but Mark's mom has figured out that a nice sharp serrated knife works even better for her.  Sometimes the electric knife would get too hot and burn the wax caps and honey!  Plus, it's a pain in the pa-tooty to clean the electric knife.  Ya know, sometimes low-tech is juuussst fine.

Mark's mom cutting off the caps
There's a lot of honey still in the cuttings, so we collect them in a big bowl to be drained later.  We'll get about a full quart of honey from these cuttings.  That's a lot! 
Wax caps after they're cut off
 Next, the frames are put in the extractor and Mark cranks the handle to extract the honey.  Just imagine honey flying all over the place inside the cylinder as Mark cranks ... splat!

Splat! ... goes the honey
 Then it's time to pour the honey off into jars.  We're almost done!!  Well ...

Pouring off the honey

Our harvest

... except for the clean-up.  But we let the bees help with that!

Bees cleaning up the inside of the extractor
And now for the best part - eating the honey!  My absolute favorite way to enjoy honey is very simple ... blue cheese with a drizzle of honey on a baguette slice.  There's just something about the combination of the sweet honey with the tangy-ness of the blue cheese.  Absolute yum.

Here's to hoping the bees are working hard so we can rob them again in July!!  Get busy, little bees!

Thank you for stopping by The Kitchen is My Playground. We'd love to have you back soon!


appetizers with honey, blue cheese appetizer, easy appetizer recipe, blue cheese with honey recipe
Appetizers & Snacks
American
Yield: varies
Author:

Blue Cheese with Honey Drizzle

Blue Cheese with Honey Drizzle

Sometimes it's the simple things we all love best. And my favorite way to enjoy honey couldn't be simpler ~ blue cheese with honey drizzle. It's an easy little appetizer that's simply delicious.
Prep time: 3 MCook time: Total time: 3 M

Ingredients:

  • 1 wedge of blue cheese
  • honey
  • baguette slices and/or water crackers

Instructions:

  1. Place the blue cheese wedge on a serving plate. Drizzle the top generously with honey, letting the honey spill over all of the edges.
  2. Serve with baguette slices and/or water crackers, and more honey on the side for additional dipping & drizzling.
Created using The Recipes Generator

4

Reuben Pizza

May 17, 2011
Reuben Pizza ~ enjoy the wonderful flavors of the classic-favorite sandwich in scrumptious pizza form!

Reuben Pizza ~ enjoy the wonderful flavors of the classic-favorite sandwich in scrumptious pizza form!

 
The Reuben.  One of my all-time favorite sandwiches!  So what did I do?  Naturally, because this is me, I turned the classic combination into Reuben Pizza.  That's just what I love to do.

I'm not quite sure when my love for all things Reuben began ... but I know it was pretty young.  There's just something so wonderfully yummy about warm pastrami or corned beef, swiss cheese, and sauerkraut all smothered up in Thousand Island dressing.  And let me just tell ya, this flavor combination is just as tasty on a pizza as it is in the classic sandwich!

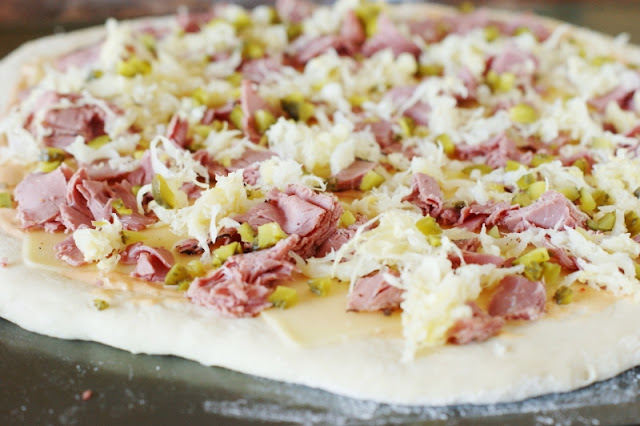
When I make Reuben Pizza, I like to start by preparing my own pizza dough ... but a store-bought pizza dough ball works just great, too.  Spread the crust with a generous slathering of Thousand Island dressing.  Next, lay some Swiss cheese slices on top of the dressing and top that Swiss cheese with well-drained sauerkraut ... I love sauerkraut! ... and then add on some roughly-chopped pastrami.  Or corned beef, if that's what you prefer.  Or probably even turkey pastrami, if that's how you'd like to roll!

Reuben Pizza ~ enjoy the wonderful flavors of the classic-favorite sandwich in scrumptious pizza form!

Now, to be truly authentic with the whole Reuben combination, you should sprinkle a few caraway seeds over the top right now.  For me - no way!!!  I absolutely detest caraway seeds!  If I'm eating something and there's one teeny-tiny caraway seed in the entire dish, I will taste it and know.  That's how much I dislike them.

There aren't a lot of flavors I don't like, but caraway is sure one of them.  Needless to say, when I'm out to eat I order my Reuben sandwiches on something other  than rye bread.

Now, top the Reuben Pizza off with a nice layer of shredded mozzarella.  And then pop it in the oven to get all golden and melty.  Total yum!

If you like Reubens, give this Reuben Pizza a try - with or without the caraway.  But if you're making it for me, please kindly skip the caraway!  Thank you sooooo much.

Reuben Pizza ~ enjoy the wonderful flavors of the classic-favorite sandwich in scrumptious pizza form!
Thank you for stopping by The Kitchen is My Playground. We'd love to have you back soon!


reuben pizza recipe, pizza with reuben ingredients, how to make reuben pizza
Pizza
American
Yield: 6-8 slices
Author:
Print
Reuben Pizza

Reuben Pizza

Enjoy the wonderful flavors of the classic-favorite sandwich in scrumptious pizza form.
Prep time: 15 MCook time: 25 MTotal time: 40 M

Ingredients:

  • 1 Pizza dough (homemade or store-bought dough ball)
  • 1/2 c. Thousand Island dressing {or a tad bit more, if you'd like}
  • 6 slices Swiss cheese
  • 2 c. sauerkraut, well drained
  • 1/2 lb. deli pastrami or corned beef, roughly chopped
  • 2 tsp. caraway seeds (optional)
  • shredded mozzarella

Instructions:

  1. Roll pizza dough out to desired size; place on preheated pizza stone or baking sheet.
  2. Spread a layer of Thousand Island dressing over the crust for sauce. Lay Swiss cheese slices over dressing, then top evenly with sauerkraut and pastrami. Sprinkle with caraway seeds (optional). Top with shredded mozzarella.
  3. Bake at 425 degrees for about 20-25 minutes, or until crust is cooked through and the cheese is bubbly and beginning to get golden brown.
Created using The Recipes Generator

Please enjoy these other tasty pizza creations from The Kitchen is My Playground ...


4

Buffalo Chicken Pizza ... neater than eating wings!

May 16, 2011
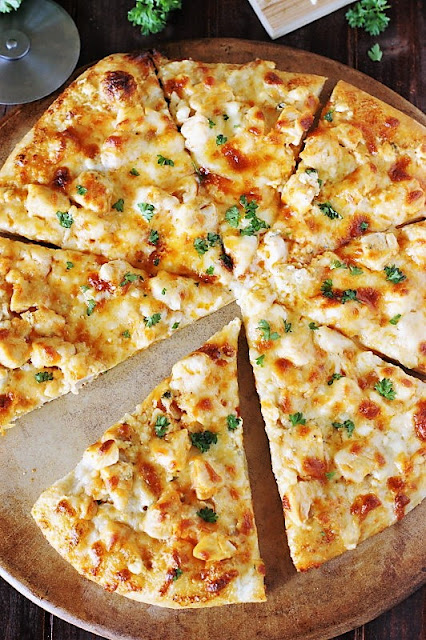
Buffalo Chicken Pizza ~ all the great taste of traditional Buffalo wings ... without the mess!

Buffalo Chicken Pizza Image ~ All the great taste of traditional Buffalo wings ... without the mess!


Having gone to school in upstate New York, I'm well-versed in the eating of Buffalo wings.

A group of us would go about once a week to indulge in $0.10 wings - can you believe $0.10 per wing??  You certainly can't find them for that price now!  They were served with the requisite side of carrot and celery sticks with blue cheese dressing.  Wings dipped in the blue cheese - fabulous!  Aahhhh .... memories.

My good-ol'-southern-boy husband wasn't familiar with Buffalo wings, nor was he into eating spicy foods (horror!), until he met me.

When it comes to Buffalo Chicken Pizza, you get all the great taste of traditional Buffalo wings ... without the mess!

I'm happy to say I have corrupted him.  He now loves Buffalo wings, and I swear would put jalapenos in everything if I'd let him.

So, in keeping with both my husband's and my love of Buffalo wings, here's our favorite spicy food turned into pizza!

Isn't that what we should do with our favorite foods, turn them into pizza?  Because when it comes to Buffalo Chicken Pizza, you get all the great taste of traditional Buffalo wings ... without the mess!

Buffalo Chicken Pizza with Blue Cheese Sauce Image

Making this spicy pizza is pretty easy, especially if you take advantage of using store-bought pizza dough balls, like I like to do.

Start by cooking up some bite-sized chicken pieces in a saute pan.

Then, marinate the cooked chicken in classic Buffalo sauce - for me, a mixture of Frank's RedHot cayenne pepper sauce and melted butter.  I love Frank's RedHot the best when it comes to making wings.

Chicken Marinated in Buffalo Sauce Image

While the chicken marinates, get your crust ready and top it with blue cheese dressing as your sauce.  

Now, as you can see in the photo below, my entire crust is not topped with blue cheese dressing.  

Why, you ask?  

Because as I was beginning to spread the blue cheese dressing, my husband Mark walked into the kitchen and declared that he didn't like blue cheese with his Buffalo wings, so he didn't want blue cheese on the pizza. 

Marinate the cooked chicken in classic Buffalo sauce - for me, a mixture of Frank's RedHot cayenne pepper sauce and melted butter. 

Plan B went into action for 1/2 of the pizza - and I brushed that 1/2 with some of the Buffalo sauce that the chicken was marinating in.  Crisis averted.  

Oh - and an experimental "test condition" set up!  

If you're a frequent reader of this blog, you know that I love that ... I love putting different combinations and versions together in head-to-head taste tests.  

So, hmmmm, which version will be better??

Buffalo Chicken Pizza - Blue Cheese Sauce vs. Buffalo Sauce Image

Top the blue cheese sauce with the marinated chicken pieces.  Don't worry about shaking off the Buffalo sauce marinade, you want some of it to get on there.

Then, top with a generous amount of mozzarella cheese.

Topping Buffalo Chicken Pizza with Cheese Image

Bake it all up, and get ready to enjoy the taste of Buffalo without all the mess!

Okay, so now for the taste-test results.

Mark had to eat his words!

The blue cheese sauce was amazing, and way better than having just the Buffalo sauce.

There's just something about that classic combination of Buffalo sauce and blue cheese.  And if you want to be really traditional, serve this pizza with some extra blue cheese dressing with carrot and celery sticks for dipping on the side.

Enjoy!

Buffalo Chicken Pizza Photo
Thank you for stopping by The Kitchen is My Playground. We'd love to have you back soon!


buffalo chicken pizza recipe, buffalo sauce recipes, homemade pizza recipe, recipes with Frank's Red Hot
Pizza
American
Yield: 8 slices

Buffalo Chicken Pizza

Buffalo Chicken Pizza

Buffalo Chicken Pizza ~ all the great taste of traditional Buffalo wings ... without the mess!
prep time: 30 Mcook time: 20 Mtotal time: 50 M

ingredients:

  • Pizza dough (homemade or store-bought dough ball; click here to read more about pizza dough)
  • Blue cheese dressing (make your own with my favorite recipe, or use bottled if you'd like)
  • 2 chicken breasts, cut into bite-sized pieces
  • 1 to 2 T. olive oil
  • 1/3 c. Frank's RedHot cayenne pepper sauce
  • 4 T. butter
  • Shredded mozzarella

instructions:

How to cook Buffalo Chicken Pizza

  1. Prepare blue cheese dressing, if using homemade. Refrigerate dressing while you prepare the rest of the pizza.
  2. Heat olive oil in a saute pan; saute chicken until cooked through. While chicken is cooking, melt butter and combine with the Frank's RedHot sauce in a medium-sized bowl. Once chicken is cooked through, combine it with the butter/RedHot sauce mixture; toss to coat the chicken well. Marinate the chicken for about 15 minutes.
  3. While chicken is marinating, prepare your pizza crust. Roll pizza dough out to desired size; place on preheated pizza stone or baking sheet. Spread a layer of blue cheese dressing over the crust for sauce. Top with marinated chicken, then sprinkle with mozzarella cheese.
  4. Bake at 425 degrees for about 20-25 minutes, or until crust is cooked through and the cheese is bubbly and beginning to get golden brown.
Created using The Recipes Generator
Please enjoy these other tasty recipes from The Kitchen is My Playground ...


8

Tapenade Pizza - a total experiment ... that worked

May 9, 2011
One night I had an idea.  Tapenade pizza.  Why not?  My idea was inspired by a tapenade bruschetta prepared at a demonstration cooking class I took a while back.  If you can make tapenade bruschetta, then why not tapenade pizza??  I had to give it a try.  If you haven't figured this out about me already, I like to try new things with food.

The tapenade bruschetta that inspired me was a slice of baguette topped with tapenade, then sprinkled with some mozzarella or goat cheese, and topped with a piece of sundried tomato and chopped fresh basil.  So ... hmmmmmm ... I thought, what combination of items would make the best pizza?  Since I wasn't sure, I decided to make this pizza a total experiment by testing four different combinations on the one pie.

My test items of choice - fresh grape tomatoes vs. sun-dried tomatoes, and feta cheese vs.  a combination of mozzarella and feta together.  Do you have a prediction about what combo wins the taste test??

I started by getting my dough ready, preparing my tapenade, and spreading a good layer of tapenade all over the dough as my "sauce."  (Click here to read more about pizza dough.  Click here to read a full post about preparing homemade tapenade.)

Tapenade "sauce"

I decided I wanted feta cheese in each bite ... and each "test condition" ... of the pizza.  So, I sprinkled a nice layer of feta crumbles over the tapenade "sauce."
Tasty feta

Now, to start my "test conditions" ... what would be better, grape tomatoes or sun-dried tomatoes?  To find out, I covered half the pizza with julienned sun-dried tomatoes and the other half with halved grape tomatoes.  I thought about leaving the grape tomatoes whole, but then, with visions of hot tomato inards squirting inside my mouth when I bit into them, I decided halved would probably be safer.

1/2 & 1/2

Next, I covered half the pizza with shredded mozzarella and left the remaining half with just feta.  I went "the other way" from what I did with the tomatoes, so I ended with four different combinations, like this:

1/2 & 1/2 the other way

Then I popped it in the oven to get it ready for it's taste-testing.  Do you have your prediction of the winner ready??

Which quarter will win??

It's ready!  I prepared a tasting plate for myself and one for Mark, including a small slice of each of the four varieties.  We tasted each combination, and without making comments to each other, decided on our favorite.  When it came time to share our favorite, amazingly, we matched!  So I feel pretty good about the end-result recipe.

So are you ready to find out the winning combination?

It was the fresh grape tomatoes with just feta!  Was that what you were thinking?  Totally not what I had predicted!!  I fully expected the feta and mozzarella together to win, and was shocked that it didn't.  The mozzarella just seemed to mask the yummy flavor of the tapenade and the feta.  And I kind-of thought the sun-dried tomatoes would win, but again not the case.  The moistness of the warm fresh tomatoes was a really nice touch against which the sun-dried tomatoes just didn't stand a chance.

So there you have it ... tapenade pizza topped with feta and grape tomatoes.  Fabulous.


Tapenade Pizza
Source:  Tracey-Original
Pizza dough (homemade or store-bought dough ball; click here to read more about pizza dough)
Tapenade (make your own - see recipe below, or used jarred if you'd like)
1 (8 oz.) package feta cheese crumbles
1 pint grape tomatoes, halved

Prepare tapenade. Roll pizza dough out to desired size; place on preheated pizza stone or baking sheet. Spread a layer of tapenade over the crust for sauce. Sprinkle with feta cheese crumbles, then top with grape tomato halves.  Bake at 425 degrees for about 15-25 minutes, or until crust is cooked through.


Tapenade   (Click here to view post about making tapenade)
Source:
Adapted from Heidi Billotto

1 (6.25 oz) jar pitted country mix olives
1 (6 oz) can pitted black olives
A couple spoonfuls of pimento-stuffed manzanilla olives
1/2 of a 4 oz jar capers
Zest of 1 lemon
3 T. fresh or dried parsley
Olive oil

Drain olives and capers; place in the bowl of a food processor. Add lemon zest and parsley; process a few seconds to chop and blend ingredients together. Drizzle in olive oil, pulsing occasionally, until tapenade reaches your desired consistency. It should be moist, but not runny.

NOTES:
- You can use any combination of olives you like ... all green, all black, 1/2 & 1/2, the mix I use - whatever you like!
- Capers control the saltiness, so adjust to taste.
2
Blog Design: Tracimichele.com. Powered by Blogger.