Easter Bunny Butt Doughnuts are not just yummy and adorable, they're super easy to make, too! Such a cute treat for Easter breakfast, Easter brunch, or as a fun little project to make with the kids. They're so easy, even the youngest of little ones can participate in the bunny butt fun.
CLICK HERE TO PIN THIS FOR LATER
CLICK HERE TO PIN THIS FOR LATER
Want a fun and adorable little treat for Easter? Look no further than these super-cute Bunny Butt Doughnuts!
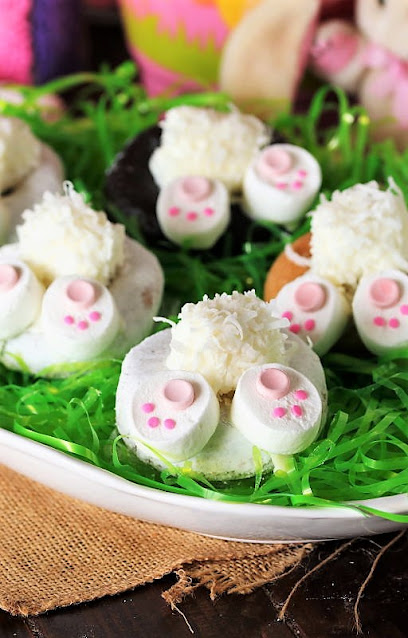
They're a fabulously fun treat for Easter breakfast or brunch. Whip up a batch, snuggle them into a bed of Easter grass on a platter, serve them up, and watch the smiles appear -- while the bunny butts disappear!
Or, they make for a really simple spring project to do with the kiddos. Bunny Butt Doughnuts are truly so easy, even the youngest of little ones can participate in their creation. While no part is difficult, making the feet especially is so easy, any skill level or age can handle it.
Such a cute treat for Easter breakfast, Easter brunch, or as a fun little project to make with the kids.
My daughter and I first made these together a few years back when she was 10, and had so much fun doing them. We whipped a dozen together from start to finish in about 30 minutes. And at 10 years old? -- My daughter was 100% independent in making them.
There is simple knife-work involved in cutting marshmallows in half to make the feet. So if you've got an age involved that you're not comfortable with using a knife, just have a grown-up do that step. But the rest? -- Pretty simple and totally safe for all.
Grab a dozen doughnuts and whip up a bunch of these fun little bums for breakfast! They're sure to bring the smiles and be loved by all.
Easter Bunny Butt Doughnut Ingredients:
You need just 6 simply ingredients to make a batch of bunny butt doughnuts:
- Doughnuts - The foundation of the bunny butt. We use powdered sugar and plain doughnuts, though pretty much any kind of doughnut will work. We did make some with chocolate-coated doughnuts -- and while they worked fine, we thought the plain and powdered sugar Bunny Butt Doughnuts were cuter.
- Regular-sized marshmallows - Serve as both the tails and feet for the Bunny Butt Doughnuts
- Coconut - Adhered with melted white chocolate, creates the adorable "fur" on the bunny butt marshmallow tail.
- Pink Smarties candies - Create the pad on the underside of each bunny's foot. We use pink Smarties candies (and coordinating confetti sprinkles), but you can also use other colors if you'd like. We also did some with purple Smarties that were cute!
- Pink confetti sprinkles - Create the toe pads on the underside of each bunny's foot. We coordinate the color of the confetti sprinkles with that of the Smarties candies used on each foot.
- White chocolate candy melts - Coats the marshmallow tails and serves as the cement when creating the bunny butts. You'll need about 6 ounces of white chocolate melts, give or take a little. So just melt part of the package to start, and then melt more if you need more as you go. As a substitute for candy melts, white almond bark coating can be used instead.
On a side note, we also tested using Marshmallow Fluff as cement, as well. Marshmallow Fluff works fine for the tails, but does not work well to adhere the feet. We recommend sticking with melted white chocolate to make and glue the bunny butt parts together.
How to Make Easter Bunny Butt Doughnuts:
Now let's take a look, step-by-step, at how to make Bunny Butt Doughnuts. It's so easy, you'll see! -- So easy, in fact, even the youngest of little ones can participate in their creation.
Step 1: Dip Marshmallow in White Chocolate for Tail
Start by making the tails.
Place some white candy melts (or almond bark coating) in a small microwave-safe bowl. Melt the coating in the microwave, according to the package directions.
Then dip a marshmallow in the melted white chocolate, coating all surfaces except where your fingers are holding it.
Step 2: Coat Tail in Coconut
Immediately roll the dipped marshmallow in coconut until it's well coated all over. Place the coconut-covered tail on some wax paper, parchment paper, or a plate to set.
I like to place the coconut in a shallow small plate to make it easy to roll the marshmallows.
Repeat these two steps with additional marshmallows to make all the tails you'll need at once.
Step 3: Allow Tails to Dry
Set the finished tails aside to dry while you make the feet.
Step 4: Cut Marshmallows for Feet
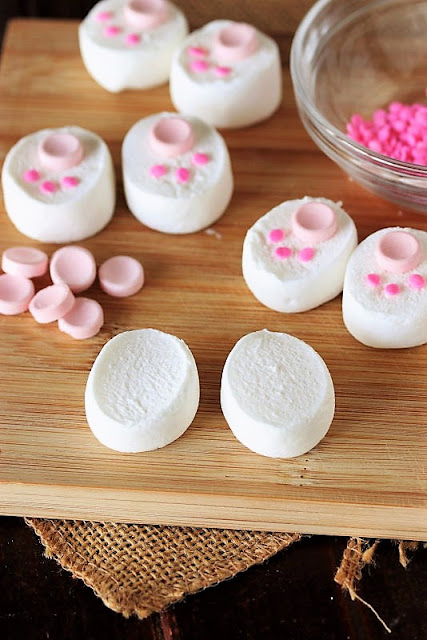
Cut a marshmallow in half and place the halves on your work surface with the sticky cut sides facing up.
If the marshmallow halves are perfectly round, you may want to gently squish them a little to make them more oval-shaped. -- Do be gentle with this though, because it's easy to squish them out of shape too much.
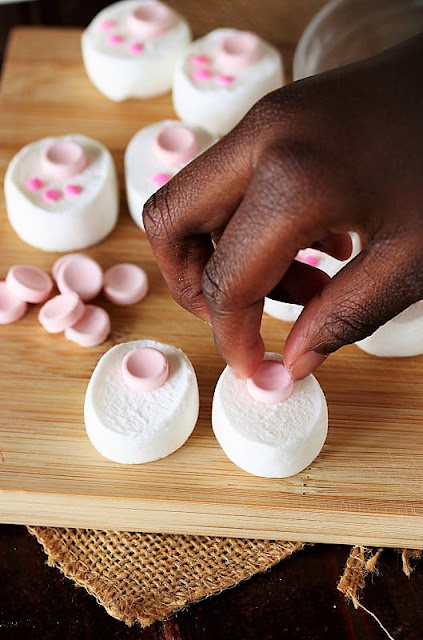
Step 5: Adhere Smarties
Place a pink Smarties candy toward the top of each marshmallow half to create the pad of the foot, pressing gently to adhere the Smarties candy.
Step 6: Add Confetti Sprinkles
Arrange 3 pink confetti sprinkles under the Smarties candy on each marshmallow half to create the pads of the bunny's toes.
Then, repeat with more marshmallows to make all the pairs of feet needed.
We used pink Smarties candies and confetti sprinkles, but you can also use other colors if you'd like. We did some with purple Smarties and sprinkles that were cute!
Step 7: Adhere Tail to Doughnut
Re-warm the melted white chocolate (leftover from making the tails) for a few seconds in the microwave to soften it back up.
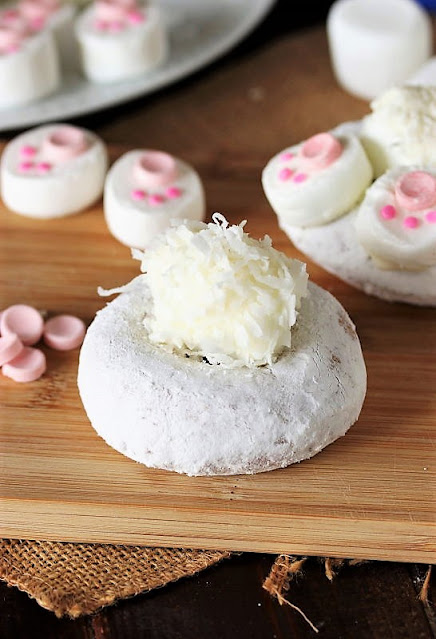
Then dip the bottom of a bunny butt tail in the white chocolate, getting just a small coating of the melted chocolate to act as cement.
Immediately place the tail on top of a doughnut, covering the doughnut's hole.
Step 8: Adhere Feet
Dip the bottom of a foot in white chocolate. You don't need to dip the entire bottom of the foot -- just the bottom of the end under the Smarties candy is enough.
Put the dipped foot on the doughnut beneath the tail, and hold it in place for about 20 seconds to let the white chocolate set. Repeat this same step with the other foot.
Then add tails and feet to all the remaining doughnuts, too.
And that's all there is to whipping up a platter of these cute little bunny butts! Pretty easy, right?
Bunny Butt Doughnuts can be prepared about a day or 2 in advance and stored in a single layer in an airtight container. After a couple days, the cut marshmallow feet start to deteriorate a bit and look a little shriveled. -- We recommend preparing them the day of or day before serving for the best result.
So grab a box of doughnuts and have some fun whipping up these little cuties. Such an adorable treat for Easter breakfast, Easter brunch, or as a fun little project to make with the kids. They're so easy, even the youngest of the little ones can participate in the bunny butt fun!
Thank you for stopping by The Kitchen is My Playground. We'd love to have you back soon!
Yield: 12 doughnuts

Easter Bunny Butt Doughnuts Recipe
Easter Bunny Butt Doughnuts are not just yummy and adorable, they're super easy to make, too! Such a cute treat for Easter breakfast, Easter brunch, or as a fun little project to make with the kids. So easy, even the youngest of little ones can participate in the fun.
Prep time: 30 MCook time: Total time: 30 M
Ingredients:
- 1 dozen doughnuts (powdered sugar, plain, or a mix of varieties)
- 24 regular-sized marshmallows
- about 1 1/2 to 2 c. coconut
- 24 pink Smarties candies
- pink confetti sprinkles
- about 6 oz. white chocolate candy melts or white almond bark coating
Instructions:
How to make Easter Bunny Butt Doughnuts
Make the Tails:
- Place candy melts or bark coating (chopped in small pieces) in a small microwave-safe bowl. Melt in the microwave per package directions (typically in 30 second intervals, stirring in between).
- Place coconut in a shallow bowl or on a small plate.
- Dip a marshmallow in the melted white chocolate, coating all surfaces except where your fingers are holding it.
- Immediately roll in coconut until well coated. Place on waxed paper, parchment paper, or a plate.
- Repeat with additional marshmallows to make 12 tails.
- Set aside to dry while you make the feet.
Make the Feet:
- Cut a marshmallow in half and place halves on your work surface with the sticky cut side facing up.
- Place a pink Smarties candy toward the top of each marshmallow half, pressing gently to adhere it. Arrange 3 pink confetti sprinkles under the Smarties candy on each marshmallow half.
- Repeat with remaining marshmallows to make 12 pairs of feet.
Assemble Bunny Butt Doughnuts:
- Re-warm the melted white chocolate leftover from making the tails for a few seconds in the microwave.
- Dip the bottom of a bunny butt tail in white chocolate, getting just a small coating of the melted chocolate to act as cement. Place the tail on top of a doughnut, covering the doughnut's hole.
- Dip the bottom of a foot in white chocolate (you don't need to dip the entire bottom of the foot -- just the bottom of the end under the Smarties candy), arrange on the doughnut beneath the tail, and hold in place for about 20 seconds to let the white chocolate set. Repeat with the other foot.
- Repeat with the remaining doughnuts.
TRACEY'S NOTES:
- Though we used powdered sugar and plain doughnuts, pretty much any kind of doughnut will work. We also made some with chocolate-coated doughnuts -- they worked fine, but we thought the plain and powdered sugar were cuter.
- We used pink Smarties candies and confetti sprinkles, but you can also use other colors if you'd like. We did some with purple that were cute!
- We tested using Marshmallow Fluff as cement, as well. It works fine for the tails, but does not work well to adhere the feet.
- These can be prepared about a day or 2 in advance and stored in a single layer in an airtight container. After that, the cut marshmallow feet start to deteriorate and look a bit shriveled.
Affiliate
links are included in this post. As an Amazon.com associate, we earn from qualifying purchases.







So cute! I think my kid would love these!
ReplyDeleteThank you Suzie! Yes, I think your kid would indeed love these ... our 10-year-old daughter had a ball making them.
DeleteThese are absolutely adorable, I love them -thanks for sharing
ReplyDeleteThank you! We think they're pretty adorable, too ... AND tasty.
DeleteThese are just adorable!! Pinned.
ReplyDeleteThank you so much for stopping by, and for the pin!
DeleteBunnies just happen to be my very favorite animal, well second only to cats. And these are adorable little butts!
ReplyDeleteBunnies are fun, aren't they? And these adorable little butts are so fun to make, too.
DeleteSuper cute! Very clever using those candies on the paws, they're perfect.
ReplyDeleteWhat a fun and hilarious project for the kids. Thank you for bringing it to FF.
ReplyDeleteThese are too cute and I love how easy they are to make!
ReplyDeleteSo adorable! Pinning so I can remember to make them next year for my niece and nephews. Thanks for linking them to Thinking Out Loud Thursday!
ReplyDeleteWe are featuring your awesome post at Full Plate Thursday,479 this week! Thanks so much for sharing your talent with us and we sure hope you have a great week!
ReplyDeleteMiz Helen
Oh my goodness! These are absolutely adorable!!
ReplyDeleteThese are so cute, look for your post to be featured on OMHGWW this week #252
ReplyDeleteThank you for shring your amazing recipes! aHave a great week!
What fun for Easter!!
ReplyDeleteThank you for sharing your Easter Bunny Butt Doughnuts at Create, Bake, Grow & Gather this week. I'm delighted to be featuring this recipe at tonight's party and pinning too.
Happy Easter,
Kerryanne
Your awesome post is featured on Full Plate Thursday, 634 this week. Thanks so much for sharing with us and have a fantastic week!
ReplyDeleteMiz Helen
These are too cute. My son would love them minus the coconut. I’ll use a piping tip to make the fur on the bunny.
ReplyDeleteToo cute... I'd have to close my eyes to bite into them ;)
ReplyDeleteThanks for sharing at the party this week Tracey. I'm thrilled to be featuring your adorable bunny butt doughnuts at Create, Bake, Grow & Gather tonight and I have pinned this recipe too.
Hugs ~ Kerryanne
Thank you for hosting the linky. We always enjoy linking up with you.
Delete