


Whip up these super-fun Surprise Rocks with a simple mixture of sand, coffee grounds, and flour. Tuck whatever surprise inside you'd like, so long as it can go in the oven at a low temperature. -- With mini plastic dinosaurs, they're just perfect for a dinosaur dig!

.%20%20So%20cool%20for%20a%20pretend%20dinosaur%20dig.%20%20%0A%7BThe%20Kitchen%20is%20My%20Playground%7D "Pin It")
This project always makes me smile.
Each year with my little first graders, I do a dinosaur dig ... featuring these nifty little surprise rocks hiding dinosaurs inside. And they love it! They think it's so cool to pretend to be paleontologists digging for fossils or dinosaur bones, never sure what they're going to find.
And these surprise rocks are truly so easy to make, the little bit of time invested in them is so, so worth the joy and fun they bring my students. I would make these for them even if they took 100 times the effort! Now, these are not edible ... it's the first non-edible recipe I'm posting, but they're so fun I hoped you wouldn't mind.
With just a little bit of sand, a bit of flour and water, some leftover coffee grounds, and a package or two of plastic dinosaurs (or other surprise!) from the dollar store, you can have yourself a batch of surprise rocks. And here's how.
Start by combining some sand, flour, coffee grounds, and water in a big bowl. It will be hard to mix, but just get it started a little bit with a spoon.

Then, knead the mixture with your hands, just like you would if you were making bread dough.
I recommend taking off any rings you're wearing for this step... unless you want someone to get a real surprise in their rock!

The mixture will come together nicely, and look like this after your kneading is done.

I use plastic dinosaurs that fit in the palm of my hand as the surprise. You could use any other little trinket that wouldn't be harmed by a low temperature oven ... or, you could use something bigger than this but would need to adjust up the baking time of the rocks.

To make a rock, grab a hunk of dough. To cover the dinosaur in my hand in the photo above, I took a hunk about this big:

Flatten the dough out into a pancake ...

... that's about this thick:
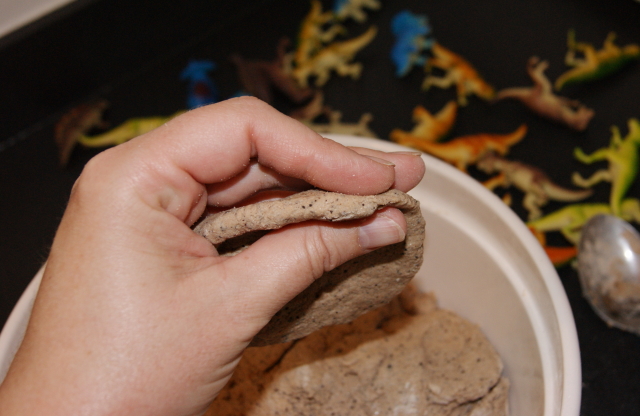
Lay your surprise on the flattened dough pancake and fold half of the pancake over it.

Then continue to fold the dough pancake up over your surprise ...

... until it's all covered. Gently press the seams together to seal your surprise in.

Place the rocks on a baking sheet lined with parchment paper.

Finally, pop them in the oven for a while ... and they come out looking like this. Surprise rocks!

For our dinosaur dig, I bury the surprise rocks in a little bit of sand in a plastic tub. Each student then gets to pretend to be a paleontologist. So cute! They first look over the 'land,' scanning for an area that looks like it's a little different than the surrounding 'land.' Once they've found potential dig spots, they use paint brushes to gently excavate their finds.

After they've got their finds excavated enough to be able to grab them with their fingers, they pick up a rock and clean it off with their brushes, inspecting it to predict what they may have found. Their excitement builds ...

... until they're finally at a point where they can break their rocks open! They give the rocks a big ol' squeeze ...

... and SURPRISE! ... reveal what they've found. T-Rexes and pterodactyls always get the most squeals.
And, I can't say for sure ... I mean, I wouldn't really know ... but I think the adults usually have just as much fun breaking open the leftovers.

Ingredients
- 2 c. sand
- 2 c. all-purpose flour
- 1 c. coffee grounds (leftover from brewing coffee in a coffee maker)
- 3/4 c. water + possibly 1/4 c. more
- Combine the sand, flour, coffee grounds, and 3/4 cup water in a large bowl. Knead, as you would bread dough, until the mixture comes together into a workable dough. Add the remaining 1/4 cup water, a little at at time, if needed.
- Take a small amount of dough (about the size of a golf ball), flatten it, and form it around your object.*
- Bake at 250 degrees for about 30 minutes, turning over after the first 10 minutes. Store uncovered.
*Note: It's best if the dough is just thick enough to be workable in covering your surprise object, but not too thick. If you make it thick, it'll take the rocks a long time to bake in the oven or the dough may not dry out enough at all. For larger objects, you will need a larger amount of dough. Large surprise rocks may require additional baking time.
Have fun and enjoy!


This is a very neat idea and looks like so much fun!
ReplyDeleteThanks so much, Anita! It is really fun!!
DeleteI love this and can't wait to do it with my boys this summer! I would love it if you would come and share it at my Summer Bucket List Link Party at
ReplyDeletehttp://www.missinformationblog.com/2012/05/my-little-chef.html
I love this! My kids would definitely love this! I'm going to have to add it to our list of things to do this summer...
ReplyDeleteI'm your newest follower from the blog hop!
I'm glad you like what you see on my little corner of blogworld! Thanks so much for becoming a follower.
DeleteThis is the cutest thing EVER!! I LOVE IT!! So glad that I found your site on Live. Laugh. Rowe. - now I'm following and will get all KINDS of great ideas... Would love for you to visit - stringtownhome.blogspot.com.
ReplyDeleteHave a great week!
-heather
Thanks so much for the kind words, Heather! So glad you stopped by, and that you became a follower. These surprise rocks really are a whole lot of fun.
DeleteHow fun! I've never seen this before! I noticed all the great recipes you have on your site as well and wanted to let you know I will be hosting "What's Cooking Wednesdays" I really hope you'll come by and link up! I'm a new follower regardless :)
ReplyDeleteThanks so much for the invite, Christine! Hope to see ya on Wednesdays.
DeleteThis is a wonderful idea! I'm bookmarking it to do with my kids this summer! They are going to LOVE it!!!
ReplyDeleteWhat a great idea! Thanks for sharing!
ReplyDeleteWhat a cool idea! I'm saving this for when I have some older kids or to do with my niece and nephew.
ReplyDeleteThis has to be one of the coolest ideas for kids! I love it! What a wonderful idea. I sure hope I can pin this to my homeschooling board on Pinterest. Moms will love it! Thank you so much for sharing with us at Kids in the Kitchen! We sure hope to see you again next week. Blessings
ReplyDeleteThank you for your kind words, Carrie! Please feel free to Pin away! My students REALLY love this activity.
DeleteI think I found a new adventure for my girls, and the best part is that it still starts in the kitchen!
ReplyDeleteThese are just too cute! Such a great idea and so creative. Thanks for sharing!
ReplyDeleteI must try this my boys will go nuts!
ReplyDeleteOh my goodness! This is the cutest idea! I am saving this for my "someday grandchildren". Thanks for bringing this creative idea to TUTORIALS TIPS AND TIDBITS!
ReplyDeleteJust made these with gluten-free flour/baking mix for my son's 6th BD party.
ReplyDeleteWhat GF flour did you use? I want to make for my son, who has celiac, birthday. Thanks
DeleteThank you for such a wonderful idea!!! Can't wait to try it.
ReplyDeleteWe actually did something similar with our third graders at school last week and they had such a great time!
ReplyDeleteCUTE!!
ReplyDeleteDo you put the coffee grounds in for the specks or do they help hold the rock together?
ReplyDeleteBoth ... they add the specks, and the moisture from the grounds gives some help in binding the dough.
DeleteLove this!!
ReplyDeleteMaking these today for my daughter's dinosaur birthday party. Can't wait for her and her friends dig for these!
ReplyDeleteOh, fun!! I hope they enjoy them. Thank you so much for stopping back by to let me know ... you made me smile.
DeleteThis will be a great activity to do with my grandson on his visit. How far in advance can I make these? Thanks so much.
ReplyDeleteYou can make them waaaaaaaaaay in advance ... like a couple of months, even, if you'd like. Enjoy!
DeleteI love it and so will my son he's 3 and loves dinos and calls himself a paleontologist, he can even name at least 20 of them. I can't wait to try it!! thank you
ReplyDeleteThis is so awesome! Will definitely be doing this for my son and daughter's birthday party! I know I will try this either way, but wondering if any other tools will be needed for 2/3 year olds, as they aren't as strong as school aged children. Do these mostly just crumble fairly easily?
ReplyDeletethanks!
They more break in big pieces than crumble. They break fairly easily, but may need just a tad of mom/dad help to get them started for 2/3 year olds. Enjoy!! {they're so fun}
DeleteI want to make those for my daughter's Dinosaur Train party, I think the kids will have a ball! But my husband vetoed putting the plastic toys in the oven, no matter how low the oven setting. Do you think I could make them in advance and just let them air dry? Have you tried that?
ReplyDeleteThank you so much for the grand ideas and projects here!
I haven't tried just letting them air dry, but I do think that would work. I bet putting them out in the sun would do the trick fairly quick! I would just turn them over periodically so they dry out all around. Enjoy them at the party! They're really fun. :-)
DeletePlanning on making these for my sons dinosaur birthday party! How long in advance can I make them without them drying out too much and being too difficult to break?
ReplyDeleteOh, you can make them waaaaaaaaay in advance, and they'll still break open just fine. I kept a few of them for over a year, and they still broke open easily. Enjoy!!
DeleteFab! Thank you!
DeleteHave the plastic toys ever melted during the baking process? :O
ReplyDeleteNot for me, they sure haven't. :-)
DeleteWhat is the purpose of the coffee grounds? Do the 'eggs' smell strongly of coffee?
ReplyDeleteThe coffee grounds make the eggs resemble fossils. After baking, the smell of coffee is minimal.
Delete