Love lemon? Then tart, tangy, and delicious Lemon Curd Tartlets are for you! But don't be fooled by their little size ~ these tiny tarts pack a huge lemon punch. CLICK HERE TO PIN THIS FOR LATER
Fun and easy cherry-topped brownie bites are fabulous for a party, Christmas, Valentine's Day, or anytime!
How absolutely precious are these little cherry-topped brownie bites? I just love them! I think they have so much potential ... great for a party ... a potluck ... a Christmas dessert tray .... or Valentine's Day!
And they're so absolutely easy, it's not even funny. Seriously. Easy.
All you do is bake up a batch of your favorite brownies. I used a regular ol' box mix. Then, use a round cookie cutter or biscuit cutter to cut brownie circles from your pan of brownies. Be sure to eat all the scraps you want. It's fun that way.
And finally, top each brownie circle with a cherry and a dab of the 'juice' from a can of cherry pie filling. Sweet! You've got cherry-topped brownie bites!
They're just the perfect size for a little finger food sweet treat. Serve 'em up on a platter and they're pretty, too. Fun and tasty doesn't get much easier than that!
Thank you for stopping by The Kitchen is My Playground. We'd love to have you back soon!
brownie bites recipe, cherry topped brownie bites, easy party food ideas, party foods made with brownies
Cookies & Bars
American
Yield: about 30
Author: Tracey | The Kitchen is My Playground
Cherry-Topped Brownie Bites
Fun and easy cherry-topped brownie bites are fabulous for a party, Christmas, Valentine's Day, or anytime!
Prep time: 15 MCook time: Total time: 15 M
Ingredients:
A baked batch of your favorite brownies (I use a box mix)
1 1/2 inch or 2 inch round cookie cutter or biscuit cutter
1 can cherry pie filling
Instructions:
Cool brownies completely after baking.
Use the round cookie cutter or biscuit cutter to cut as many circles as possible out of the pan of brownies. (Note - using a 1 1/2 inch cutter, you'll get around 30 brownie bites from a 9x13" pan.)
Place brownie circles on a serving platter. Just before serving, top each brownie circle with a cherry and a bit of the cherry liquid from the cherry pie filling.
Dunk away to your heart's delight with easy and delicious Chocolate & Honey Fondue.
Oh, fabulous fondue. This is one of my absolute favorite meals to entertain with. Why? Because, truly, it's a really easy meal to prepare ... you gather together the stuff, and guests do their cooking themselves. I mean, how easy is that?? And another thing? - It's just. Plain. Fun.
Fondue holds a very special place in my heart. Growing up, fondue was my family's Christmas Eve tradition. Mom would prepare three fondue courses - cheese fondue with bread for dipping, steak and shrimp fondue'd (I may have just made that word up) with peanut oil, and chocolate fondue for dessert. Yum. I am hard pressed to say which course was my favorite ... so hard to choose. I can say for sure what my favorite dipper for the chocolate was - marshmallows! I loved the marshmallows.
Back in those days, our fondue pots were the ones you had to keep a flame burning under as the heat source. Anyone remember those little Sterno cup-like-things that burned blue flames? I remember how hard it was for my mom to keep the pots at the right temperature for cooking with those little things. We'd have to take breaks from the cooking during the steak & shrimp course to let the oil come back up to temperature! Now, now we're spoiled. With electric fondue pots. If you're thinking of getting into fondue'ing, let me tell ya, electric pots are the way to go. Easy sneezy (as we'd say in 1st grade).
Recently, Mark and I had the pleasure of having friends over for an evening of fondue. We had so much fun just chatting away, and cooking, and eating all evening long. Way too much eating. But hey, that's nothing loose-waisted pants can't accommodate, right?
So, just how easy is this easy chocolate-&-honey fondue? Well, all you do is melt up some chocolate, honey, and evaporated milk in a fondue pot, and then dip away to your heart's content. We usually make a big platter of dippers for people to choose from ... strawberries, bananas, and fresh pineapple are standard for us. Other great choices ... pieces of pound cake, angel food cake, Rice Krispy treats, pears ...
... oh, and don't forget the marshmallows! Happy fondue!
Thank you for stopping by The Kitchen is My Playground. We'd love to have you back soon!
chocolate fondue recipe, easy chocolate fondue recipe, how to make chocolate fondue, chocolate fondue with honey
Desserts
French
Yield: varies
Author: Tracey | The Kitchen is My Playground
Easy Chocolate & Honey Fondue
Dunk away to your heart's delight with easy and delicious Chocolate & Honey Fondue.
Prep time: 10 MCook time: Total time: 10 M
Ingredients:
12 oz. semi-sweet chocolate chips
3/4 c. honey
1/4 to 1/3 c. evaporated milk
Instructions:
Melt chocolate chips over medium heat in a fondue pot.
Stir in honey. Add evaporated milk until mixture is desired consistency for dipping (I usually add only about 1/4 cup or so).
Keep chocolate mixture warm in fondue pot. Serve a variety of dippers such as strawberries, fresh pineapple chunks, banana slices, large marshmallows, or pieces of Rice Krispies Treats.
Brie lends wonderful creaminess, with a subtle touch of brie flavor, in this delicious Creamy Chicken Noodle Soup with Brie, Spinach, and Artichokes.
It's Crazy Cooking Challenge time! The challenge presented for January by our hostess, Tina of Mom's Crazy Cooking, was CHICKEN NOODLE SOUP. The rules? Our soups must include chicken, our soups must include noodles, and we must have found the recipe out there somewhere in blogland. That was it ... anything else goes. And you probably know me by now ... I had to find something that was, well, just a bit different. I love, love, love to try recipes that have a crazy-sounding flavor combination or just a little something in them you wouldn't ordinarily expect.
Enter ...Elizabeth of Pine Cone and Acorns' Chicken Artichoke Brie Soup. Ah hah! I had found my 'little something different.' Brie in chicken soup? Oh, I was all over trying that. And let me just say, I'm sooooooo glad I did. This soup is so richly creamy and flavorful, and beautiful, too, with the deep dark green of spinach running all through it. Yum.
Another great thing with this recipe - it's pretty 'flexible' ... I think you could easily make changes to the ingredients to suit your personal taste and it still be just as wonderful as the original. Here are the changes I made:
- Added noodles ... mini farfalle (bowties), to be exact. Hey, The Challenge did require me to use noodles, right?
- Increased the amount of spinach
- Substituted whole milk for the half-&-half and whipping cream (I just couldn't bring myself to use three different kinds of milk in this one single soup!)
- Left a little bit of the rind on my brie, instead of cutting it all completely off. It broke my heart to cut all the wonderful brie-y-ness off.
- Added a little extra seasoning of salt at the end of the cooking process
- Oh, and I changed the name. Like Elizabeth suggested, I wanted a name that encompassed all the yummy ingredients in this soup!
So ... let's see how to whip up this totally delicious, creamy dreaminess of a chicken noodle soup.
Just as so many totally tasty soups begin, start by cooking up some onion, celery, carrots, and garlic in a bit of butter. Just soften them up a little bit and let them get to know each another.
Oh .... this is how sooooooo many wonderfully tasty soups begin!
Add in some chicken broth ... simmer ... then add in some small pasta ... and simmer again. I chose to use this mini farfalle, also called bowties. I loved the itty-bitty size of the mini farfalle. Isn't it cute?
Mini farfalle - it's so cute!
Next, add in some flour that you've shaken up in a jar with some whole milk. This starts the 'creamy' part of this creamy dreaminess. Pour it on in ...
Bring on the creamy!
... and simmer it up for a bit. Now you're ready to add in the green veggies - artichokes and spinach.
"I'm ready for my dip in the hot tub!"
Stir the veggies in and behold your beautiful soup! Isn't it just gorgeous with all that deep dark spinachy green in it? I think so! Is it weird that I think food can be gorgeous? I hope not, 'cause I sure do think foods can be stunningly beautiful.
Beautiful soup
Oh, and don't forget the Brie! Stir this in at the end and get it all melty and creamy.
So-soft-and-squishy Brie
Now, let's talk about the Brie for a minute. Two things.
Thing 1- Does the Brie add a flavor element?
In Elizabeth of Pine Cone and Acorns' post, she pondered about whether the Brie added flavor to this soup, or if it simply made it nice and creamy. Well, I had to explore that question further to find out. Ya know, that's just what I like to do ... I'm always full of "I wonders." So, I scooped out some of the soup before I melted in the Brie and later put it to a head-to-head comparison with the Brie'd version.
The verdict?? Brie does add a flavor factor, though it's indeed very mild. Without doing a side-by-side, head-to-head taste test, I think it would be difficult to discern the Brie flavor element. But the Brie flavor is indeed there. The Brie absolutely adds quite a bit of a creaminess factor. While the non-Brie version is certainly still creamy, the Brie puts this soup over the top in terms of creamy dreaminess. That being said, if you're not a fan of Brie or just don't feel like running to the store to get some Brie, rest assured that this soup is totally wonderful and flavorful even without it.
Thing 2 - To rind or not to rind? - that is the question!
The original recipe instructs us to remove the rind from the Brie. Well, as I mentioned earlier in this post, cutting off all that Brie-y-ness in the rind just broke my heart. So, I cut off some but also left some on. I think the answer to this question is a matter of personal preference. The rind that I left on melted into the soup just like the creamy inside, so there weren't any big ol' rind lumps. I do think the rind gave fabulous flavor to the soup. Next time I make this soup, I will simply shave off just a tiny bit of the rind and leave most of it intact. Personally, I love the flavor of Brie rind. But, if you don't, cut it off.
Serve this flavorful soup up with a salad and some biscuits or crusty bread, and you've got yourself one tasty and hearty meal. Enjoy!
Thank you for stopping by The Kitchen is My Playground. We'd love to have you back soon!
creamy chicken noodle soup recipe, chicken noodle soup with brie, chicken noodle soup with spinach
4 ½ oz. Brie or Camembert cheese, some or all of the rind removed, and cut into chunks
Instructions:
In a large saucepan or Dutch oven, melt butter. Add carrots, celery, onion, and garlic; cook until tender, about 5-7 minutes.
Add chicken broth, ½ teaspoon salt, and 1/2 teaspoon pepper. Bring to a boil; reduce heat and simmer, uncovered, for 15 minutes.
Increase heat to return broth mixture to a slow boil. Add pasta; reduce heat to medium and simmer until pasta is al dente, about 5-7 minutes.
Combine 2 cups milk and flour in a large screw-top jar. Cover and shake well until smooth. Stir into soup. Increase heat back to medium-high; cook and stir until thickened and bubbly, about 8 minutes. Reduce heat to medium.
Stir in chicken, additional 1 cup milk, spinach, artichokes, and brie. Cook and stir over medium heat about 5 minutes more until the soup is heated through and the brie is melted. Be careful not to let the soup scorch.
Give the soup a taste, and add salt as needed. I found that an additional 1/2 teaspoon or so of salt added at the end of the cooking time really brightened up the flavors in this hearty soup.
TRACEY'S NOTES:
This soup is flavorful and delicious both with and without the Brie. Including the Brie's rind in the soup or cutting it off is a matter of personal flavor preference. The rind adds a stronger, more pronounced brie flavor.
You could make this with turkey, too. Great to use up leftovers from a big ol' turkey!
Make sure to taste the soup at the end of it's cooking and add some salt, if needed. I find that a little sprinkling of salt at the end can really brighten up the flavors.
A touch of tomato paste, a touch of balsamic vinegar, and the pressure cooker method are the secret to these tender and tasty New Year's Day Collards.
Every Southerner knows the traditional New Year's Day meal is collards, some form of pork, and black-eyed peas. Why, you ask? Because this, according to lore, brings you luck and good fortune for the upcoming year.
According to Southern Living, collards and black-eyed peas "all but guarantee a prosperous year. Some say the greens represent dollar bills and the peas, coins, ensuring wealth and luck." And, one reason pork is traditional for New Year's Day according to About.com is that "pigs have also long symbolized progress. A pig can't turn his head to look back without turning completely around, so it's believed that pigs are always looking to the future. They fit in perfectly with other New Year's celebrations."
Now, I'm not sure if this is true or not, but I'd rather not tempt fate to find out!
My husband Mark took point to prepare our New Year's Day meal this year, giving his pressure cooker a whirl for the collards and pork. And boy oh boy, were those collards tasty and tender! I can absolutely say they were the best collards I've ever had. And I'm not just saying that because my cute husband made them.
He loaded his pressure cooker up with collards ...
... and then put in some onions, garlic, ham hocks, and other good stuff.
He cooked it for about 20 minutes or so, and delivered up the most super tasty and tender collards I've ever had.
So, whether or not you ate your collards, pork, and black-eyed peas on New Year's Day, Mark and I wish you much luck and prosperity in 2012!
Collard Greens {Pressure Cooker Method} Source: Adapted from Yummly (Printable recipe) Ingredients
1 bunch fresh collard greens
1 1/2 c. chicken broth
2 T. olive oil
2 T. tomato paste
3 cloves garlic, minced
2 T. balsamic vinegar
2 tsp. salt
2 large onions, quartered
2 ham hocks
1/4 lb. hog jaw or fatback
Directions
1. Clean your collards by filling your sink with cold water and soaking them for 1/2 hour. Remove the thick part of the stems at the bottom of the greens. Give the collards a rough chop to cut them into large pieces.
2. Place the chicken broth, olive oil, tomato paste, minced garlic, balsamic vinegar, and salt in the bottom of the pressure cooker; stir to combine. Add collards and toss a bit to coat them with the chicken broth mixture.
3. Place the onions, ham hocks, and hog jaw on top of the collards.
4. Seal the pressure cooker pot. Pressure cook for 20 minutes.
Rich and fudgy flourless chocolate cake with raspberries. It's a chocolate lover's dream!
Happy New Year, everyone! I'm not big on making New Year's resolutions, are you? I don't really like to make them because then I feel like a failure when I don't follow through ... which is usually the case. Instead, I like to set up little project goals for myself at the start of the new year ... things I'd like to get to ... but that I won't stress out about if I don't.
Like my "30 for 2012" Project - 30 recipes I've picked out to make in 2012 (click on the link or scroll to the bottom of this post to see the entire list). Last year my project list included 50 recipes, and I only got through about half of them. So, I decided to scale the list back for this year. Thirty should be doable!
And guess what?! I've already done one of the recipes on the "30 for 2012" Project list! ... this rich-and-delicious Chocolate Almond Flourless Cake. I'm so proud of myself for already tackling one of my project goals.
Chocolate flourless cake is one of those desserts that I've always seen on restaurant menus, but had never attempted myself. I don't know why ... I just hadn't. So, I decided to put it on "my list" this year.
One of my other goals this year is to incorporate more whole grain baking into my line-up. Mark and I switched over to all whole grains in our pastas and other store-bought goods a few years ago, but I haven't really made great strides in incorporating whole grains into my personal baking yet. So, I've decided this is one of my project goals for this year ... more whole-grain baking ... not a resolution, mind you (remember, I don't make resolutions) ... just a goal. And since you use finely ground nuts in this cake and no flour, this cake counts as whole grain!
Start this cake by finely grinding some almonds in a food processor. Or, if you are able to purchase almond meal in your local store, use that. I totally had some almond meal from Trader Joe's in my freezer and completely forgot about it until after I had already ground up my almonds. Oh well.
Finely ground almonds serve as the "flour" for this cake
Combine the ground almonds with melted semi-sweet chocolate (yum!), some sugar, egg yolks, sour cream, and a few other things ...
Semi-sweet chocolate & other good stuff
... and then gently fold in some beaten egg whites.
In go the egg whites ... be gentle
Bake it up in a springform pan, and you'll end up with a rich-and-delicious cake with a texture reminiscent of a light, fluffy brownie. Mmm, mmm, it's good. Do be aware though, you'll "feel" the almond pieces when you're eating this.
Yummy rich chocolate cake
The cake will rise up quite a bit while it's in the oven, but then fall drastically once removed from the heat. It'll be only about 1 or 2 inches thick once it falls. It's supposed to be like that.
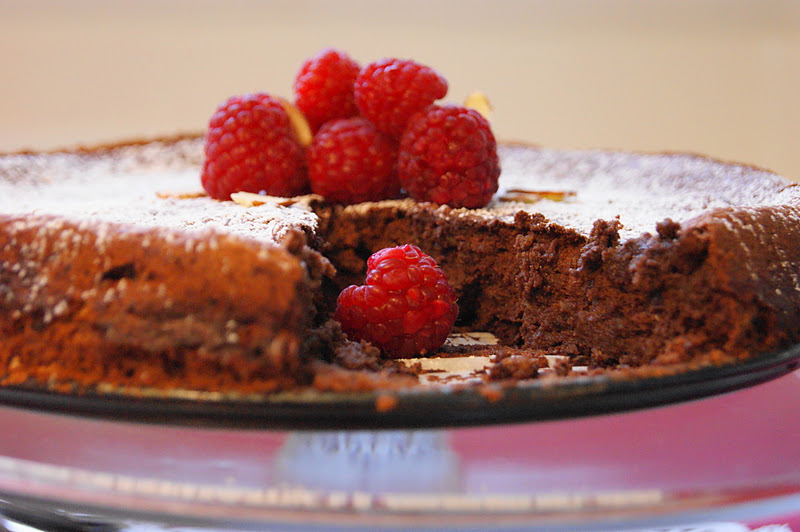
This is how thick the cake is once it's fallen
Serve up slices with a dusting of powdered sugar, a few fresh raspberries, and a sprinkling of slivered almonds ... and, voila! ... you've got a beautiful dessert all dressed to impress.
An adorned slice
Then dig in! I dug right in during my photo shoot ... couldn't wait until I was all done staging the pictures.
The photo shoot slice didn't even make it back to the kitchen.
Rich and fudgy flourless chocolate cake with raspberries. It's a chocolate lover's dream!
Prep time: 30 MCook time: 30 MTotal time: 60 M
Ingredients:
2 T. butter
3 T. unsweetened cocoa powder, divided
1/2 c. almonds, ground (or a little bit less than a 1/2 cup of almond meal)
8 T. sugar, divided
3 oz. semi-sweet chocolate
1/2 c. reduced-fat sour cream
2 egg yolks
1 T. amaretto
1 tsp. vanilla
1/2 tsp. cinnamon
5 egg whites, at room temperature
1/4 tsp. salt
Fresh raspberries, slivered almonds, and powdered sugar for garnish
Instructions:
Generously coat an 8" or 9" springform pan with about 2 teaspoons of the butter and dust with 1 tablespoon cocoa powder. Do not tap out the excess cocoa powder - leave it in the bottom of of the pan.
In a food processor, process the almonds with 1 tablespoon of the sugar until very finely ground. (If using almond meal, you can omit this step. Use just a little bit less than a 1/2 cup of the almond meal.)
In a small saucepan over very low heat, or in the top of a double boiler, melt the chocolate and remaining better, stirring occasionally, until smooth. Remove from heat and place the chocolate mixture in a large mixing bowl.
Add the almond mixture, sour cream, egg yolks, amaretto, vanilla, cinnamon, 5 tablespoons of sugar, and the remaining 2 tablespoons of cocoa powder. Stir until well blended.
In another large mixing bowl, use an electric mixer on high speed to beat the egg whites and salt until foamy. Gradually add the remaining 2 tablespoons of sugar, beating until the egg whites make stiff peaks when the beaters are lifted.
Stir 1/4 of the egg whites into the chocolate mixture to lighten the chocolate batter. Then, gently fold in the remaining egg whites. Spoon into the prepared pan and smooth the top.
Bake at 350 degrees for 30 minutes. The cake is done when it has risen, is dry on the top, and a toothpick inserted in the middle comes out with just a few moist crumbs. As the cake cools, it will fall to be about 1" to 2" thick.
Loosen the edges of the cake with a knife and remove the springform pan sides. Serve each slice with a dusting of powdered sugar, a few raspberries, and a sprinkling of slivered almonds.