The sweet lemony flavor of Lemon Cookie Thins with tart cranberry and creamy brie are an amazingly wonderful combination for a very simple-to-pull-together appetizer. You'll be amazed at the deliciousness of Cranberries & Brie on Lemon Thins.
One of my favorite parts of Thanksgiving is the leftovers. I know ... many people loathe leftovers. Not me. I love them!
For days after Thanksgiving day, my Mom, Dad, and I eat solely on leftovers. (Hey, the Pilgrims' first Thanksgiving feast did last for three days, ya know!) For each meal, Mom and I take all the leftovers out of the refrigerator, sprawl them across the counter, and each of us serves up whatever we're in the mood for. I don't know why, but I just think these kind of meals are fun. Sometimes we serve ourselves the leftovers 'straight up' ... and sometimes we get creative, seeing what new combinations and concoctions we can come up with.
Like Cranberries & Brie on Lemon Thins. This is a great idea for leftover cranberry sauce. Just spoon some of your leftover cranberries over a chunk of brie (this particular photo has my Cabernet Cranberry Sauce) and serve it with Lemon Cookie Thins.
I've also found lemon cookie thins at Trader Joe's, but you can find other brands at the 'regular' grocery store.
While any cracker would work for simple appetizer, the sweet lemony flavor of the Lemon Cookie Thins with the tart cranberry and creamy brie are an amazingly wonderful combination. These cookie thins also come in a gingerbread flavor, which I'd like to try with the cranberries, too. Wonder if it would be as good? I'll have to find out!
Happy Thanksgiving, everyone! I wish you a very blessed and fabulous day with your families. Oh, and remember to wear stretchy pants!
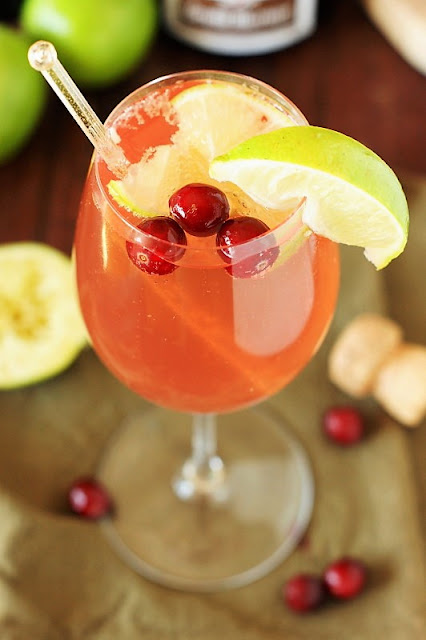
Don't think you like cranberry sauce? Give this Cabernet Cranberry Sauce a try! With cranberries simmered in Cabernet Sauvignon, and accented with cinnamon and tangerine zest, it may just change your mind.
Cranberry sauce. To me, it always seemed like one of those things that was on the Thanksgiving table just because it's supposed to be there. I'd take a tiny dollop ... pretty much because I thought I had to. Then I found this recipe for cabernet cranberry sauce. And that's when my entire view of this cranberry stand-by changed.
This cranberry sauce, I could gobble up by the spoonful (no pun intended!). There's something about the combination of bold, rich Cabernet with tart cranberry and cinnamon that ... well ... just works. Now, admittedly, I am a wine lover. So that could have something to do with why I love this cabernet cranberry sauce so much. How could a wine lover go wrong with a wine-based sauce? But that aside, even if you're not a wine lover, I think you'd find this cabernet cranberry sauce to be a cut above the 'standard' fare.
Okay, so where's my spoon?? I need to dig in! I sure hope I don't eat it all before Thursday.
Don't think you like cranberry sauce? Give this Cabernet Cranberry Sauce a try! With cranberries simmered in Cabernet Sauvignon, and accented with cinnamon and tangerine zest, it may just change your mind.
prep time: 5 Mcook time: 15 Mtotal time: 20 M
ingredients:
1 (12 oz.) package fresh cranberries
1 1/4 c. granulated sugar
1 c. Cabernet Sauvignon
1 3-inch cinnamon stick
1 to 2 tsp. tangerine zest
instructions:
How to cook Cabernet Cranberry Sauce
Bring sugar and wine to a boil in a medium saucepan over medium-high heat.
Add remaining ingredients, and return to a boil, stirring constantly. Reduce heat to low and simmer, partially covered, for 10-15 minutes, or until cranberry skins have popped.
Remove and discard cinnamon stick. Cool slightly. Serve warm or chill at least 2 hours. Sauce will thicken as it cools.
TRACEY'S NOTES
This cranberry sauce may be stored in the refrigerator for up to a month, so it's a great dish to make ahead of time.
Use good quality wine. It makes a difference in this recipe! Also, I've tried making this with Merlot instead of Cabernet Sauvignon, and didn't like it nearly as well.
If you are a cinnamon lover, consider adding an extra cinnamon stick or a dash of ground cinnamon to the pot when adding the other ingredients. Personally, I love the cinnamon flavor in this sauce. I've also been known to add two or three whole cloves, as well.
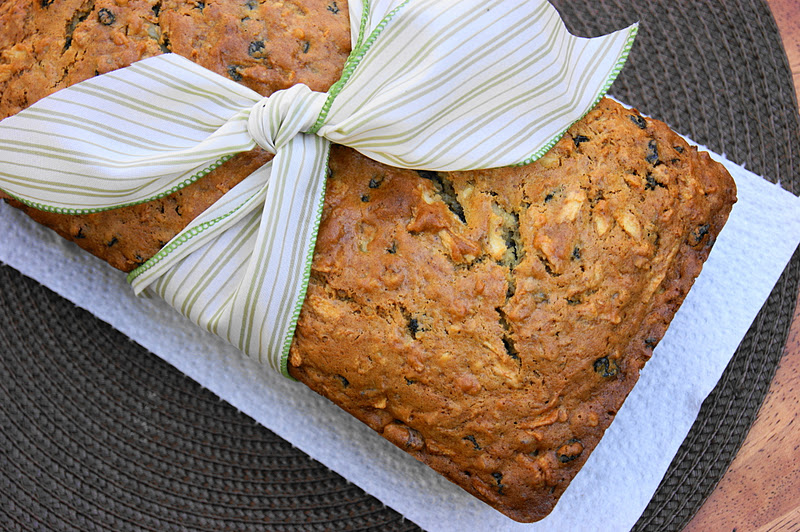
Fresh fall apples combine with sweet dried currants to yield one flavorful and comforting autumn quick bread.
Oh, fond memories of childhood. That's what this fabulous fall bread brings back to me. My Mom used to bake all the time when I was growing up. (Hmmmm ... were you wondering where I got it from?? The apple doesn't fall far from the tree, right?) And this apple currant bread was one of my absolute favorites in her line-up.
Fresh apple. Sweet currants. Just a hint of cinnamon. The crunch of chopped pecans. Isn't that the perfect blend of fall flavors? If it's not, well then it's pretty close!
I hadn't had this bread in years. And had truly forgotten how much I like it. Then, while leafing through my family's cookbook, it struck me - "Hey! I need to make apple currant bread!" So I did.
Bake yourself up a loaf of this beautiful bread, slice off a big hunk, and dig in. You'll be glad you did.
Classic Pumpkin Cake Roll with Cream Cheese Filling is classic for a reason ~ and one bite is all you need to remember why it's so loved.
If you are a frequent reader of The Kitchen is My Playground, you know I'm cooking my way through my family's cookbook ~ slowly, but surely. This week I tackled a recipe that scared me ~ the classic Pumpkin Cake Roll with Cream Cheese Filling my Mom used to make when I was growing up.
I'm so happy to say that I can report success with this one!
Because ... truly ... I had concerns.
Alas, I am scared no more. While this creation is a bit nerve-wracking the first time through, the beautiful and absolutely scrumptious result is worth the tiny bit of wear-and-tear on the nerves.
After my afternoon adventure with this cake, which included three in-process phone calls to my Mom, I can now walk you through its creation step-by-step. Complete with tips from Mom, of course. Follow Mom's advice, and you'll be cranking out a gorgeous Pumpkin Cake Roll, too!
Start by lining a jelly roll pan with waxed paper. To ensure the baked cake slides out of the pan intact, spray the pan with non-stick cooking spray, add the waxed paper, and then spray with non-stick cooking spray again. MOM TIP #1: Mom says this is very important. Do not skip this step.
Or you'll be sad later.
Next whip up the cake batter, being sure to beat the eggs for the full 5 minutes called for in the recipe. This incorporates air into the batter and creates a light, springy cake. You'll like it this way, I promise.
Spread the batter into your prepared jelly roll pan, like so ...
... and sprinkle evenly with the finely chopped walnuts.
Bake up the cake.
And now comes nerve-wracking part #1 ... turning the cake out of the pan. This part made me sooooooo nervous. To get ready for this nail-biter step, spread a towel out on your counter and sprinkle it generously with powdered sugar. Okay, now take about three deep breaths.
Take your cake out of the oven ... take a few more deep breaths ... and immediately flip your pan over onto your powder-sugared towel. Say a little prayer that when you lift up the pan, you'll have a cake sitting there neatly separated from the pan.
Now, go ahead -- lift up the pan. Keep saying your prayer ... cross your fingers ... whatever you do ... until you see ...
... THIS!! A cake ~ neatly out of the pan in one piece. I was so excited that mine came out of the pan intact.
Time now to peel off the waxed paper. I had to do a little coaxing with mine. I very gently worked on the corners first, loosening them carefully. Next, I got all the edges loosened ...
... and after that, the rest of the waxed paper peeled up really easily.
Now comes nerve-wracking part #2 ... rolling up the warm cake. TIP FROM MOM #2: Roll it up tightly, gently, and slowly.
Towel-and-all, gently roll the cake up into a log, keeping it as tight as you can. Then set it aside to cool to room temperature.
And now we're onto nerve-wracking part #3 ... unrolling the cooled cake.
Once your cake is cooled, very gently unroll it. TIP FROM MOM #3: Unroll very slowly!! To quote Mom, "This thing will crack on you."
And, yep, mine sure did. See those three or so big cracks? Moving slowly helps avoid this. I moved slowly, but still couldn't avoid a few cracks. I just gently squished the cake back together, and 'glued' the cracks up with cream cheese filling.
Spread the cream cheese filling evenly over the unrolled cake. And, now, roll your Pumpkin Cake Roll back up! Just as before, keep it tight and roll slowly. Oh, and this time, leave the towel out of the cake roll. :-)
Success! Isn't it gorgeous?
Transfer this beauty to a serving platter and chill. The cake that is. And you, too. You deserve a little chillin' after all your hard work.
After the Pumpkin Cake Roll with Cream Cheese Filling has chilled, serve yourself up a big slice and enjoy.
And, WOW, is this ever good! Totally worth the frayed nerves. Thanks for the coaching, Mom!
Check out these other delicious pumpkin sweet treats:
Classic Pumpkin Cake Roll with Cream Cheese Filling
Classic Pumpkin Cake Roll with Cream Cheese Filling is classic for a reason ~ and one bite is all you need to remember why it's so loved.
prep time: 25 Mcook time: 15 Mtotal time: 40 M
ingredients:
Cake:
3 eggs
1 c. granulated sugar
2/3 c. pumpkin puree (100% pure pumpkin)
1 tsp. lemon juice
3/4 c. all-purpose flour
1 tsp. baking powder
2 tsp. ground cinnamon
1 tsp. ground ginger
1/2 tsp. ground nutmeg
1/2 tsp. salt
1 c. finely chopped walnuts
Powdered sugar
Cream Cheese Filling:
1 c. powdered sugar
8 oz. cream cheese, softened
4 T. butter, softened
1/2 tsp. vanilla extract
instructions:
How to cook Classic Pumpkin Cake Roll with Cream Cheese Filling
Cake:
Grease a 15x10x1" jellyroll pan; line with waxed paper or parchment paper (this is very important!). Lightly spray waxed paper with cooking spray.
Beat eggs on high speed for 5 minutes; then gradually beat in granulated sugar. Stir in pumpkin and lemon juice.
Stir together flour, baking powder, salt, cinnamon, ginger, and nutmeg. Fold into pumpkin mixture.
Spread batter into prepared pan. Top with finely chopped walnuts.
Bake at 375 degrees for 15 minutes.
Immediately turn out onto a towel sprinkled with powdered sugar. Carefully remove waxed paper. Starting at the narrow end of the cake, roll towel and cake up together.
Cool. Once cool, slowly and gently unroll cake.
Cream Cheese Filling:
Combine powdered sugar, cream cheese, butter, and vanilla; beat until smooth.
Maple Mashed Sweet Potatoes are incredibly flavorful - and incredibly easy. Maple syrup enhances the natural sweetness of the sweet potatoes, and brings a nice subtle maple flavor to the finished dish. They pair perfectly with turkey, ham, pork tenderloin, and so much more!
Classic Chocolate Fudge made with marshmallows ~ creamy and oh-so delicious.
Can you believe, until now, I had never made fudge before? I love fudge. So I don't know why I waited so long to try my hand at it! I always thought it was hard to make - it's not. It's easy. Very easy.
So, you want to know what I went and did on my very first time making fudge? I didn't make just one recipe of fudge. No, no. I put two fudge recipes to a head-to-head fudge cook-off battle. See, I'm cooking my way through the family cookbook I published last year for our family. And both my mother-in-law and my sister-in-law put a chocolate fudge recipe in the cookbook. It just seemed like the right thing to do was to put both recipes to the test, rather than picking just one. So, that's what I did.
The two recipes were similar in method. The differences, you ask? Well, my mother-in-law's recipe was made with marshmallows, had a higher ratio of evaporated milk, and a bit lower ratio of chocolate. My sister-in-law's recipe was made with marshmallow creme (as opposed to marshmallows themselves), had a lower ratio of evaporated milk, and a higher ratio of chocolate.
So I set about to whipping up both. And this method is so easy, I was done in no time.
First, bring some sugar, butter, and evaporated milk to a boil and cook it for a bit, stirring constantly, of course.
Boiling, boiling, boiling ...
Then stir in some chocolate until it's all melted.
Chocolate!
Finally, stir in the marshmallow until it's all melty and combined.
Stirring in the marshmallow
Pour the mixture into a pan, and let it cool to set up. I used an aluminum foil sling in my pans to make removal from the pan (and clean up!) easier.
Here are my two finished products side-by-side ... I made one plain chocolate and the other chocolate-walnut, just for fun. My mother-in-law's is on the left ... my sister-in-law's is on the right. Which do you think won the cook-off battle?
And the winner is ...
Well, I preferred my mother-in-law's version! ~ the one made with the marshmallows themselves, the higher ratio of evaporated milk, and (surprisingly!) the lower ratio of chocolate. To me, it had a smoother and creamier texture - just the way I like my fudge. The other one was good, too, - but it had a slightly drier, more crumbly texture. So, in my book, marshmallows reign supreme over marshmallow creme!
Looks like I can cross fudge off my cooking & baking bucket list. Well, chocolate fudge anyway. Let's see, there's still peanut butter fudge ... Nutella fudge ... maple walnut fudge ... rocky road fudge ...
Check out these other super tasty chocolatey treats:
Classic Chocolate Fudge made with marshmallows ~ creamy and oh-so delicious.
Prep time: 10 MCook time: 10 MTotal time: 20 M
Ingredients:
2 1/4 c. granulated sugar
1/2 stick (4 T.) butter
3/4 c. evaporated milk
1 c. (6 oz.) semi-sweet chocolate chips
18 large marshmallows
1 tsp. vanilla
1/2 c. chopped walnuts (optional)
Instructions:
Combine sugar, butter, and evaporated milk in a saucepan; bring to a full rolling boil, stirring constantly. Continue to boil, over medium heat, for 5 to 6 minutes, stirring constantly.
Pour in chocolate chips; remove from heat and stir until chocolate chips are melted. Add vanilla and marshmallows. Stir until smooth and all marshmallow is incorporated.
Stir in chopped walnuts, if using.
Pour into an 11x7" pan lined with aluminum foil. Cool.
Use the edges of the aluminum foil to lift fudge from the pan; cut into small squares.


